Slow-Cooked Pork Roast with Sauerkraut and Sausage

December 29, 2017

I grew up in Johnstown, PA. The town was founded by a Swiss German immigrant, Joseph Schantz in 1800. Over the years, in various documents, recorders anglicized his last name, most commonly rendering it “Johns,” a name the family ultimately adopted. The name of the town was ultimately changed from Schantzstadt to Johnstown.

Johnstown Panorama (Photo by Greg Hume)

I can’t say there was much of a noticeable German influence when I was growing up in the 1950s to 1970s, except for one: New Year’s Day dinner.

Regardless of one’s ethnic background, the most common dinner on New Year’s Day was “Pork and Sauerkraut.” It was commonly acknowledged that this was a nod to Johnstown’s German heritage. And, much like black-eyed peas in the South, was viewed as a way to bring good luck to the coming year.

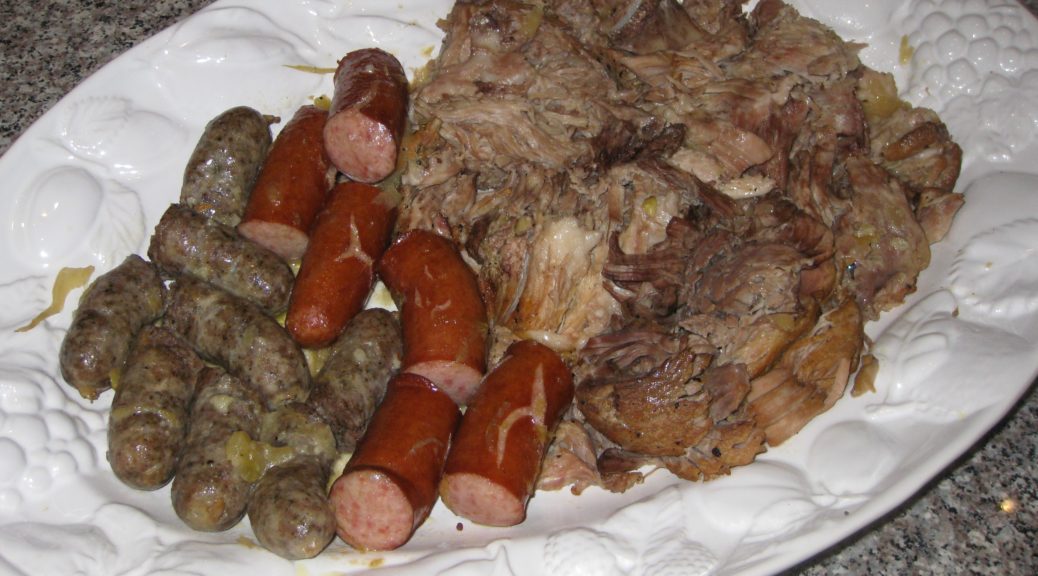
As you might expect, recipes for pork and sauerkraut vary. Sauerkraut and a large cut of pork are, obviously, essential. Sausages of some sort are common, as are dumplings.


Click HERE to join our mailing list and you’ll never miss a recipe again!


The recipe that I use is close to what my mother made except that I enhance the seasonings in the sauerkraut along more Germanic lines, with onion, carrot, apple, and juniper berries. My mother’s was more basic and similar to the way the Slovak side of my family prepared sauerkraut. My cousin Angie, of Italian heritage, added a brown gravy to hers, which also has Germanic roots.

The Inclined Plane goes from downtown Johnstown to the suburb of Westmont (Photo by Greg Hume)

Long and slow cooking is essential as much for pull-apart-tender pork as it is to mellow out the sauerkraut. Among Central and Eastern Europeans, sauerkraut tends to be cooked for several hours to tenderize it and tame its sour bite.

Kielbasa was a favorite sausage in our house and was always included in pork and sauerkraut. It was always locally made and never procured from large national meatpackers. Often times, other sausages, such as bockwurst or bratwurst, would also be added. But kielbasa was king in pork and sauerkraut and, in the sausage pantheon, second only to hot Italian sausage in our house.


Follow us on your social media platform of choice


The kielbasa that we ate on a regular basis was made from pork, or pork and beef, but venison kielbasa was common too. The first day of deer-hunting season was a public school holiday. You can imagine the importance of venison.

Some of the hunters would have their venison (or some of it, at least) turned into kielbasa, flavored with garlic and smoked. I remember on several occasions going with my father to have work done on the car in late December. The service station had a big platter of meats, cheeses, and pickles laid out for customers to nibble on. Among the offerings was venison kielbasa made from a deer that the owner of the service station had shot.

One of my resolutions for the new year is to find a small, artisanal purveyor of kielbasa that’s as good as what I remember from childhood.


If you have a favorite family recipe and a bit of a story to tell, please email me at santafecook@villasentieri.com and we can discuss including it in the blog. I am expanding the scope of my blog to include traditional recipes from around the country and around the world. If you haven’t seen the post on Melinda’s Drunken Prunes, it will give you an idea of what I’m looking for.


Print Recipe
Slow-Cooked Pork Roast with Sauerkraut and Sausage
Saueraut from the refrigerated section of the market is usually of better quality than canned, especially if the sauerkraut is from an artisinal producer. Draining the sauerkraut and rinsing it well under cool water will produce a more mellow taste. If you want dumplings with this (and who wouldn't?), remove the meat from the pan and keep warm while cooking dumplings on top of the sauerkraut on the stovetop. See the notes section below for my recipe for dumplings.
Votes: 0
Rating: 0
You:
Rate this recipe!
Course Mains, Meats
Cuisine German
Prep Time 20 m
Cook Time 6 1/2 hours
Servings
people
Ingredients
Course Mains, Meats
Cuisine German
Prep Time 20 m
Cook Time 6 1/2 hours
Servings
people
Ingredients
Votes: 0
Rating: 0
You:
Rate this recipe!
Instructions
  1. Cut the cloves of garlic, top to bottom, into approximately 4-6 slivers each.
  2. Pierce the pork around the outside about 1 inch deep with the tip of a sharp knife.
  3. Insert slivers of garlic into the slits
  4. Season the pork generously with salt and pepper.
  5. Brown the pork in a heavy Dutch oven using the oil.
  6. Add white wine, cover tightly, and transfer to oven at 350°F.
  7. After one hour, reduce heat to 225°F.
  8. Slice the onions in half top-to-bottom then cut crosswise into thin slices.
  9. Shred the carrot on the tear-drop side of a box grater.
  10. Cut the apple into small dice.
  11. After the pork has been cooking for a total of about 3 hours, drain and rinse the sauerkraut.
  12. Slowly sauté the onion in the butter or bacon fat until caramelized, approximately 20 minutes.
  13. Add the shredded carrot and diced apple and sauté until heated through.
  14. Add sauerkraut, juniper berries, caraway seeds, bay leaf, and black pepper to taste.
  15. Add water and bring to a boil.
  16. Add the boiling sauerkraut to the pork after the pork has cooked for a total of four hours (1 hour at 350°F plus 3 hours at 225°F).
  17. An hour later nestle the kielbasa and other sausage into the sauerkraut.
  18. Continue to cook, covered, until the pork is fall-off-the-bone tender. Approximately 1-2 more hours.
  19. Remove the pork and sausages.
  20. Skim fat from the top of the sauerkraut.
  21. Put the Dutch oven on the stove and cook dumplings on top of the sauerkraut if desired.
  22. Meanwhile, pull the pork into big chunks. Keep the pork and sausages warm.
  23. Serve the sauerkraut in a separate bowl, or use it to surround the pork and sausages.
Recipe Notes

This is where you can find my recipe for dumplings.

Copyright © 2017 by VillaSentieri.com. All rights reserved.

Share this Recipe

Crostoli (Italian Fried Pastries)

December 26, 2017

I didn’t grow up eating crostoli.

That doesn’t mean we didn’t have our own version of fried dough.

Unlike crostoli, which are thin and crispy and leavened with baking powder, I grew up eating ovals of fried yeasted bread dough sprinkled with granulated sugar.

Frying bread dough and sprinkling it with granulated sugar is a common among Southern Italians. My mother had a name for it that I’ve never heard anywhere, it sounded something like “pitla.” I started doing some research. The word “pitta” is still used in Calabria, where my mother’s family originated, for various types of dough-based foods, including some that are quite flat. The word “pitta,” which I believe derives from the Greek word “pita,” became the word “pizza” in standard Italian. I’m guessing that “pitla” is a dialectical variation of “pitta.”


Click HERE to join our mailing list and you’ll never miss a recipe again!


One of the positive outcomes of doing research on Italian fried dough products is that I came across a wonderful Wikipedia page on fried dough from around the world.  Check it out here.

Crostoli (or crostui in the Friuli-Venezia-Giulia region of Italy where my mother-in-law was born) are traditionally served at Christmastime. My mother-in-law says that they would sometimes have them at other times of the year when they “wanted something sweet” that was simple to make.

My mother-in-law’s zig-zag pastry cutter

Not growing up eating crostoli, I asked my husband to tell me what he remembered.

I got two sentences:
“We always had them at Christmas.”
“They’re not my favorite.”

There you have it, the entirety of the crostoli story in 10 words.

I even waited a couple of days and asked him again if he remembered anything else about crostoli. “Nope” was the answer.

Now we’re up to 11 words.


Follow us on your social media platform of choice


That might have been the end had it not been for Christmas Eve. The morning of Christmas Eve, after I mixed dough for panettone, my mother-in-law and I made up a batch of crostoli to take to Christmas Eve dinner at the home of our friends Rich DePippo and Doug Howe.

Rich’s grandfather was from Domegge di Cadore in the Veneto region of Italy, just next door to Friuli-Venezia-Giulia where my mother-in-law was born. In fact, Domegge is about 100 kilometers from Treppo Grande, my mother-in-law’s home town.

As it turns out, Rich and his mother, visiting for Christmas, also made crostoli the morning of Christmas Eve.

Using a Microplane grater makes fast work of zesting lemons

There were dueling crostoli served for dessert (along with pizzelle, nut roll, and biscochitos).

Rich’s were long and thin, with a slit cut in the middle through which one end of the dough was twisted before frying. This seems to be the most traditional shape that I’ve seen in my research, though Lidia Bastianich, who is also from very near where my mother-in-law was born, ties hers in a knot.

Having seen pictures of crostoli twisted and tied before embarking on making them with my mother-in-law, I asked her why hers were just left as irregular squares (well, quadrilaterals, really) of dough. That’s the way her mother made them was, of course, the first response. After which she added that she liked them to puff up, which they don’t do if they’re twisted or tied.

The other difference in the crostoli is that Rich used anisette to flavor his whereas my mother-in-law used lemon zest and vanilla.

The anisette was definitely a new twist. In researching crostoli, I’ve seen citrus, usually lemon or orange, as the most common flavoring.  Often vanilla is added; sometimes brandy or rum. Never have I run into a recipe with anisette. Hopefully Rich will weigh in on his family’s recipe for crostoli and how they came to use anisette for flavoring.

Meanwhile, enjoy!


If you have a favorite family recipe and a bit of a story to tell, please email me at santafecook@villasentieri.com and we can discuss including it in the blog. I am expanding the scope of my blog to include traditional recipes from around the country and around the world. If you haven’t seen Bertha’s Flan, it will give you an idea of what I’m looking for.


Print Recipe
Crostoli (Italian Fried Pastries)
Crostoli are pastries that re rolled thin, fried, and dusted with granulated sugar. Powdered sugar melts and becomes sticky so granulated sugar is traditional. Crostoli are usually larger than the ones shown here, something like 1 ½ inches by 3 or 4 inches. We made these smaller because they were being served as part of a dessert buffet at the end of a large meal.
Votes: 0
Rating: 0
You:
Rate this recipe!
Cuisine Italian
Prep Time 30 minutes
Cook Time 45 minutes
Servings
Cuisine Italian
Prep Time 30 minutes
Cook Time 45 minutes
Servings
Votes: 0
Rating: 0
You:
Rate this recipe!
Instructions
  1. Combine flour, sugar, baking powder, lemon zest and salt in a large bowl. Mix well.
  2. Make a well in the center and add eggs. Using a fork, begin to incorporate the flour.
  3. Add vanilla extract, lemon juice and incorporate.
  4. Add melted butter.
  5. Mix to form a soft, non-sticky dough.
  6. When the dough becomes too stiff to mix with a fork, use your hand. Do not over knead.
  7. Cut into four or five pieces.
  8. Roll out less than 1/8 inch thick, dusting with a little flour as needed to keep the dough from sticking.
  9. Cut into rectangles, approximately 1 1/2 inches by 3 inches, with a zig-zag cutter.
  10. When all are cut, deep fry until brown. If you are not comfortable doing this from experience, use a thermometer and keep the oil at about 350 degrees Farenheit.
  11. Sprinkle with granulated sugar as soon as they are removed from the oil so the sugar sticks.
  12. They are best the same day but will stay fresh at least one day at room temperature, loosely covered.
Recipe Notes

Copyright © 2017 by VillaSentieri.com. All rights reserved.

Share this Recipe

Crostata di Noci (Italian Walnut Tart)

December 20, 2017

One evening in 1996 my husband and I were sitting with his parents in a dimly-lit bar in Venice. We were all chatting. I was drinking grappa, as was my father-in-law. Then the desire for dessert hit me. If you’ve spent any time in Italy you know that at no point in the day are you actually hungry. There’s just too much wonderful food around to not partake in it. So the desire for dessert had absolutely nothing to do with the need for more calories.

Going for something new, I selected Crostata di Noci. I was absolutely amazed by what I got.

The pastry was standard-issue Italian pasta frolla, a slightly sweet leavened crust that’s like a cross between shortbread cookies and a dense cake. The filling, however, tasted for all the world like nut roll, one of my favorite pastries but one that is also very time-consuming and frustrating to make.

In that instant, it all made sense. Nut roll hails from Eastern and Central Europe (as does another of my favorites, the poppy seed roll).  In northeast in Italy there is a lot of Eastern European influence. Suddenly, taking nut roll filling and putting it in a pasta frolla case meant I could have something that tasted just like a nut roll but without all the frustration of actually making nut roll.


Click HERE to join our mailing list and you’ll never miss a recipe again!


Now, Crostata di Noci will never actually replace “real” nut roll just like making bread in my bread machine won’t replace making bread by hand. But, with a bread machine, I have homemade bread every day which wouldn’t be the case if I had to make every loaf by hand. With less than half-an-hour’s active time, I can indulge my taste for nut roll any time I want!

Around the holidays nut rolls were ubiquitous in my home town but my mother and my Aunt Margie made the best nut rolls I have ever had. Largely this is because they both put in a large proportion of sweetened nuts to dough. Honestly, there was just enough dough to roll pinwheel fashion and hold the whole thing together. Many other nut rolls were bready by comparison.

To be sure, my mother’s filling differed from my Aunt Margie’s. I’m not sure how each of them came by their respective recipes but my suspicion is that Aunt Margie’s came from her mother or another Italian relative or friend because it contained orange juice. The use of citrus in various pastries is common in Italy. Pasta frolla, for example, is traditionally flavored with lemon zest and vanilla. I am guessing my mother’s recipe came from my father’s mother or someone on the Slovak side of my family because the liquid in the nuts was milk and not orange juice.


Follow us on your social media platform of choice


Separate from actually eating nut roll, there was this whole aura around making them (at least there was when I was young!). Buying shelled walnuts and using a food processor make quick work of preparing the nuts but in the 1960s, making nut roll started with my mother buying a large quantity of whole walnuts. We would sit around the table and crack the nuts open then extract the nutmeats. I still have the nutcracker and picks that we used.

My parents’ nutcracker and picks

After all the nuts were shelled, they needed to be ground. We did this in a hand-crank grinder of the same type used to grind meat for sausage. As a kid, I got to turn the crank on the grinder! I no longer have my mother’s grinder as it got rusty from being stored in the basement but I have my own that is pretty much identical. I got it when I was in college.

The hand-crank grinder I got while in college

After the excitement (well, as a kid it was pretty exciting!) of shelling and grinding the nuts we all kind of abandoned my mother who started the laborious process of actually making the nut rolls. That is definitely not a job for amateurs. The dough had to be very thin but just thick enough to contain the nuts. The nuts had to be moist, sweet, and generous in quantity compared to the amount of dough. Then the whole thing had to be rolled up and baked.

After my mother died, Aunt Margie started sending me nut roll every year. After Aunt Margie died, my cousin Donna (Aunt Margie’s daughter) picked up the nut roll mantle. The two nut rolls that I got this year will be carefully doled out over a few weeks, befitting their preciousness, starting on Christmas Eve!

This year’s nut roll from my cousin Donna.  Notice the large proportion of nuts to dough.

If you have a favorite family recipe and a bit of a story to tell, please email me at santafecook@villasentieri.com and we can discuss it. I am expanding the scope of my blog to include traditional recipes from around the country and around the world. Take a look at Bertha’s Flan.  It will give you an idea of what I’m looking for.


After returning from that trip to Venice I was determined to recreate Crostata di Noci. I whipped up a batch of Zia Fidalma’s pasta frolla and made a simple walnut filling with orange juice in a nod to the Italian origins of this particular pastry.

The first try was a winner and I haven’t really made any substantive changes in the recipe since. If one wanted a creamier filling, one could add a few tablespoons of butter but, honestly, the crostata is so rich that I haven’t felt the need to make it more so.

Until I tackle nut roll making 101 (which I swear I’m going to do one day soon!), I’ll have to settle for crostata di noci, and the occasional nut roll care package from my cousin!

Print Recipe
Crostata di Noci (Italian Walnut Tart)
Lightly sweetened ground walnuts fill an Italian pasta frolla crust in this Venetian dessert. If you’re not a fan of walnuts you could use other nuts. If you want to make the crostata extra festive, put a paper doily on top and sprinkle it with powdered sugar to get a pattern.
Votes: 0
Rating: 0
You:
Rate this recipe!
Cuisine Italian
Prep Time 40 minutes
Cook Time 45 minutes
Passive Time 30 minutes, plus cooling
Servings
people
Ingredients
Pasta Frolla
Nut Filling
Cuisine Italian
Prep Time 40 minutes
Cook Time 45 minutes
Passive Time 30 minutes, plus cooling
Servings
people
Ingredients
Pasta Frolla
Nut Filling
Votes: 0
Rating: 0
You:
Rate this recipe!
Instructions
Pasta Frolla
  1. Blend flour, sugar, baking powder, vanilla powder, salt and lemon zest in a food processor until combined.
  2. Add the cold butter, cut in pieces.
  3. Blend till well combined. The mixture in the food processor will appear to move as one mass though when you stop the processor you will see that it is not.
  4. Add the eggs and vanilla extract if you are using that instead of vanilla powder and blend till it almost forms a ball.
  5. Remove the pastry from the food processor and incorporate the final bits of flour by hand.
  6. Wrap the dough in waxed paper and refrigerate for about 30 minutes before using.
Nut Filling
  1. Combine all ingredients and mix well.
  2. Cover the nut filling and keep it at room temperature while rolling out the pasta frolla.
Assembly
  1. Roll out pasta frolla between sheets of waxed paper until it is just large enough to come up the sides of a 10" diameter by 1” tall tart pan with a removable bottom.
  2. Trim the edges of pastry even with the top of the tart pan.
  3. Add the filling and spread it out evenly.
  4. The filling should come just to the top of the tart pan.
  5. Bake the crostata at 350°F for approximately 45 minutes or until crust is golden brown.
  6. Cool and remove the sides of the tart pan.
  7. The crostata can be sprinkled with powdered sugar for serving and/or accompanied by lightly sweetened whipped cream.
Recipe Notes

Copyright © 2017 by VillaSentieri.com. All rights reserved.

Share this Recipe

Aunt Margie’s Colored Cookies

December 15, 2017

We called them “Colored Cookies.”

I’ve never seen them anywhere but in my hometown of Johnstown, Pennsylvania though I can’t believe they are unique to there.

Truth be told, I don’t think I’ve ever had them made by anyone besides Aunt Margie until I made them from her recipe.

Aunt Margie in 2004 with me on an architectural tour of Chicago by boat

Many of the Italian and Italian-American cookies that I grew up with were cake-like. A stiff batter of flour, sugar, eggs, and fat (lard and butter were the most common), leavened with baking powder, flavored in some way (vanilla, lemon, chocolate and spice, sesame, and so forth), rolled or shaped and baked, and usually iced with a thin powdered sugar-milk icing that would harden to a glaze.


Follow us on your social media platform of choice


Totos are a perfect example of the chocolate and spice variety.

Anginetti (Genets, as we called them in Italian-American-dialect-slang) also referred to as Lemon Knots, are lemon flavored. Although I’m devoting most of December to posting Italian-American pastry recipes, Anginetti won’t appear until next year.

Sesame Seed Cookies (which certain members of my family like to dip in wine) have no flavoring other than the sesame seeds they are rolled in before baking. These are coming next December, too.


Click HERE to join our mailing list and you’ll never miss a recipe again!


Colored Cookies are flavored with vanilla despite the riot of color that might suggest otherwise. There was a brief period of time, however, when Aunt Margie got creative (read iconoclastic) and used coconut extract instead of vanilla. Coconut and almond are my two favorite flavors when it comes to sweets, leagues beyond chocolate and vanilla as far as I’m concerned, but coconut-flavored colored cookies strayed too far from tradition for my taste. It didn’t keep me from eating them, however!

Colored Cookies

This is Aunt Margie’s original recipe. And if you flavor them with anything other than vanilla, please don’t tell me…just kidding!


If you have a favorite family recipe and a bit of a story to tell, please email me at santafecook@villasentieri.com and we can discuss it. I am expanding the scope of my blog to include traditional recipes from around the country and around the world. If you haven’t seen Bertha’s Flan, it will give you an idea of what I’m looking for.


I don’t use a lot of food coloring.  The only other exception in recent memory (other than these cookies) was Jim’s Hawaiian Guava Cake.  Take a look at my box of food coloring.  The number 39 is the price:  39 cents!  I’ve had it a long time, though I used up the red making the Guava Cake.


Print Recipe
Aunt Margie's Colored Cookies
Use a very good quality vanilla extract, not artificial vanilla flavoring, as that is the predominant flavor. The best way to mix these is using your hand. If you don’t start there, you’ll end up there so just use your hand from the beginning. Although Aunt Margie’s original instructions were to ice the cookies while still warm, that is very difficult to accomplish without assistance. You can ice them after you have baked all of them with no noticeable difference. It is best to use medium-weight shiny aluminum cookie sheets. Dark metal makes the bottoms too dark before the cookies have completely cooked. You can divide the dough into five parts and color the last one yellow. If you do so, you will need to use slightly less of each dough to make a cookie.
Votes: 0
Rating: 0
You:
Rate this recipe!
Cuisine Italian
Prep Time 1 hour
Cook Time 2 hours
Servings
dozen
Ingredients
Cookies
Icing
Cuisine Italian
Prep Time 1 hour
Cook Time 2 hours
Servings
dozen
Ingredients
Cookies
Icing
Votes: 0
Rating: 0
You:
Rate this recipe!
Instructions
Cookies
  1. Measure all the ingredients.
  2. Combine butter and sugar.
  3. Mix well using your hands.
  4. Add eggs one at a time mixing after each.
  5. Mix in salt and baking powder then add milk and vanilla.
  6. Combine well.
  7. Add flour and mix until a dough forms.
  8. Divide dough into four parts.
  9. Leave one part of dough white.
  10. Color the others pink, blue, and green.
  11. Take approximately 1 teaspoon of each dough and roll into a ball the “size of a walnut” according to Aunt Margie’s recipe. You will need to apply a bit of pressure, without smashing the colors together, to be sure that the different colored doughs have joined into one cookie. If not, the cookies will split during baking.
  12. Bake 350°F for 17-20 minutes until very light brown on the bottom and the top does not depress when touched lightly.
  13. Remove cookies from cookie sheet and put on a cooling rack.
  14. Using your finger, ice with powdered sugar icing while still warm.
Icing
  1. Combine powdered sugar, vanilla and milk. Stir to combine.
  2. Stir to combine.
  3. Thin with a small amount of milk if needed. The icing should be of a spreading consistency.
Recipe Notes

Copyright © 2017 by VillaSentieri.com. All rights reserved.

Share this Recipe

Grandma Mihalik’s Butter Cookies

December 11, 2017

When I was young, cookie season started in mid-December and continued until early January. Friends and family all had platters and trays of cookies on their tables, often of the multi-tiered variety. Each was carefully wrapped in plastic ready to be unwrapped when guests arrived. The platters were replenished after each group of guests left.

In my circle of family and friends, cookies usually fell into one of two categories, Italian-American or Slovak-American.

To be sure, there was some crossover.


Click HERE to follow us on Twitter


Nut rolls and poppy seed rolls are Slovak (well, OK, they’re really pretty much pan-Eastern European but since I grew up in a half-Slovak family we considered them to be Slovak even though we knew they were also made by the Poles, Ukrainians, Slovenians, and other Eastern Europeans in town) but they were made by the Italian side of my family as much as by the Slovak side.

There were also nut horns, butterballs, and thumbprints which defied ethnic baking boundaries.

However, flat, rolled cookies, like these butter cookies, were not usually made by Italian-Americans.  The totos that I wrote about last December and the colored cookies that are coming up later this week were not usually made by Slovak-Americans.


Click HERE to join our mailing list and you’ll never miss a recipe again!


This recipe came to me by way of Aunt Ann who was married to my father’s brother, Jano. She said it was Grandma’s recipe.

I remember eating these cookies and seeing them piled on my grandmother’s table over the holidays.

These cookies are similar to the sand tarts that are common in the central part of Pennsylvania where the Pennsylvania Dutch, of German extraction, historically lived. The big difference, though, is that the dough for these butter cookies is prepared more like a pie crust while the dough for sand tarts is prepared more like cake batter. That is, for these cookies, flour and sugar are cut into butter with a pastry blender whereas for sand tarts the butter and sugar are first creamed together.

There also are sand tarts that I think of as more Southern.  These are usually rolled into balls or formed into shapes and baked but not rolled thin like Pennsylvania Dutch sand tarts and my grandmother’s butter cookies.


Follow us


Print Recipe
Grandma Mihalik's Butter Cookies
The cookies should just be pale golden brown on the bottom. The color and weight of the cookie sheet significantly influence cooking. I find that shiny aluminum cookie sheets of medium weight work best. Dark metal will cause the bottom of the cookies to brown too much. Allow the cookies to rest for about 30 seconds before removing them from the cookie sheets. If you wait too long the cookies will lose their flexibility and are likely to break.
Votes: 0
Rating: 0
You:
Rate this recipe!
Cuisine Slovak
Prep Time 1 1/2 hours
Cook Time 1 hour
Passive Time 30 minutes
Servings
dozen
Ingredients
Cuisine Slovak
Prep Time 1 1/2 hours
Cook Time 1 hour
Passive Time 30 minutes
Servings
dozen
Ingredients
Votes: 0
Rating: 0
You:
Rate this recipe!
Instructions
  1. Combine cinnamon and three tablespoons sugar. Reserve.
  2. Grind the walnuts and reserve.
  3. Put the butter in a mixing bowl and leave at room temperature for about 30 minutes to soften slightly.
  4. Add 1 cup of sugar and flour to the butter.
  5. Mix with a pastry blender until little beads form.
  6. Add the cream and egg yolks and continue mixing with the pastry blender until a shaggy dough forms.
  7. Press into a log, cut in half (or quarters) and wrap in plastic wrap and refrigerate for 30 minutes.
  8. Roll a portion of dough between sheets of waxed paper to approximately 1/8 inch thick.
  9. Cut into shapes.
  10. Arrange on ungreased cookie sheets.
  11. If the dough starts to warm too much it will be difficult to get the cookies off the waxed paper. If this happens, put the rolled out dough, still between the waxed paper, in the refrigerator for a few of minutes.
  12. Brush with unbeaten egg whites.
  13. Sprinkle with ground walnuts
  14. Sprinkle with cinnamon sugar.
  15. Bake 350°F approximately 8-9 minutes or until light brown on the bottom.
  16. Remove from the cookie sheet almost immediately and cool on a wire rack.
Recipe Notes

Copyright © 2017 by VillaSentieri.com. All rights reserved.

Share this Recipe

Pizzelle (Italian Anise-Flavored Wafer Cookies)

December 6, 2017

Pizzelle punctuated my childhood.

Pizzelle were present at every holiday, birthday, wedding, and festive event as well as at random times throughout the year.

They usually came from Aunt Margie, though other folks made pizzelle, too.

My mother never did. Though she liked to bake, and made some wonderful pastries, pizzelle were not part of her repertoire.

The classic flavor is anise, though vanilla, and to a lesser extent lemon and orange, are common as well.

Aunt Margie would use pizzelle to make ice cream sandwiches. She would roll them around a tube to make faux cannoli. She would even roll them into ice cream cones. Of all the permutations, though, my favorite is just the classic, flat, crispy anise-flavored cookie.


Click HERE to join our mailing list and never miss another recipe again!


I don’t know anybody who doesn’t use an electric pizzelle iron these days but originally Aunt Margie used one of cast iron that was heated on the stove. It came from Berarducci Brothers in McKeesport, Pennsylvania and is most definitely iron, not aluminum. I have the pizzelle maker in its original box.

Aunt Margie’s original cast iron pizzelle maker

The original box for the pizzelle maker

Unfortunately Berarducci Brothers is no longer around. Not only did they manufacture stove-top and electric pizzelle irons, they made ravioli molds, crank-handle vegetable strainers, and an array of other culinary tools.

A modern pizzelle maker

In my experience, anise oil is essential. Anise extract simply does not pack enough flavor to give pizzelle the punch they need.

When I was young, anise oil came from the pharmacy. It was not uncommon in those days for pharmacies to routinely compound medications to a physician’s specific instructions. Compounding is now limited to a few specialty pharmacies but not so back then. Anise oil was commonly used to flavor what might otherwise be a noxious medication.

It was common practice among the Italian families in my hometown to go to the pharmacy to buy a bottle of anise oil. One upside, besides the easy availability of the stuff, is that it was pharmaceutical grade and, therefore, very pure.


Follow us


I tried that in Santa Fe after my mother-in-law kept failing to get enough anise flavor out of anise extract. We even have actual compounding pharmacies in Santa Fe as well as pharmacies that specialize in herbal and homeopathic medications that also make up their own medications. No dice. Not one of them carried anise oil.

Amazon to the rescue. There are other on-line sources, too, like the King Arthur Flour people. So, if you want to try your hand at pizzelle, get anise oil, not anise extract.  If you don’t like anise you could give vanilla, lemon, or orange a try.  If you do, I suggest the lemon and orange oils from Boyajian rather than extract.

The brand of Anise oil I have been using lately

Print Recipe
Pizzelle
Anise extract does not work well. Anise oil is an absolute requirement for the authentic taste. As with many "old Italian recipes" in my collection, this one provided a range of amounts of flour. 1 3/4 cups of all-purpose flour worked well and was pretty much right in the middle of the range. The batter will be quite stiff until the melted butter is stirred in.
Votes: 0
Rating: 0
You:
Rate this recipe!
Cuisine Italian
Prep Time 15 minutes
Cook Time 30 minutes
Passive Time 15 minutes
Servings
dozen
Ingredients
Cuisine Italian
Prep Time 15 minutes
Cook Time 30 minutes
Passive Time 15 minutes
Servings
dozen
Ingredients
Votes: 0
Rating: 0
You:
Rate this recipe!
Instructions
  1. Combine flour, salt, and baking powder.
  2. Mix well. Reserve.
  3. Combine eggs and sugar.
  4. Mix until well combined.
  5. Stir in vanilla and anise oil.
  6. Stir dry ingredients into egg-sugar mixture.
  7. Stir in melted butter.
  8. Lightly grease the pizzelle maker (with lard, preferably) before the first ones are baked. After the first, additional greasing is not needed.
  9. Add a rounded tablespoon of batter to the center of each shape, depending on the size of your iron.
  10. Cover and cook until light golden but not really brown. The length of time will vary based on the specifics of your pizzelle iron. With mine, it took 30-45 seconds per batch.
  11. Cool the pizzelle on racks.
  12. You can dust with powdered sugar if you'd like but I rarely do unless it's a really festive occasion.
Recipe Notes

Copyright © 2017 by VillaSentieri.com. All rights reserved.

Share this Recipe

Cuban Black Beans

December 1, 2017

Black beans are ubiquitous on tables in Cuba.

Getting beans to the right texture and the liquid to the right thickness is almost an art form.

Food is scarce in Cuba…at least if you’re a Cuban paying in Cuban Pesos. Not so much if you’re paying in CUCs (Cuban Convertible Pesos), which is what foreigners use. The CUC is pegged to the US Dollar but if you change Dollars for CUCs you pay a 10% penalty as opposed to exchanging another currency, say the Euro, for CUCs.


Click HERE to follow us on Twitter


Prices in Cuban Pesos at a locals’ only market

One view of a locals’ only market
Another view of a locals’ only market

I visited a butcher shop in Havana which pretty much now only sells chicken; when chicken is available, that is. If you notice the door to the cooler is open. That’s because the cooler isn’t on because there’s no inventory.

A butcher shop in Havana

The butcher is just waiting around for chicken to arrive.

When that chicken does arrive, it will likely be frozen Tyson chicken from the United States. Even though, when this picture was taken, the US embargo of Cuba was in full force.

Most of the chicken in Cuba is frozen Tyson chicken from the United States

The same is true of hot sauce. If one asks for hot sauce at a restaurant in Cuba one is likely to get a bottle of Tabasco shipped in from Avery Island, Louisiana. Clearly there are exceptions to the embargo for some American companies!

If you pay in CUCs, the food available increases dramatically.

One stall in a multi-vendor market where prices are denominated in CUCs
Another stall in the same market
Locally prepared beverages in the CUC-denominated market

The disparity in prices for food purchased with Pesos vs CUCs is so large that average Cubans cannot afford to buy food with CUCs, even if they can get them. It takes 25 Cuban Pesos to buy one CUC. Paying in Pesos limits one to shopping in pretty-much locals’ only stores, with limited inventory where the products, like rice and beans, are sold at subsidized prices.

Rum is widely available regardless of the currency.  You’ll pay more if you’re a foreigner, however.

Havana Club is a popular brand of rum in Cuba
A well-stocked bar ready for the day’s customers
Cuban cigars for sale at the bar

After returning from the trip to Cuba in 2014, I tried but couldn’t get the texture of my “Cuban” black beans right. But then, my mother-in-law got a recipe from Beatriz (Betty) Scannapieco. Betty is from Cuba. She was in the exercise group my in-laws attend. Betty’s recipe, using a pressure cooker as is common in Cuba, works like a dream. It’s really pretty effortless, too. The green pepper, onion, and garlic add tremendous flavor but are removed after cooking leaving just beans and the silky cooking liquid.

I made three changes to Betty’s recipe. She called for 1 teaspoon of white wine. I use 1 tablespoon. Betty didn’t use tomato paste or black pepper but both are common ingredients in many Cuban black bean recipes.


Follow us


Click HERE to join our mailing list and you’ll never miss a recipe again!

Print Recipe
Cuban Black Beans
This recipe came from Beatriz (Betty) Scannapieco in my in-law’s exercise group. Betty is from Cuba. I added the tomato paste and black pepper to Betty’s recipe. I also increased the wine from 1 teaspoon to 1 tablespoon. It can be challenging to get the bell pepper, onion, and garlic out of the beans as they very soft after cooking. If you want to make it easier, you could tie them in cheesecloth.
Votes: 0
Rating: 0
You:
Rate this recipe!
Prep Time 10 minutes
Cook Time 1 1/4 hours
Servings
people
Ingredients
Prep Time 10 minutes
Cook Time 1 1/4 hours
Servings
people
Ingredients
Votes: 0
Rating: 0
You:
Rate this recipe!
Instructions
  1. Wash the beans.
  2. Cover beans with water by a couple of inches and soak overnight in the refrigerator.
  3. The next day, cut the bell pepper in half and remove ribs and seeds.
  4. Cut the onion into 4 or 6 wedges, but do not cut the whole way through the root end.
  5. Bruise the garlic by laying the blade of a chef's knife on top and gently pounding the knife blade.
  6. Drain the beans. Put the beans in a pressure cooker along with 3 ¼ cups of fresh water.
  7. Bring the beans to a boil, uncovered.
  8. Skim the foam from the beans then remove the pot from heat.
  9. Add the green pepper, onion, garlic and bay leaves to the beans.
  10. Put the lid on the pressure cooker and bring to 10 pounds pressure.
  11. Reduce heat and cook for 30 minutes.
  12. Remove the pressure cooker from heat and allow pressure to dissipate naturally.
  13. Uncover the pressure cooker.
  14. Add the olive oil, tomato paste (if using), wine, vinegar, salt and black pepper (if using).
  15. Bring to a boil uncovered and boil for 5 minutes.
  16. Remove from heat. Cool slightly and remove bell pepper, onion, bay leaves, and garlic.
  17. The beans can be served immediately but are better if refrigerated overnight.
  18. Serve the beans in a shallow bowl with pieces of finely diced raw onion in the center. Black beans are customarily accompanied by white rice.
Recipe Notes

Copyright © 2017 by VillaSentieri.com. All rights reserved.

Share this Recipe