Sunlight in a Bottle: Passata (Tomato Puree)

October 23, 2019

It’s been way over a month since I last wrote.  After leaving Tuscany for Calabria on August 31st, my plan was to continue to post about my new adventures at the Italian Culinary Institute.  As it turned out, I kept myself pretty busy and couldn’t quite find the time to post.  Knowing that my time was limited, I chose to spend as much of it as possible in the kitchen, which usually meant 12-plus hours per day, six or seven days per week.

There were some exceptions, like the Saturday I went to Maria’s house to make passata with her.

Maria and her son, Nicola, prep tomatoes for passata.

Maria works at the Institute, ostensibly as a dishwasher.  In reality she does much more.  Her wisdom and advice are frequently sought out by Institute staff on matters related to local food.  Maria assists in the kitchen during the meat-curing (salumi) courses.

Although I make passata at home, I’m self-taught.  It was exciting for me to see (and assist with) it being done in a traditional manner.

But first I had to find Maria’s house.

Stirring a cauldron of tomatoes.

Join our mailing list and you’ll never miss a recipe again!


Maria only speaks Italian.  My Italian is not good enough for anything resembling a real conversation though I can certainly manage restaurants, supermarkets, and food vendors well enough to get by.

Mariana, Chef Juan’s wife, chatted with Maria and told me that I should meet Maria at the Padre Pio mural.  Maria lives in the town of Stalettì, which is up the mountain from the Institute.  The directions were easy enough:  Go up.  When you get to Padre Pio, stop and wait for Maria.  If you get to the center of town, you’ve gone too far.

Maria and Nicola putting the cooked tomatoes through an electric food mill.

Up I went.  It was obvious I had gone too far when I hit a spot vaguely resembling a piazza onto which streets converged from many sides.  There was a fussball table sitting in the roadway and a group of older guys congregated in front of the local bar.  (Remember that a “bar” in Italy is traditionally a Coffee Bar.)

I mustered enough Italian to ask them where Padre Pio was.  They told me to go back in the direction from which I came and that I couldn’t miss it.

Nicola and I spattered with tomato puree.

Luckily Maria was in her car on the roadside waiting for me across the street from the GIANT Padre Pio STATUE.  I saw the statue on the way up but completely ignored it as I was looking for a mural.  Something got lost in translation.

Maria made a U-turn and I followed her down a side lane that opened led to a small farm with wonderful views of the mountains beyond.


Follow us on your social media platform of choice


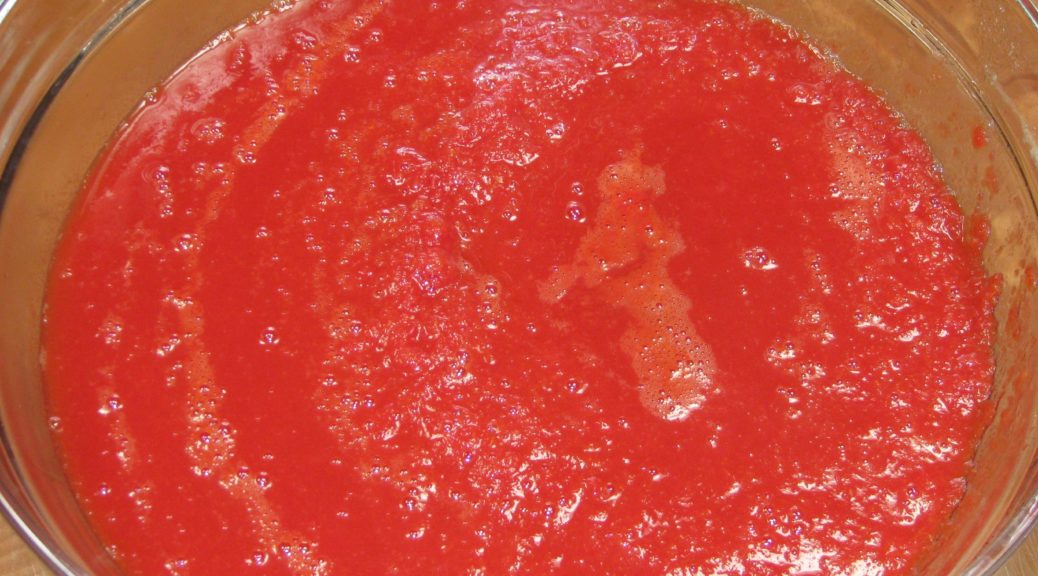
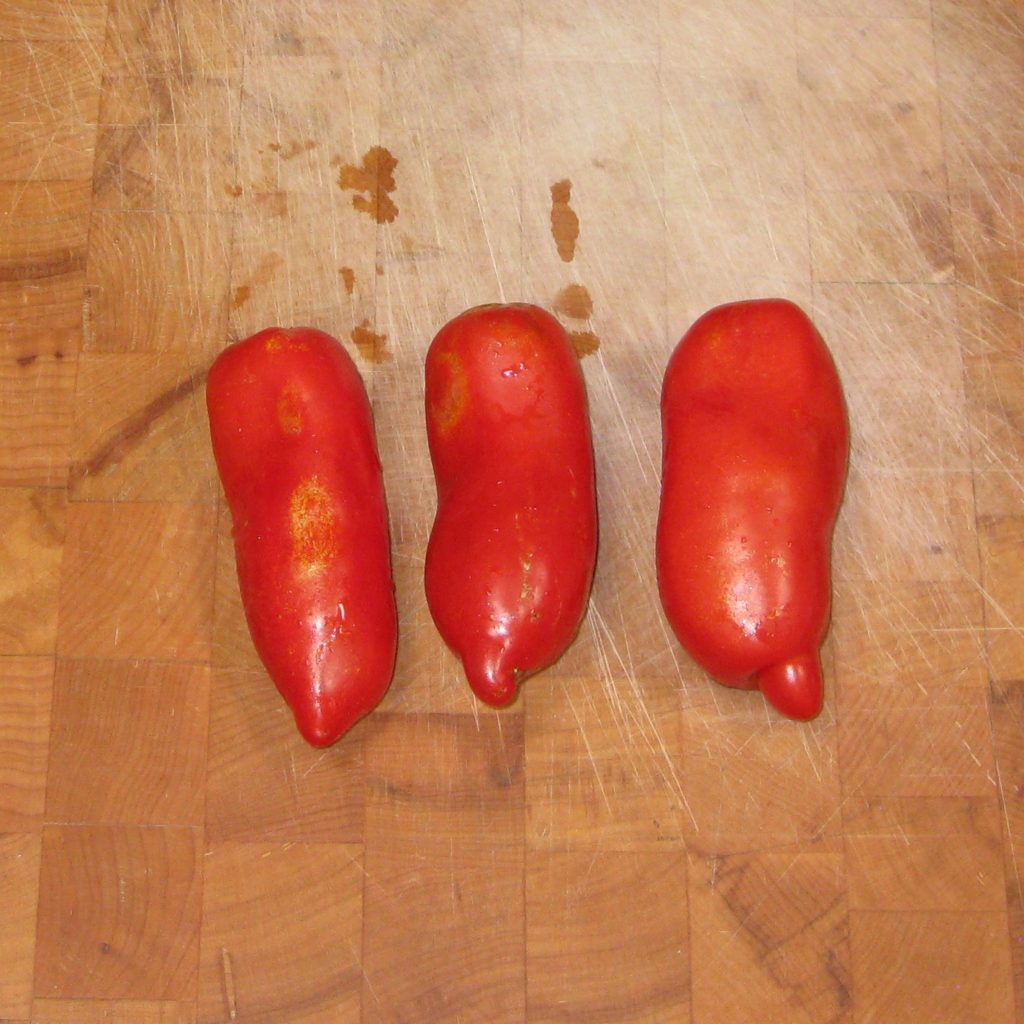
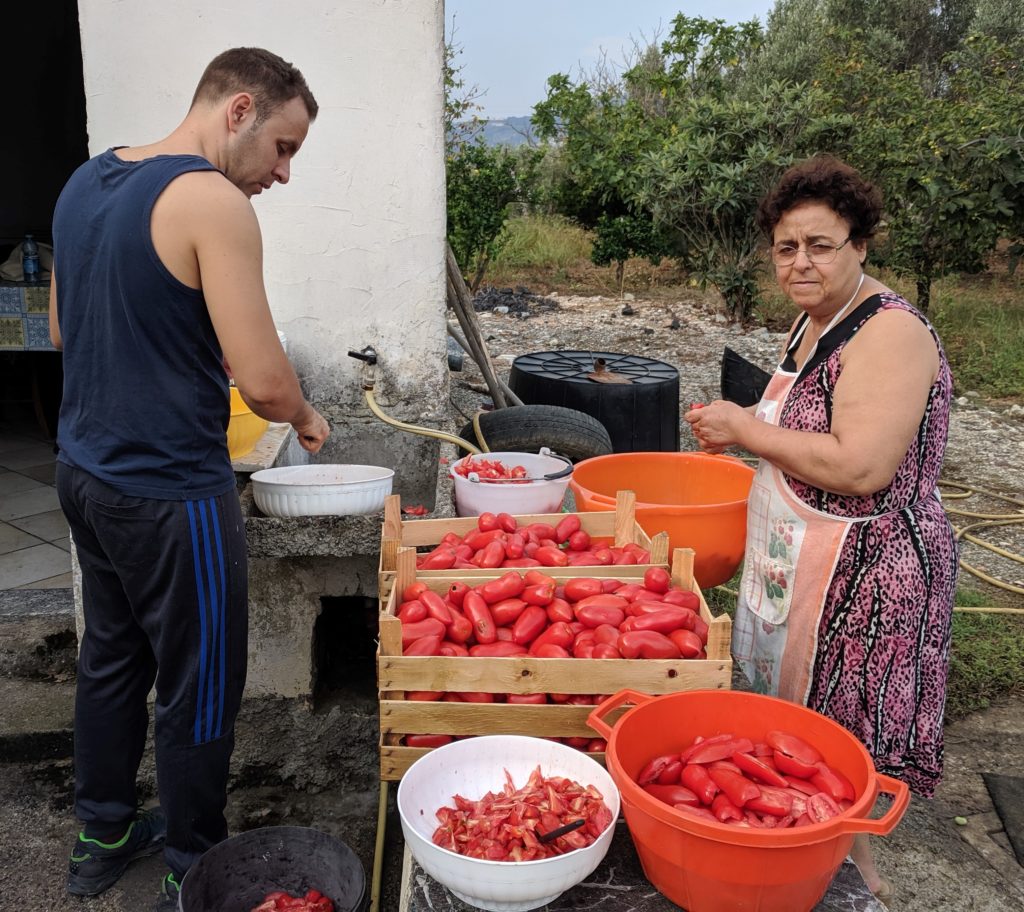
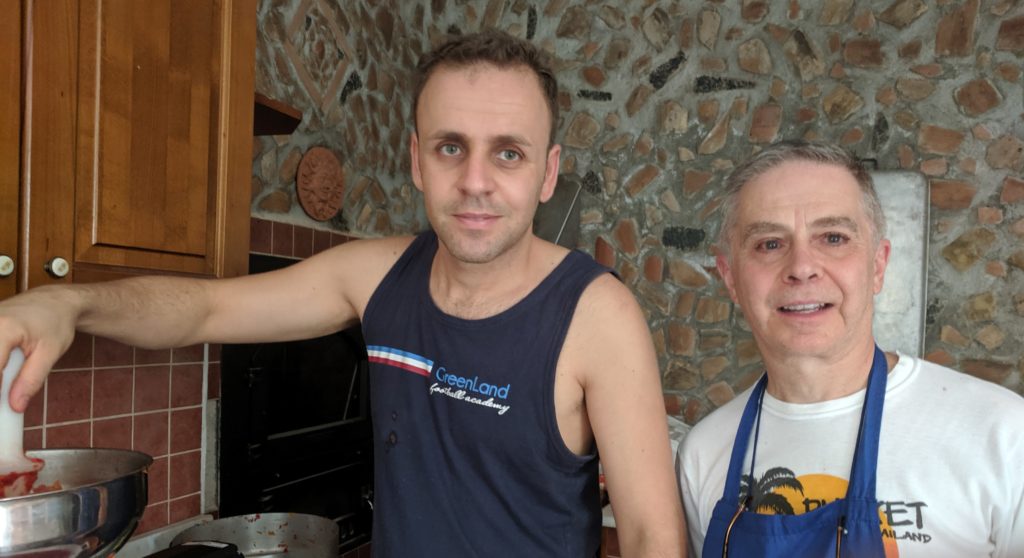
Maria’s son, Nicola, was standing outside cutting tomatoes.  Maria introduced us then immediately began to cut tomatoes, too.  I opened my knife roll, got out my paring knife and began to cut tomatoes.  After all, there were six cases to cut and process.

A hand-crank food mill is a good option for making small quantities of passata.

We cut them in half, removed the core and dropped the halves into a bucket.  The cores were saved for the pig which will become Sopressata ‘round about January.

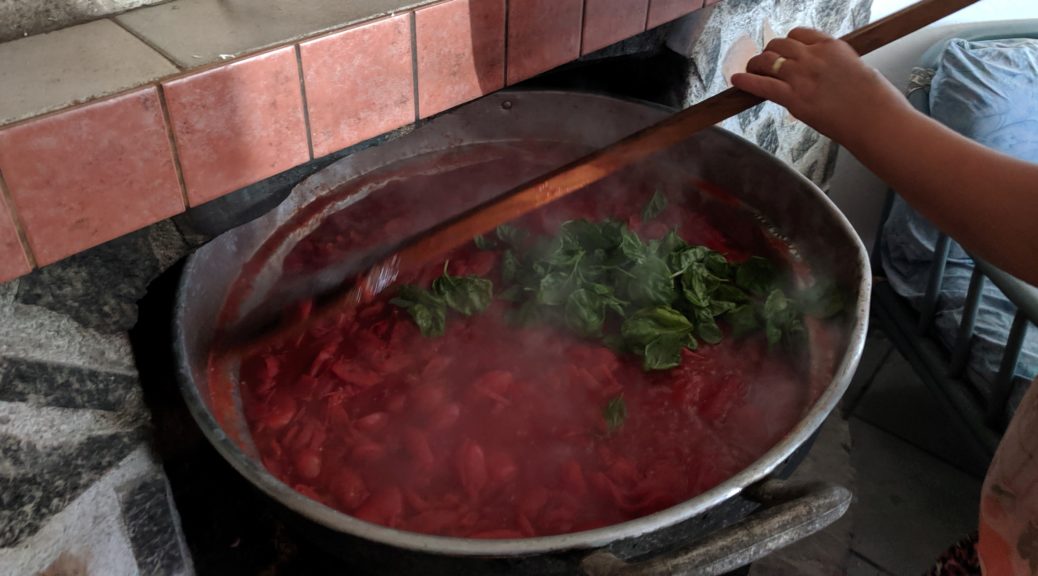
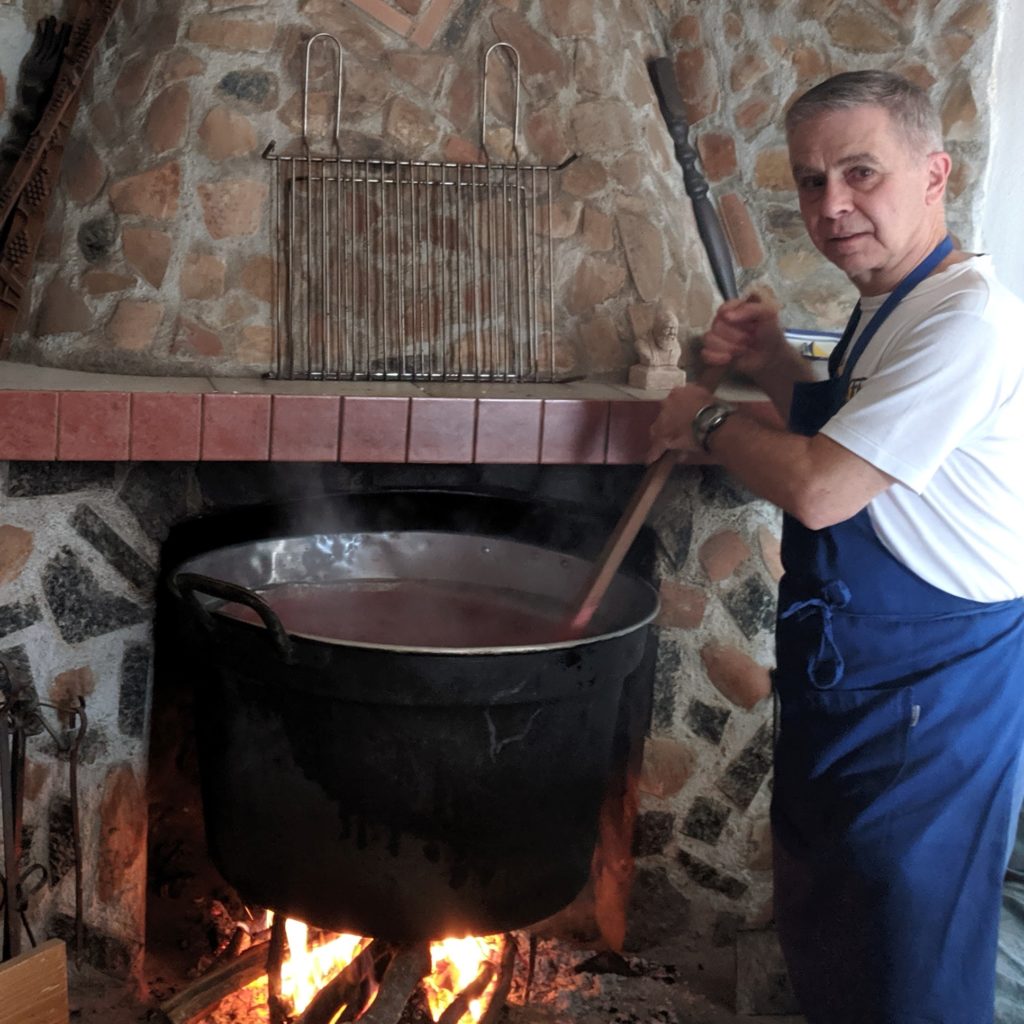
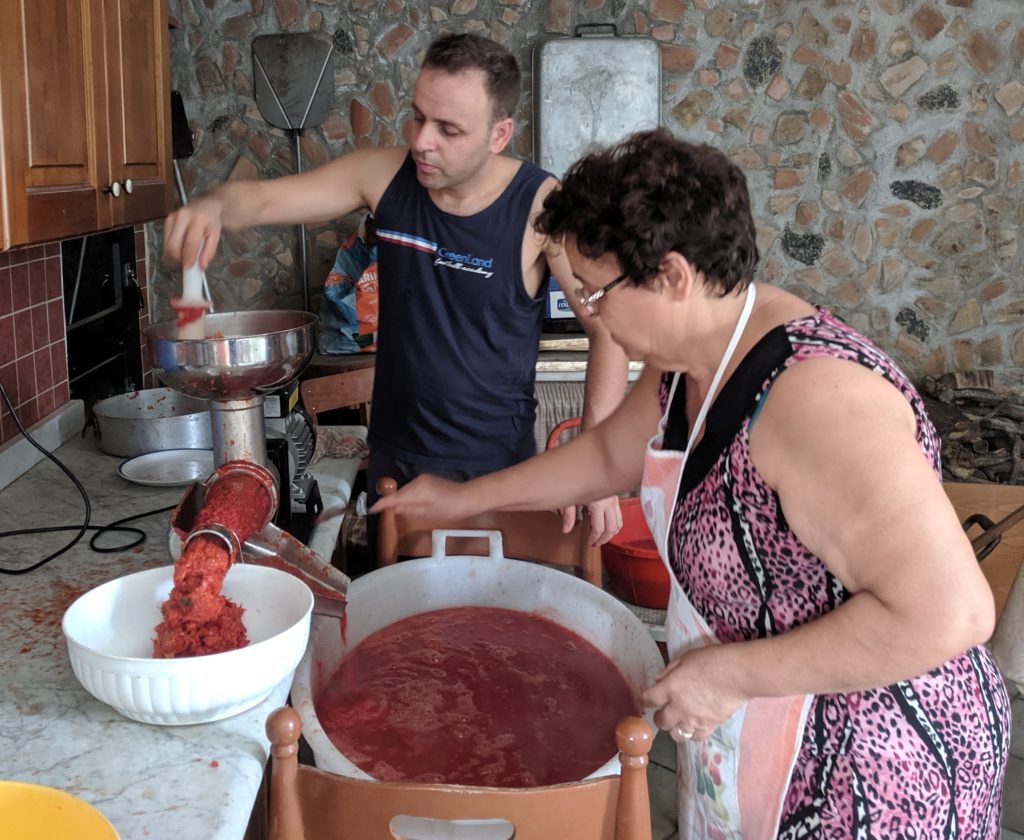
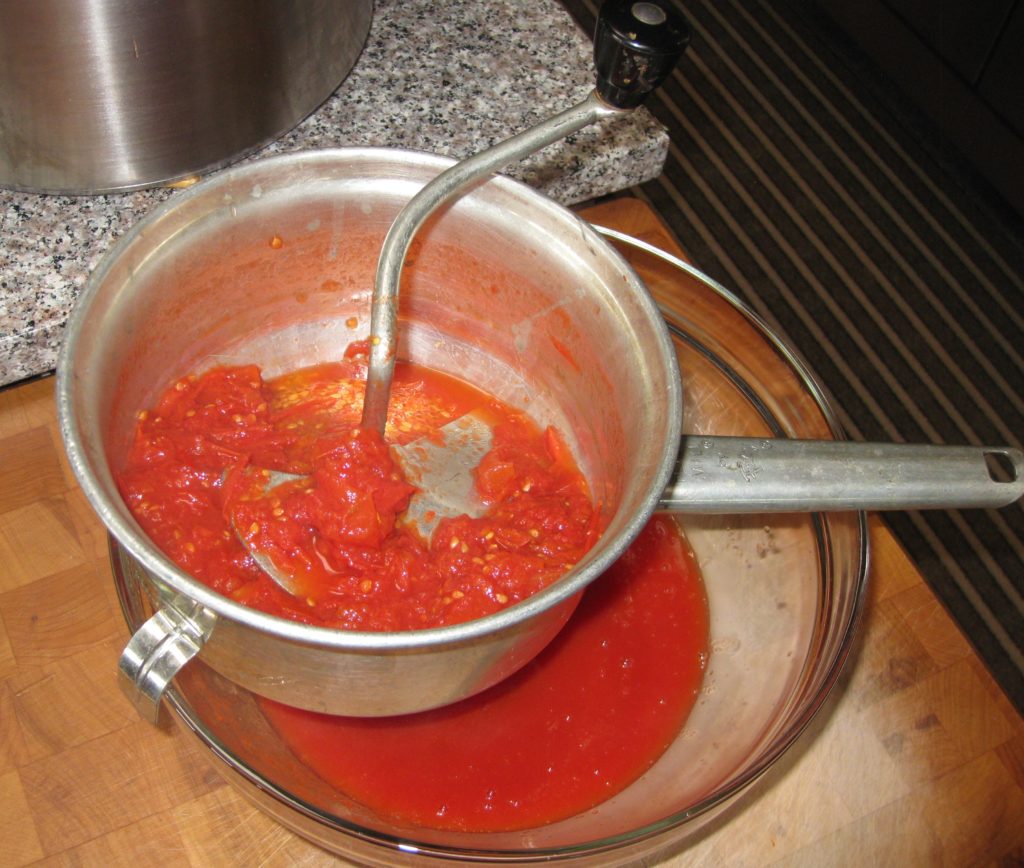
The tomato halves went into a big cauldron set over a wood fire.  Maria simmered them, with salt and some basil, until they were soft enough to go through an electric food mill.  The resulting liquid was put back into the cauldron and cooked until it was the right consistency.

Passata freezes well.

I’ve seen many videos and recipes for making passata that remove the seeds and jelly.  This definitely makes the process faster because extra liquid is removed at the beginning.  However, the jelly has a high concentration of naturally occurring glutamates that really enhance the flavor of the passata.  Like Maria, I always include the seeds and jelly.

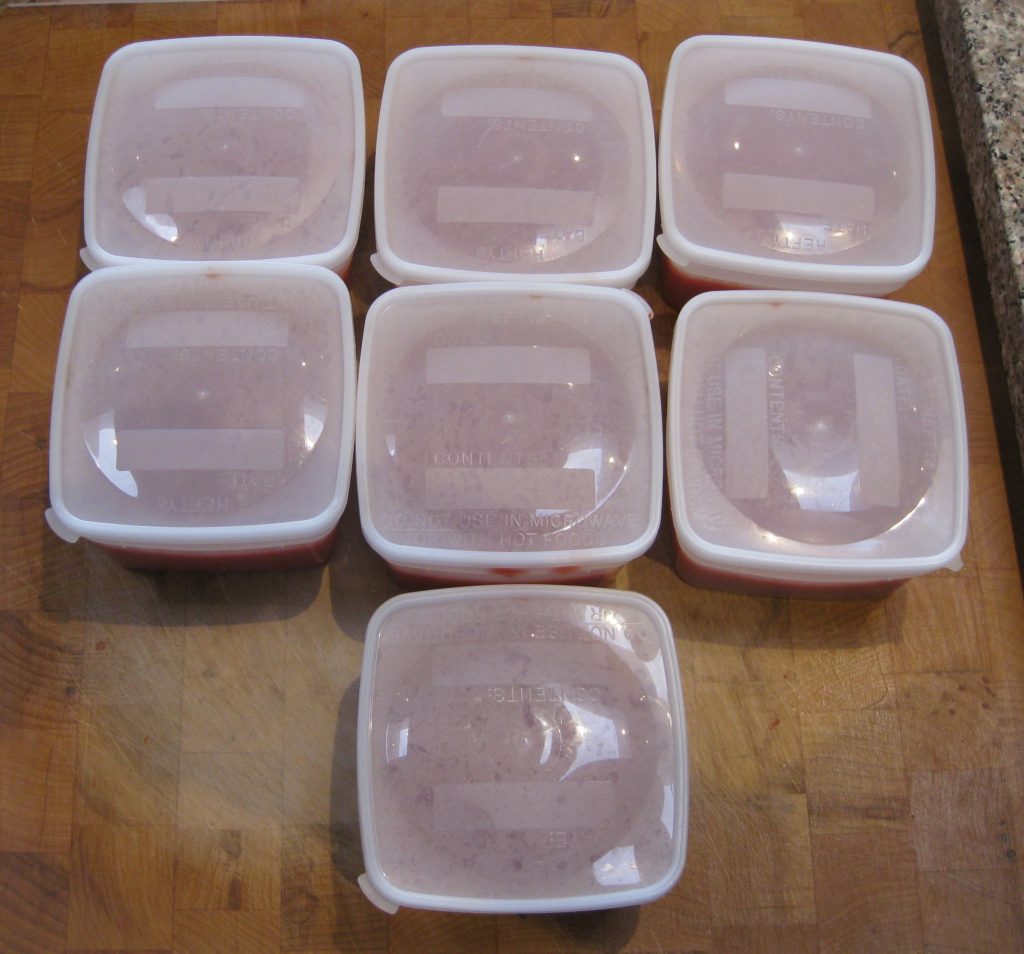
Maria put the passata into jars, sealed them and put them under a blanket to cool slightly.  This is where a bit of controversy exists.  The USDA says it is never safe to can tomatoes or tomato puree at home without adding an acid, such as citric acid, because many tomatoes are not acidic enough to be canned safely relying on their own acidity.  The Italian Ministry of Health disagrees and provides directions for canning tomatoes in a boiling water bath without the addition of acid.

In practice, many Italians simply put the passata into jars, seal, and cover the jars with a blanket to allow them to cool slowly.  No boiling water bath is used at all.  While I’ve eaten many jars of passata that were canned this way, I wouldn’t recommend it.

Maria made about 100 jars the day I was there.  It wouldn’t be unusual for a family in Southern Italy to put up 300 jars of passata, essentially one per day for a year.  If you’re making less, as is almost certainly the case, freezing the passata works well.

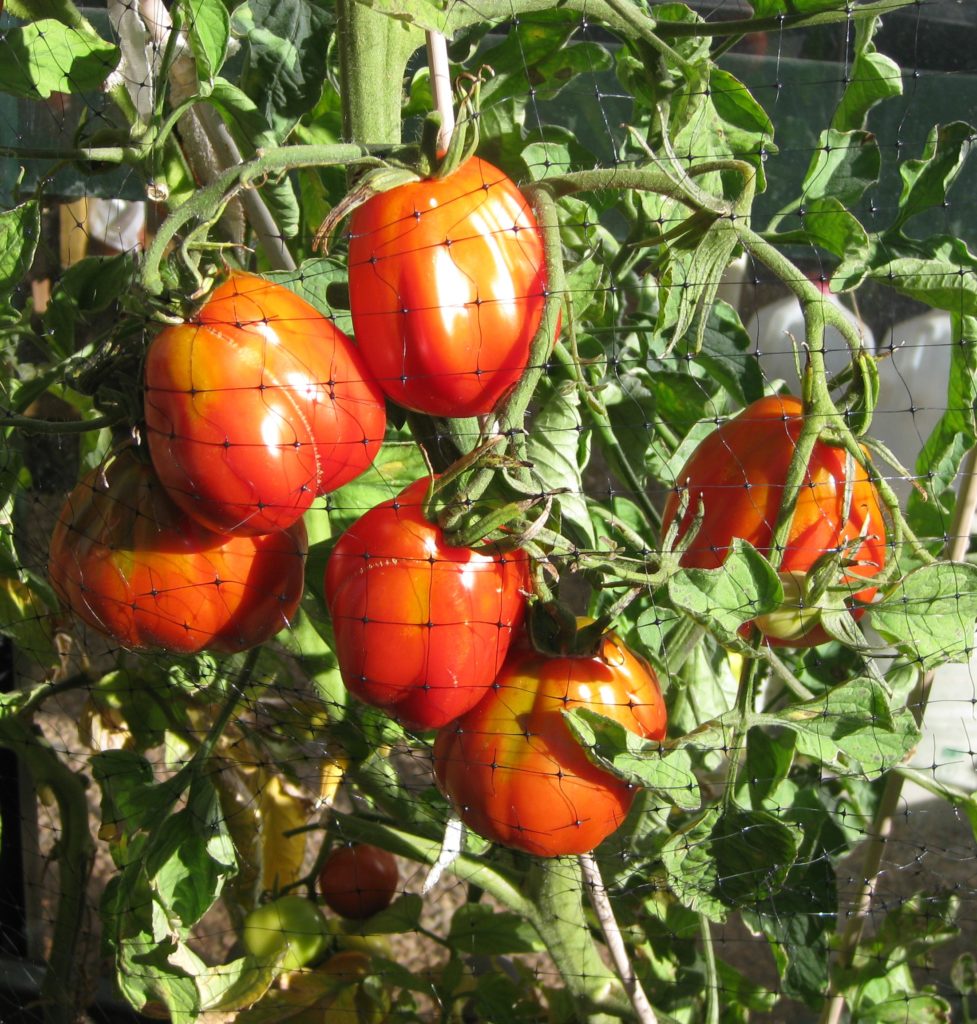
If you find yourself with some vine-ripe tomatoes, especially plum tomatoes or a meaty heirloom variety, give this recipe a try.

Print Recipe
Sunlight in a Bottle: Passata (Tomato Puree)
Maria puts some fresh basil in with the tomatoes as do many Italian cooks. After going through the food mill, there are no flecks of basil to be found. Adding basil, however, is completely optional. Maria makes large quantities of passata and uses and electric food mill. For smaller quantities, up to several gallons, a hand-crank food mill works well. The passata will keep in the refrigerator for three days. It freezes well. If you choose to can it, you can find a link to recommended directions for canning in the Recipe Notes section, below.
Votes: 1
Rating: 5
You:
Rate this recipe!
Servings
Ingredients
Servings
Ingredients
Votes: 1
Rating: 5
You:
Rate this recipe!
Instructions
  1. Cut the tomatoes in half lengthwise. Remove the core and any hard, white pith. If you are using heirloom tomatoes rather than plum tomatoes, you may need to quarter them depending on size.
  2. Put the tomatoes in a heavy-bottomed pot.
  3. Heat gently until tomatoes release some liquid.
  4. After there is liquid in the bottom of the pot, increase the heat to bring the tomatoes to a boil.
  5. Add one basil leaf for each pound of tomatoes, if desired.
  6. Continue to boil, uncovered, until the pulp is soft enough to go through a food mill, approximately 1 hour.
  7. Put the tomatoes through a food mill, discarding seeds and skin.
  8. Add ½ teaspoon of salt per quart of pureed tomatoes.
  9. Return the tomato puree to the pot and continue to boil until thick and saucy.
Recipe Notes

You can find recommended directions for canning tomato puree here.

Copyright © 2019 by Villa Sentieri, LLC. All rights reserved.

Share this Recipe

Cherry Jam

August 1, 2018

Every year during late summer when I was in grade school we would pick elderberries.  The “we” was myself, my cousin Donna Medile and our mutual friend Ricky Slivosky. Ricky’s dad, Joe, would take us on this adventure.

We’d go to various places in Stackhouse Park, aka the “woods” near our neighborhood.  If you look at the map on the website link, you’ll see Fayette Street.  It’s the street I lived on.  It basically goes right into one of the walking paths into the “woods.”  We never called it Stackhouse Park though everyone knew the name.

Join our mailing list and you’ll never miss a recipe again!

Joe Slivosky would take the elderberries to one of his relatives who would turn them into pies and jam.  I can’t say that I actually cared much for either but I loved picking the berries.  I also liked the idea that something we picked from the wild could be turned into something we ate.

Ever since then, the idea of preserving fruit, preferably fruit that I picked, by turning it into jams, jellies, preserves or by soaking it in alcohol, has fascinated me.

Pitted sour cherries ready to be turned into jam

Santa Fe had a bumper crop of stone fruit in 2012.  Peaches and apricots were everywhere.  I made peach nectar, peach preserves, apricot preserves, apricot and lavender preserves, and apricot preserves with bourbon and brown sugar all from fruit I picked from friends’ trees.  We are just finishing up the bounty of what I canned that year.

Two years ago, I made orange jam and lemon jam from citrus trees outside our house in Palm Springs.

Although guava jelly is my absolute favorite in the jam-jelly-preserve category I find it impossible to get really good guava jelly.  Years ago, I would bring guava jelly back from Guyana where it was made by a friend of my college roommate’s father.  It contained only guava juice, sugar, and lime juice and it tasted just like guava.  Nothing I’ve had since compares to it.

Follow us on your social media platform of choice


Cherry jam is actually my second favorite, though, honestly, there isn’t anything in the jam-jelly-preserve category that I don’t like except traditional British orange marmalade, which I find too bitter.

I was really excited when Rich DePippo’s cherry trees produced enough cherries for the birds, the squirrels, and us this year.

If you’re intimidated by the idea of canning, then don’t can the jam.  Make a batch of it, which will be about six cups total.  It’s really a breeze to make.  When the jam is done, put it in nice jars and refrigerate.  It’ll keep for a few months with no problem.  You can also gift some of it to your friends, who will be amazed that you made it yourself.

Print Recipe
Cherry Jam
This recipe uses one box of traditional fruit pectin. If you make a lot of jam, you may want to buy pectin in a multi-use container. Follow the instructions on the container for the amount that equals one box of pectin. Pie cherries or sour cherries make the best jam.
Votes: 0
Rating: 0
You:
Rate this recipe!
Prep Time 45 minutes
Cook Time 20 minutes
Passive Time 6 hours
Servings
cups
Ingredients
Prep Time 45 minutes
Cook Time 20 minutes
Passive Time 6 hours
Servings
cups
Ingredients
Votes: 0
Rating: 0
You:
Rate this recipe!
Instructions
  1. Put six clean, 1 cup jam jars into a large pot of water. Bring to a boil and reduce to low to keep the jars and the water hot.
  2. Put six new lids in a small saucepan of water. Bring to a simmer, reduce heat to low and keep warm.
  3. Pit the cherries.
  4. Put the cherries in a food processor and pulse until finely chopped. There should still be bits of fruit visible.
  5. Measure four cups of chopped cherries.
  6. Combine the chopped cherries and pectin in an 8 quart saucepan.
  7. Over high heat, bring the cherry mixture to a full, rolling boil; one that cannot be stirred down.
  8. Add the sugar all at once.
  9. Stir and bring the mixture to a full rolling boil as quickly as possible. Boil for one minute.
  10. Remove the jam from the heat.
  11. Skim off any foam.
  12. Remove the jars from the hot water. Turn the heat to high and bring the water to a boil.
  13. Ladle the jam into the hot jars filling to ¼ inch from the top.
  14. Put a lid and a band on each jar. Tighten until you just meet resistance. The lid must be loose enough to allow air to escape (but not allow water to enter) otherwise the jar will explode when being processed.
  15. When all the jars are full, lower them into the boiling water.
  16. Return the water to a boil and boil 10 minutes at sea level. If you are above 1000 feet in elevation, increase the processing time by the amount noted below.
  17. Remove the jars from the boiling water and tighten the lids. Do not overtighten or you may break the seal.
  18. Allow the jars to cool completely.
  19. When cool, the lids should all be concave or, if pressed, should stay concave. If the lids pop up in the center, refrigerate that jar as the seal is not adequate to protect the contents.
  20. Add the following time to the original 10-minute processing time based on altitude: 1000-3000 feet above sea level: 5 minutes; 3001-6000 feet above sea level: 10 minutes; 6001-8000 feet above sea level: 15 minutes; 8001-10,000 feet above sea level: 20 minutes
Recipe Notes

Copyright © 2018 by Villa Sentieri, LLC. All rights reserved.

Share this Recipe

Angie’s Pickled Hot Peppers

September 13, 2017

With one set of grandparents and many relatives hailing from Southern Italy, hot peppers and foods containing hot peppers were staple features of the cuisine I grew up eating.

Hot sausage, with fennel seed, was frequently on our table and, since it was often homemade by Uncle Joe Medile, it could be as hot as we wanted. When it wasn’t Uncle Joe’s sausage, it would typically have been from Lopresti’s Market in Geistown, a suburb of Johnstown, PA.

Spicy foods more often showed up at lunch, though. There was spicy salumi, including Calabrese salami, capocollo (of which there are several types but in our house it was always the spicy one), and sopressata, among others.

There were hot banana peppers fried until tender, usually with onions. The fried peppers could be a condiment or they could be used as the filling for a sandwich. Fried hot pepper sandwiches are still one of my favorite lunchtime treats!

There were various pickled, spicy vegetables like giardineria and pickled peppers of various types. These were usually store-bought except for my cousin Angie’s pickled hot peppers.

Angie is the daughter of my mother’s oldest sister. Angie, however, was born six months before my mother. It’s kind of interesting to think about the fact that my grandmother was pregnant with my mother at the same time that my grandmother’s daughter was pregnant with Angie.

Despite their inverted ages, Angie always called my mother Aunt Theresa.

Angie’s mom, my Aunt Rosie, died at a young age. I never knew her. Aunt Rosie’s husband, Uncle Dominic lived with their other daughter, Marie.

Uncle Dominic grew vegetables, including hot peppers, in the back yard. He’s the one who taught me about fried hot pepper sandwiches for which I am eternally grateful!

Usually I would make Angie’s Pickled Hot Peppers with Italian Banana Peppers but fresh New Mexico Green Chile is far more abundant in Santa Fe than Banana Peppers and the substitution works just fine. Years past, when we lived in Chicago and grew lots of peppers, I would even make these with jalapeno peppers.

These peppers are a breeze to make, just some slicing and dicing and pulling together a quick pickle. No actual canning or processing is required. They will keep for months and months in the refrigerator.

The recipe calls for a peck of peppers. A peck is an interesting measure. It is eight dry quarts. A dry quart, however, is not the same as a liquid quart (unless you use the British Imperial system in which case a dry quart and a liquid quart are the same volume but not the same volume as any quart used in America).

Confused? Oh how I wish we used the metric system!!!

A dry quart is slightly larger than a liquid quart. Eight dry quarts equals 9 1/3 liquid quarts. If you go to a farmers market, chances are you’ve seen produce displayed in baskets that are one peck in size. Not to worry, though. First off, the measurements aren’t that critical for this recipe, so plus or minus a quart (dry or liquid) isn’t a big deal. Second, if you have any type of large container, pot, or bucket marked in liquid measure, just fill it up a little beyond the 9 (liquid) quart mark and you’ll be good to go.

If you’re buying peppers in the supermarket and don’t want to carry a bucket to measure a peck, I suggest buying approximately four pounds of banana peppers. I found that amount of New Mexico Green Chile came very close to a peck when I measured it out.


Follow us


Click HERE to join our mailing list and you’ll never miss a recipe again!

Print Recipe
Angie's Pickled Hot Peppers
Though usually made with hot Italian Banana Peppers, I made this batch with hot New Mexico Green Chile which is far easier to source in Santa Fe than are large quantities of Banana Peppers. Four pounds of peppers should come pretty close to a peck. A peck is 8 dry quarts which is the equivalent of 9 1/3 liquid quarts. If there isn’t enough pickling liquid to fully submerge the peppers, make a little extra following the proportions in the recipe. These peppers will keep well in the refrigerator for many months. Try to let them mellow at least a couple of days before eating them…if you can!
Votes: 0
Rating: 0
You:
Rate this recipe!
Prep Time 75 minutes
Passive Time 8 hours
Servings
quarts
Ingredients
Prep Time 75 minutes
Passive Time 8 hours
Servings
quarts
Ingredients
Votes: 0
Rating: 0
You:
Rate this recipe!
Instructions
  1. Wash and dry the peppers.
  2. Cut off the stem ends.
  3. Cut the peppers crosswise into rings a little more than 1/8 inch thick.
  4. Cut the celery into ¼ inch dice.
  5. In a non-reactive container large enough to hold all the ingredients, combine the vinegar, water, oil, garlic, salt, and oregano. Mix well.
  6. Add the sliced peppers and diced celery.
  7. Mix thoroughly. Cover and allow to sit at room temperature for 8 hours or overnight.
  8. Using a slotted spoon, ladle the peppers and celery into clean jars.
  9. Once the jars are filled, ladle the pickling liquid into the jars. Mix the liquid well with each ladleful so that you get the right proportions of vinegar/water and oil.
  10. If there is not quite enough liquid to cover the peppers make a small amount more using the same proportions.
  11. Cover and refrigerate until ready to use.
Recipe Notes

Copyright © 2017 by VillaSentieri.com. All rights reserved.

Share this Recipe

Passata di Pomodoro (Homemade Tomato Puree)

September 4, 2017

Sometimes in the late summer my mother and Annie Castagnola would get together to “put up” tomatoes. I don’t really remember paying much attention to the process but I was fascinated by the jars and jars of red orbs sitting on an enamel table in Annie’s garage at the end of the day.

Annie lived in a jewel-box of a mid-century-modern house on a quiet residential street in Westmont, a suburb of Johnstown, PA where I grew up. She was always immaculately made-up, her hair coiffed, and frequently dressed in muumuus.

She was also a chain-smoker. There was a very large abalone shell on the coffee table on her side porch that served as a communal ashtray. I was always amazed at the number of cigarette butts that would collect in that shell over the course of a visit.

Though Annie was a very good cook, she was mostly known for her baking. Some of you may remember me mentioning her in an early blog about Totos, Italian Chocolate Spice Cookies.

Growing up we used a lot of canned tomatoes. My mother made her long-simmered Southern Italian Style Ragu most Sundays. Each batch used about a quart of canned tomatoes. The number of jars of tomatoes that my mother and Annie “put up” was nowhere near the 50 or so that would have been needed just to supply my family’s Sunday dinner table, let alone what Annie needed.

Those home-canned tomatoes, though, were a treat when they were used and a potent reminder of cultural heritage and a more agrarian family history.

These days I turn our home-grown tomatoes into passata (puree) rather than canning whole tomatoes. It’s easier. The results can be frozen successfully eliminating pressure canning at my 8000-foot elevation. And, since there aren’t enough home grown tomatoes to supply all of our tomato-product needs (canned tomatoes, tomato puree and tomato paste being the primary ones) I’ve opted for the most expedient option.

Though we had more tomato plants when we lived in Chicago, I still use the same field mix of canestrini, lunghi, and beefsteak tomatoes to make passata.

The canestrini, an heirloom variety, are grown from seeds that we brought back from Italy about 20 years ago. They were given to us by my husband’s Great Uncle Faliero (Great Aunt Fidalma’s husband). Every year, seeds are lovingly removed from several tomatoes, spread out on waxed paper, and allowed to dry. Since these are heirloom, and not hybrid, tomatoes, they breed true. The seeds are used to start the following year’s tomato seedlings.

Canestrini are meaty and don’t have an excess of jelly surrounding the seeds. They can also be ugly if one’s vision of a tomato is a perfectly formed red orb. The taste, however, is superior.

Canestrini tomatoes on the vine

The lunghi seeds are imported from Italy and are available domestically as are the beefsteak tomato seeds. Mostly we grow the beefsteak tomatoes for eating but there are always more than enough so they get put into the field mix for the passata.

Lunghi tomatoes

Making passata is really a breeze compared to canning whole tomatoes or making tomato paste. The tomatoes are washed, quartered, cored and coarsely chopped before being simmered into a pulp. They are then passed through an old-fashioned food mill, a step that only takes a few minutes, which eliminates the seeds and skin. They cook for about 2 ½ hours but it is mostly hands off other than the occasional stir.

Leaving the seeds and surrounding jelly in the chopped tomatoes means that the cooking time is a bit longer than it might otherwise be but there are two distinct advantages. Getting the tomatoes ready to cook is really quick. Perhaps more important, though, is that the jelly surrounding the seeds contains loads of naturally occurring glutamates which boost the savory “umami” quotient of the tomatoes.

If you have access to vine-ripe tomatoes, grab yourself 15 or 20 pounds and give this recipe a try. You won’t be sorry!

Click here for a video showing the process of making tomato puree.


Follow us


Click HERE to join our mailing list and you’ll never miss a recipe again!

Print Recipe
Passata di Pomodoro (Homemade Tomato Puree)
This easy-to-make tomato puree can be frozen for later use. It brings a blast of late-summer goodness to winter meals. Ten to 20 pounds of tomatoes is a good amount to start with. If you are planning on using more than 20 pounds, I would either divide the tomatoes among several pots or find an extra-wide rondeau (a wide shallow pot) so that there is enough surface area to foster evaporation.
Votes: 0
Rating: 0
You:
Rate this recipe!
Prep Time 20 minutes
Cook Time 3 hours
Servings
quart
Ingredients
Prep Time 20 minutes
Cook Time 3 hours
Servings
quart
Ingredients
Votes: 0
Rating: 0
You:
Rate this recipe!
Instructions
  1. Wash and dry the tomatoes.
  2. Cut the tomatoes into quarters from top to bottom.
  3. Remove the hard bit where the stem attaches and any bad areas.
  4. Coarsely chop the tomatoes.
  5. Put the tomatoes into a heavy-bottomed, non-reactive pot (such as stainless steel).
  6. Add one teaspoon of salt for every quart of chopped tomatoes.
  7. Cover the pot and bring to a boil over medium-high heat. This will take approximately 10-20 minutes depending on volume of tomatoes.
  8. Remove the cover. Stir the tomatoes.
  9. Boil gently, uncovered, for 2 ½ to 2 ¾ hours, stirring every 15-20 minutes. It takes a bit of practice to estimate how much to concentrate the tomatoes to get the desired thickness of puree but don’t sweat it, the tomatoes can be cooked further.
  10. Pass the cooked tomatoes through a food mill to remove skin and seeds.
  11. If the puree seems too thin, return it to the pot and cook it a bit longer after passing it through the food mill.
  12. Portion and freeze or use as desired.
Recipe Notes

A rondeau is useful if you are going to prepare more than 20 pounds of tomatoes as it provides more surface area for evaporation than a deep sauce pan.

A rondeau is a wide, shallow pot

Copyright © 2017 by VillaSentieri.com. All rights reserved.

Share this Recipe