Spaghetti alla Carbonara

21 March 2023

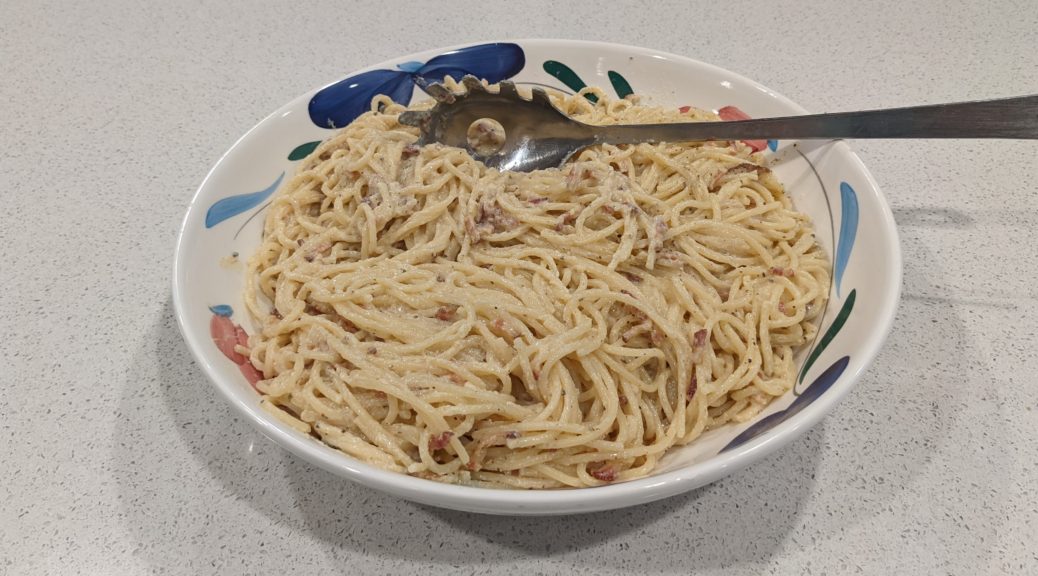
Cacio e Pepe, Pasta alla Gricia, Spaghetti all’Amatriciana, and Spaghetti alla Carbonara are the Holy Quaternity of Roman pasta dishes.

The sauce for Cacio e Pepe is little more than Pecorino Romano cheese emulsified into some of the pasta-cooking water to make a glossy sauce.  Pasta alla Gricia adds cured pork, usually guanciale, to Cacio e Pepe.  Amatriciana adds tomato to Gricia while  Carbonara adds egg to Gricia.

And there you have it, arguably the four most important pasta dishes of Roman cuisine.

The origins of Spaghetti alla Carbonara are murky.  Given the obvious relationship between these four pasta dishes one might think that there’s not much to talk about, one just naturally leading into the other.  However, there is some intriguing evidence, and a little speculation, about the origins of Carbonara.


Join our mailing list and you’ll never miss a recipe again!


The evidence and speculation go like this.  During the Allied liberation of Rome during WWII, the bacon and (powdered) eggs of American GI rations were combined with pasta to make a proto-Carbonara.  Some Italians agree with this, and some do not.  Those who do not usually insist that the cured pork product of choice is guanciale (cured pork jowl) not pancetta (cured pork belly) let alone American bacon.

But think about it.  How likely is it that the Romans had any cured pork hanging around near the end of WWII?  It’s more likely that they consumed anything that was consumable by then.  The existence of guanciale in any significant quantity is unlikely.  In addition, the first reference to Spaghetti alla Carbonara appeared in the newspaper La Stampa in 1950, indicating it was a favorite of American GIs.

Of course, it’s entirely possible that Spaghetti alla Carbonara existed prior to WWII and was made with guanciale.  After the Allied liberation of Rome, it’s reasonable to see how GI rations of (powdered) egg and bacon could have been substituted for fresh eggs and guanciale.  It’s also possible, even probable, that if it existed before the 1940s, Carbonara wasn’t written about because it was part of the cuisine of the poor (cucina povera).  Despite our current fascination with traditional cuisine, until recently culinary history largely focused on foods eaten by the upper classes, not the poor.


Follow us on social media


Unless more evidence comes to light, we may never know the origins of Spaghetti alla Carbonara.  Even so, there are some things we can say definitively:

  1. Adding cream to Carbonara is an abomination!
  2. If not the original meat, American bacon has a legitimate place in the history of Carbonara.
  3. Carbonara is delicious, whether made with guanciale, bacon, or pancetta.  Yes, each is different but each is delicious!  I’ve used all of them.  I prefer bacon but I’ll never turn down a well-made dish (or three) of Spaghetti alla Carbonara regardless of what cured pork product went into it.

The most challenging part of making carbonara is to incorporate the eggs, getting them to thicken into a sauce without either remaining raw or turning into scrambled eggs.  I’ve got a little trick that eliminates these concerns.

Read on!

Print Recipe
Spaghetti alla Carbonara
Spaghetti alla Carbonara is one of the four classic Roman pasta dishes, along with Cacio e Pepe, Pasta alla Gricia, and Spaghetti all’Amatriciana. It can be made with guanciale, American bacon, or pancetta though guanciale and bacon probably have the greatest claim on tradition. My preference is bacon. If using guanciale, I sometimes decrease the amount by 10% because it usually has more fat than either bacon or pancetta.
Votes: 0
Rating: 0
You:
Rate this recipe!
Prep Time 15 minutes
Cook Time 20 minutes
Servings
people
Ingredients
Prep Time 15 minutes
Cook Time 20 minutes
Servings
people
Ingredients
Votes: 0
Rating: 0
You:
Rate this recipe!
Instructions
  1. Cut the bacon into matchstick-size pieces.
  2. Sauté the bacon in a dry sauté pan until some fat renders.
  3. Add the garlic and sauté until the garlic is quite golden, but not brown. Remove the garlic and reserve. If the bacon is not well browned, continue cooking.
  4. Meanwhile, combine the eggs, egg yolks, Pecorino Romano cheese, 2 teaspoons black pepper, and reserved cooked garlic in a blender jar. Reserve.
  5. When the bacon is brown, add the wine and remove from the heat unless you are adding the pasta immediately. The dish can be made several hours ahead to this point.
  6. Cook the spaghetti in salted water until just shy of al dente.
  7. Just before draining the pasta, reheat the bacon and cook off the wine.
  8. Add the pasta to the bacon and sauté on medium to medium-high heat.
  9. Add pasta-cooking water, about one ladleful at a time, and continue cooking the pasta, stirring frequently, until al-dente. There should be enough liquid to coat the pasta in a thick "sauce."
  10. Just as the pasta reaches al dente, turn on the blender. Blend the contents thoroughly and then add about 120 ml (½ cup) of the hot pasta cooking liquid while the blender is still running.
  11. Off the heat, add the blended egg mixture to the pasta along with the parsley, if using, and even more freshly ground black pepper.
  12. Mix well to turn the eggs into a creamy sauce, adding pasta-cooking water if needed. Taste and adjust salt and pepper.
  13. Pour into a warmed serving bowl and serve immediately.
Recipe Notes

Copyright © 2023 by Villa Sentieri, LLC. All rights reserved.

Share this Recipe

Maraschino Cherry Cake

July 18, 2018

In  September 2012, at a wine paring dinner at The Compound Restaurant in Santa Fe during the holy days of Santa Fe Wine and Chile Fiesta, a group of us hatched an idea to start a dinner group.

After a lot of discussion and email exchanges, we decided to name the group Santa Fe Ate, both for what we do and for the (play on the words regarding the) number of people in the group.

From the “Things You Can Cook in a Wood-Burning Oven” dinner: Roasted Cauliflower with whipped Goat Cheese, Ricotta, and Olive Oil Dip and Cannellini alla Toscana

We had our first dinner in January 2013 and we’ve been going strong ever since.  We meet about once every three months, rotating houses.  At each dinner we decide the theme for the next dinner.  This may not be the best time to make such a consequential decision given the amount of alcohol typically consumed.  For example, one of our themes was French Indo-China 1920s to 1930s!

Join our mailing list and you’ll never miss a recipe again!

Frank and Doug don’t really cook so their group assignment is always to come up with a signature cocktail and appropriate wine pairings for each course.  They have leeway to be creative in finding or creating a cocktail, which they have to do for even for cultures where drinking alcohol is not really common.  If the theme of the dinner relates to a wine producing region, the wines are generally from that region to the extent feasible.

From the French Indo-China 1920s to 1930s dinner: Cambodian Fish Amok (Fish and Coconut Milk Curry Baked in Banana Leaves)

The other six of us do successive rounds of emails refining the list of dishes to be prepared and organizing them into courses.  Our task is to be as authentic to the theme as possible.

French Indo-China 1920s to 1930s was probably our most narrow theme.  Others have included, for example, Summer in Provence, Winter in Friuli, Along the Silk Road, Persia (not Iran but Persia), Comfort Food, and Things You Can Cook in a Wood-Burning Oven (for which the entire meal was cooked in our outdoor wood-burning oven).

The only meal we’ve had which strayed from the basic plan was Timballo.  Timballo is a (typically large) pastry-encased and baked dish of layered pasta, hardboiled eggs, cheese, meatballs, and other meats, all moistened with tomato sauce.  Each of the cooks was assigned one or more components of the timballo to make at home.  We got together to assemble and bake the final dish.  This was a multi-hour process, even with all the prep work done in advance.

Unmolding the timballo

To help pass the time, Frank and Doug devised a blind wine-tasting in which we had to try to identify the varietal and provenance of each wine.  I believe the eight of us tasted six bottles of wine.  After we finished those, we opened some more.  This was the dinner at which we decided the theme of French Indo-China 1920s to 1930s.  You may notice a correlation between alcohol intake and unusual dinner themes!

Follow us on your social media platform of choice


Earlier this year, our theme was Betty Crocker’s Picture Cook Book, first edition, published in 1950.  Every dish had to come from the cookbook with no changes, substitutions or updating unless absolutely necessary.  One of the appetizers was anchovies rolled around cornichons!

Betty Crocker’s Picture Cook Book, 1950, First Edition

The food was actually surprisingly good.  I suspect part of that was related to how each of us selected our dish or dishes (Becky, who did appetizers selected three!).  The wines were, undoubtedly, fabulous.  In the United States, if you were drinking wine in the 1950s you were likely drinking French wine, and good French wine, at that!  On that night, so were we!

I made a Maraschino Cherry Cake with Almond Crème Filling and Maraschino Boiled Frosting.  Though if I were making the cake again, I would probably substitute my recipe for Italian Pastry Cream for Betty’s Crème Filling, I really wouldn’t make any other changes.

Here’s the recipe directly from the first edition of the Betty Crocker Picture Cookbook with a few minor adaptions of the technique by me.  For you bakers out there, I’m providing the original sea-level measurements as published in the cookbook.  Since I baked this at nearly 8000 feet in elevation, I followed Betty’s recommendations for adjusting for high altitude.

Getting ready to make Maraschino Cherry Cake
Print Recipe
Maraschino Cherry Cake
You can divide the work for this cake over several days. The filling can be made up to three days in advance and refrigerated, tightly covered. Stir in the toasted almonds just before using. The cake layers can be made a day in advance, wrapped tightly and refrigerated. The frosting should be made when you’re ready to frost the cake. The original recipe called for “rich milk” in the almond crème filling. Remember, this recipe was published before the advent of homogenized milk. Half-and-half is a good substitute. Except in professional recipes, it is rare to see egg whites measured in volume but it is a very good idea as the white, much more than the yolk, varies with the size of the egg.
Votes: 0
Rating: 0
You:
Rate this recipe!
Prep Time 1 hour
Cook Time 1 1/2 hours
Passive Time 6 hours
Servings
people
Ingredients
Maraschino Cherry Cake
Almond Crème Filling
Maraschino Cherry Cooked Frosting
Prep Time 1 hour
Cook Time 1 1/2 hours
Passive Time 6 hours
Servings
people
Ingredients
Maraschino Cherry Cake
Almond Crème Filling
Maraschino Cherry Cooked Frosting
Votes: 0
Rating: 0
You:
Rate this recipe!
Instructions
Maraschino Cherry Cake
  1. Sift together the flour, baking powder and salt. Reserve.
  2. Combine milk and Maraschino cherry liquid. Reserve.
  3. Cream butter.
  4. Cream in sugar until fluffy.
  5. Add dry ingredients in four additions, alternating with milk-juice mixture in three additions. Mix lightly, but well, after each addition.
  6. Stir in nuts and Maraschino cherries.
  7. In a separate bowl, beat egg whites until stiff.
  8. Fold beaten egg whites into batter, using about ¼ of the egg whites first to loosen the batter.
  9. Pour into two greased and floured 9” cake pans.
  10. Bake 350°F approximately 30-35 minutes, until a tester inserted in the center comes out clean.
  11. Cool the pans on a rack approximately 10 minutes.
  12. Remove layers from pans and cool completely.
Almond Crème Filling
  1. Combine the sugar, cornstarch, salt and half-and-half in a heavy-bottomed saucepan.
  2. Bring to a boil, stirring constantly.
  3. Slowly pour about half of the boiling half-and-half mixture into the egg yolks, whisking constantly, to temper the yolks.
  4. Put the saucepan with the remaining half-and-half mixture back on the heat.
  5. Pour the tempered yolks back into the saucepan, whisking constantly.
  6. Bring the mixture to a boil. Boil 1 minute, stirring constantly.
  7. Remove from the heat and stir in the almond and vanilla extracts.
  8. Pour the pastry cream into a bowl. Cover with plastic wrap, putting the wrap directly on the pastry cream to avoid a skin.
  9. Refrigerate until cold.
  10. Stir in chopped almonds just before using.
  11. Just before making the frosting, put one cake layer on a serving platter. Top with Almond Crème Filling.
  12. Top with second layer.
Maraschino Cherry Cooked Frosting
  1. Combine the egg whites, sugar, cream of tartar and Maraschino cherry liquid in a double boiler.
  2. Cook over boiling water, beating constantly with an electric mixer until a spreadable consistency, approximately 5-7 minutes. The top of the double boiler should not touch the boiling water in the bottom.
  3. Beat in the vanilla and almond extracts.
  4. Immediately frost sides and top of cake.
  5. Decorate the top with whole Maraschino cherries
Recipe Notes

Copyright © 2018 by Villa Sentieri, LLC. All rights reserved.

Share this Recipe

Torta di Riso (Italian Rice Tart)

January 31, 2018

Torta di Riso is an Italian specialty.  It is basically a rice pudding baked inside of a pastry crust; a Rice Tart, so to speak.

I first had Torta di Riso more than 20 years ago while visiting Italy with my husband and his parents.

We ate meals at the homes of many relatives.  I often arrived with a spiral-bound notebook to jot down the inevitable recipes that would be discussed around the table or the recipes I begged for after being served something wonderful.  That notebook is a mashup of American and Metric measures and English and Italian words for ingredients.  It became a bible of sorts for recreating many of the dishes I ate on that trip.


Click HERE to join our mailing list and you’ll never miss a recipe again!


My father-in-law’s Zia (Aunt) Mery made the first Torta di Riso that I ever tasted.  Her recipe is below (adapted for American measures).

After having it at Zio (Uncle) Beppe and Zia Mery’s house, I started noticing Torta di Riso in many places in Tuscany.

My father-in-law with his Uncle Beppe and Aunt Mery, from whom this recipe for Torta di Riso originated in their garden in Tuscany, 1994.

Alkermes liqueur originated in Tuscany so it is particularly appropriate to use it as the liqueur in Torta di Riso.  Alkermes is nearly impossible to find in the United States, however.  One can make a perfectly traditional Torta di Riso using rum in place of Alkermes but the resulting confection won’t be pink.

According to CooksInfo, “Alchermes was invented in the Frati Convent at Santa Maria Novella in Florence. Its making was kept secret, but the recipe was reputedly stolen by spies from the nearby city of Siena, which Florence was often at war with.”


Follow us on your social media platform of choice


Recipes for alkermes (also spelled alchermes) are closely guarded but the process basically involves infusing alcohol with spices and flavorings like cinnamon, cloves, vanilla, nutmeg, mace, cardamom, star anise, rosewater, and orange zest.  The red color comes from cochineal, an insect that is the foundation for natural red food coloring.  The resulting infused alcohol is sweetened and diluted with water.

The pastry crust is pasta frolla, a slightly sweetened pastry, leavened with baking powder, and often flavored with vanilla and lemon zest.  This is Mery’s recipe for pasta frolla but I also have one from Zia Fidalma that makes about half the quantity.

Torta di Riso was a big hit at my father-in-law’s birthday dinner last week. So were the cocktails, wine, and champagne!

If you don’t have access to Alkermes, you can use rum.  In fact, torta di riso is not always pink.  Many that I saw in Italy were white.

If you want to try to make your own Alkermes you can find a recipe here.  Amazon even sells the dried cochineal insects that provide the traditional scarlet color.


If you have a favorite family recipe and a bit of a story to tell, please email me at santafecook@villasentieri.com and we can discuss including it in the blog. I am expanding the scope of my blog to include traditional recipes from around the country and around the world. If you haven’t seen Bertha’s Flan or Melinda’s Drunken Prunes, take a look.  They will give you an idea of what I’m looking for.


Print Recipe
Torta di Riso (Italian Rice Tart)
This classic Italian dessert is basically a rice pudding baked inside of a pastry crust. Alkermes is a traditional Tuscan liqueur used in a number of sweets, including torta di riso, for its color and spice-like flavor. If you don’t have Alkermes, use rum. Not all versions of torta di riso are brightly colored. Vanilla powder is a natural vanilla product, not artificial. Use vanilla extract if vanilla powder is not available.
Votes: 0
Rating: 0
You:
Rate this recipe!
Cuisine Italian
Prep Time 30 minutes
Cook Time 75 minutes
Passive Time 30 minutes
Servings
people
Ingredients
Pasta Frolla
Rice
Cuisine Italian
Prep Time 30 minutes
Cook Time 75 minutes
Passive Time 30 minutes
Servings
people
Ingredients
Pasta Frolla
Rice
Votes: 0
Rating: 0
You:
Rate this recipe!
Instructions
Pasta Frolla
  1. Blend the flour, sugar, baking powder, vanilla powder, salt and lemon zest in a food processor until combined.
  2. Add the butter, cut in pieces, and blend till well combined.
  3. Add the eggs and blend till the pastry almost forms a ball.
  4. Remove the pastry from the food processor and use your hands to press everything into a single ball.
  5. Wrap the pastry in waxed paper and refrigerate for an hour before using.
Rice
  1. Wash and drain the rice.
  2. Combine the rice, water and milk in a heavy-bottomed sauce pan.
  3. Bring the rice to a boil.
  4. Cover the rice and simmer, stirring frequently, until cooked and the liquid is almost completely absorbed. If the rice does not have the consistency of thick oatmeal, add a bit more milk at the end to make it creamy.
  5. Mix the sugar, lemon zest, and Alkermes and/or rum into the rice.
  6. Pour the rice into a bowl and cool, uncovered, stirring occasionally.
Assembly and Baking
  1. Cut off a small piece of the pastry to make a lattice top and refrigerate.
  2. Roll the remaining pastry between waxed paper, turning often, until it is large enough to cover the bottom and sides of a 10 inch springform pan.
  3. Line a 10" springform pan with the pasta frolla.
  4. Cut the pastry even with the top of the pan. Add the scraps to the pastry you have reserved for the lattice.
  5. Beat the egg and egg yolks to combine.
  6. Stir the beaten eggs into the cooled rice.
  7. Pour the rice into the pastry lined pan.
  8. Roll out the pastry reserved for the lattice.
  9. Cut seven or eight strips, approximately 1/2 inch wide.
  10. Arrange the strips into a lattice on top of the rice. Cut off the excess.
  11. Roll the pastry lining the sides of the pan down to the top of the rice and form a decorative edge.
  12. Bake at 350°F until the crust is lightly browned and the rice is barely jiggley in the center, approximately 30-45 minutes.
  13. Cool on a rack for approximately 20 minutes.
  14. Remove the side of the pan and cool completely.
Recipe Notes

Copyright © 2018 by VillaSentieri.com. All rights reserved.

Share this Recipe

Panettone (Italian Sweet Bread with Citron and Raisins)

December 10, 2016

I have been planning the launch of this site for several years.  It’s going live shortly before Christmas, a time when Italians traditionally enjoy panettone.  Panettone for breakfast.  Panettone as a gift.  Panettone as a snack.  While there are wonderful commercially produced products, I prefer to make my own.

The fact that the site is going live now feels like a gift…to myself!  So, I’m making panettone!!!  One for me, and half-a-dozen for friends.

I’ve been making Panettone for almost 30 years.  This year I’m using candied citron from Italy.  I plan to try making my own candied citron from the wonderful Buddha’s Hand fruits available from the farmers’ market in Palm Springs, California where I spend time each winter using this recipe from David Lebovitz.  For now, though, I’ll be using the citron from Italy.

Print Recipe
Panettone
Panettone is a sweet bread from Italy, traditionally served around Christmas. It is enriched with eggs and butter and contains raisins and candied citron.
Votes: 0
Rating: 0
You:
Rate this recipe!
Course Sweet Breads
Cuisine Italian
Prep Time 30 minutes
Cook Time 1 hour
Passive Time 14 hours
Servings
loaves
Ingredients
Course Sweet Breads
Cuisine Italian
Prep Time 30 minutes
Cook Time 1 hour
Passive Time 14 hours
Servings
loaves
Ingredients
Votes: 0
Rating: 0
You:
Rate this recipe!
Instructions
  1. This is candied citron from Italy. The flavor is superior to the diced candied citron sold in supermarkets.
  2. If using large pieces of citron, cut them into batons approximately 1/4 inch on a side.
  3. After cutting batons of citron, or if using citron that is already diced, slice the citron into thin slices.
  4. Beat salt, sugar, eggs and egg yolks together. Reserve.
  5. Use a mixer with a dough hook. Put 1200 g flour in the bowl of the mixer. Add yeast and begin to mix. Add warm water and mix. Add egg mixture and mix. Slowly with the mixer running, add 225 grams of melted butter and orange oil or zest. Knead for approximately 10 minutes, scraping the side of the bowl a few times. Add citron and raisins and continue mixing till incorporated. The dough will be sticky.
  6. Butter the inside of a large bowl with 2 tablespoons of the softened butter. Place dough in the buttered bowl and be sure to butter the top with some of the melted butter. Cover dough with waxed paper and place a kitchen towel on top. Refrigerate overnight. It should have at least doubled by morning. In place of a large bowl, you can use a food-service container of approximately 7 quarts with a tight-fitting lid.
  7. Punch the dough down by hand. Cover again with waxed paper and towels and allow to rise at room temperature until doubled in bulk.
  8. Butter 3 cylindrical baking pans, approximately 7 inches in diameter, using 3 tablespoons of softened butter. Set the pans aside.
  9. Knead the dough by hand until smooth and the air bubbles have been worked out. Form into 3 balls and place each into one of the baking pans. Butter the tops with the remaining 1 tablespoon of butter.
  10. Cover with waxed paper and a towel. Allow to rise at room temperature until doubled (or a little more), approximately 45-60 minutes.
  11. Cut a deep cross in the top of each loaf. Bake at 350° F for 55-65 minutes. Use a cake tester to be sure that none of the dough clings to tester.
  12. Place on a cooling rack. Cool slightly and remove from the pans. Cool completely on the rack. Wrap tightly until ready to use.
Recipe Notes

Copyright © 2016 by VillaSentieri.com.  All rights reserved.

Share this Recipe