Rabbi Goldie’s Jewish Apple Cake

September 5, 2018

In September 1972, at the age of 17, I went from the small town of Johnstown, Pennsylvania to Philadelphia to attend the University of Pennsylvania.

Little did I know how much my life was going to change, nor how sheltered I had been growing up in Johnstown.  There were a few trips to Florida and California by car, and a portion of every summer spent in Atlantic City, but other than that my life mostly revolved around the family and happenings within a few hours’ drive of Johnstown.

A few weeks before I left for college, I got a note from Jon Rikoon who was to be one of my roommates.  Jon lived on Long Island.  I don’t think I’d ever been to New York at that point.

Harnwell House, the dorm (now a college house) I lived in during freshman year

Another of my roommates (we had a three-bedroom, four-bed dorm “apartment”) was Chip Fleischmann, as in Fleischmann’s yeast.  The fourth roommate only lasted the first semester and I simply can’t remember his name.  (He kept to himself mostly.)

Join our mailing list and you’ll never miss a recipe again!

Early in freshman year, Jon started dating Gail Milgram.  Gail spent a lot of time in our apartment and she and I became very good friends.

Gail’s relationship with Jon didn’t last beyond freshman year but our friendship did.  We saw a lot of each other throughout our undergraduate years and for a few years thereafter while I was in medical school.

Our friendship remained strong.  In fact, at one point early in medical school Gail and I had to temporarily stop spending time together as her boyfriend at the time was jealous of our relationship.  Needless to say, he didn’t last!

Gail and I were in infrequent contact after my first couple of years in medical school.  In fact, years could go by without contact but, somehow, we always managed to reconnect.

As the years did, in fact, go by, Gail officially changed her name to Goldie.  She also became a rabbi.

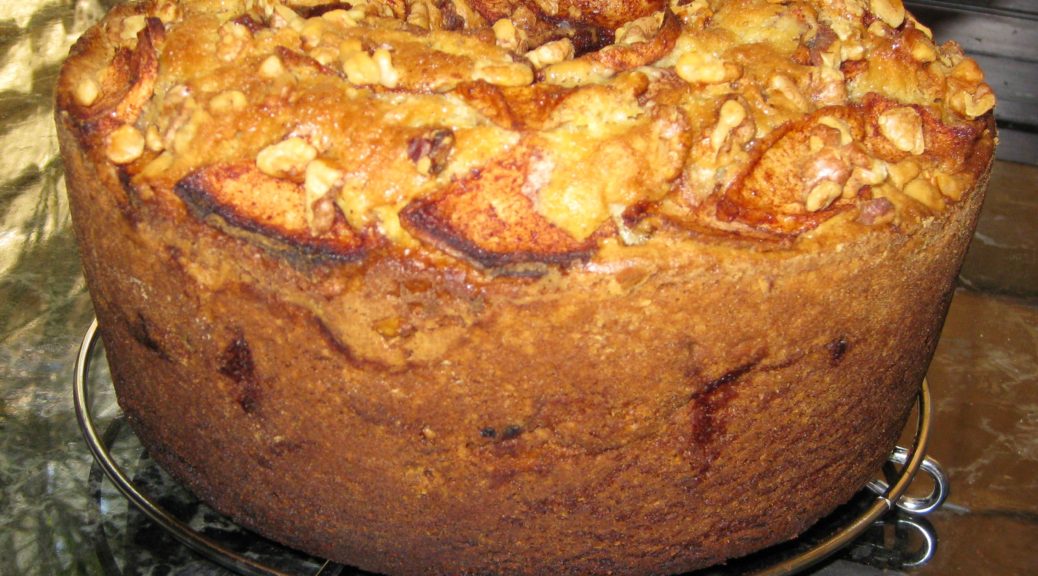
A few months ago, out of the blue, just after I decided to post a recipe for the Jewish Apple Cake that (the then) Gail taught me how to make in college, I received an email from her.

Follow us on your social media platform of choice


She was in Europe for the summer and we set up a time to chat by video conference but her internet connection did not cooperate and we were unsuccessful in our attempts to chat.  We’re planning another attempt at video conferencing when both of us are in the States later this fall.  I’m looking forward to catching up with her.

In the meantime, I hope you enjoy what is now, officially, Rabbi Goldie’s Jewish Apple Cake!

Print Recipe
Rabbi Goldie's Jewish Apple Cake
It is best to bake this cake in a plain, shiny aluminum pan. A dark pan will overcook the outside before the center is done. Don't add the sugar to the apples before you are ready to pour the batter into the pan or it will pull a lot of liquid out of the apples.
Votes: 4
Rating: 4
You:
Rate this recipe!
Cuisine Jewish
Prep Time 30 minutes
Cook Time 90 minutes
Passive Time 1 hour
Servings
people
Ingredients
Cuisine Jewish
Prep Time 30 minutes
Cook Time 90 minutes
Passive Time 1 hour
Servings
people
Ingredients
Votes: 4
Rating: 4
You:
Rate this recipe!
Instructions
  1. Grease and flour a 10" tube pan with a removable bottom.
  2. Sift together the flour and baking powder.
  3. Peel the apples, cut them in quarters and remove the core.
  4. Slice the apples crosswise into 1/8 inch thick slices.
  5. Mix the apples and cinnamon and set aside.
  6. In the bowl of an electric mixer cream oil and 2 cups plus 3 tablespoons sugar.
  7. Add eggs one at a time beating after each addition.
  8. Add 1/3 cup plus 1 tablespoon orange juice and vanilla. Mix well.
  9. Add flour and baking powder mixture and mix well.
  10. Add 5 tablespoons of sugar to the apples and mix well.
  11. Pour half the batter into the prepared pan.
  12. Top the batter with half the apples.
  13. Top the apples with half the walnuts, if using.
  14. Add the remaining batter and top with the remaining apples and walnuts, if using.
  15. Bake at 350°F for approximately 1 hour 40 minutes, until a tester inserted in the center comes out clean.
  16. Cool for 10 minutes on a rack. Remove from pan and cool completely.
Recipe Notes

Copyright © 2018 by Villa Sentieri, LLC. All rights reserved.

Share this Recipe

Jamaican Easter Bread (Bun)

March 23, 2018

Google and Wikipedia and Bing have all let me down!

Often when I’m writing a blog, I’ll do a search or two to shore up some facts.

In this instance, I was trying to find a picture of a product and to confirm my understanding of exactly what it is.  That product is New Sugar.

My searches turned up nothing.

Back in college, I would buy new sugar on trips to the West Indies.  The stuff I bought was sold in cans.  It was dark brown, partially crystalized and partially a thick liquid.  It was not as dark or as thick as molasses.  My recollection is that new sugar is basically sugar cane juice boiled down until it thickens and some of the sugar crystallizes.

It’s what my recipe for Jamaican Easter Bread (aka “Bun”) calls for.


Click HERE to join our mailing list and you’ll never miss a recipe again!


Long ago, when my meager supplies of new sugar were exhausted and I was no longer going to the West Indies on a regular basis, I created a substitute for new sugar that fooled even my Jamaican friends.  (Hint, it’s in the recipe below.)

If my recipes contain a substitute for a difficult-to-find ingredient, I like to make the substitution clear and to provide directions on how to use the original ingredient if available.

In my blog entries, I try to provide some sort of personal or cultural or social context for each recipe.  In this instance, I wanted to highlight new sugar.

I was about to give up when I tried different search terms.  I had only known it as New Sugar, but, finally, searching on “Wet Sugar” got me one website that had what I was looking for.

The website confirmed my understanding of what new sugar, aka wet sugar, is:  boiled sugar cane juice.  It also confirmed that it is much more difficult to find than it was 30-50 years ago.  I hate to admit it, but I was buying new sugar more than 40 years ago!

My recipe for Bun (that’s really what it’s called in Jamaica…just Bun) came from Valrie Tracey a Jamaican friend from college.  Valrie and I and my roommate, Ray Hugh from Guyana, were close friends in college.  Though I’ve lost touch with Valrie, Ray and I are still in touch via Facebook.  And, yes, her name is spelled Valrie, apparently due to an error on her birth certificate as her parents intended for her name to be Valerie!


Follow us on your social media platform of choice


In addition to new sugar, Valrie’s recipe called for “Mixed Spice,” a commonly used mixture in the cooking of Britain and many former British colonies.  I don’t like using spice combinations that I haven’t made myself, like pumpkin pie spice or curry powder.  If the brand goes out of existence or changes its formula one can’t recreate the dish exactly the same way again.  For that reason, starting in college, I worked out my own formulas for spice mixtures that I used on a regular basis.

Valrie Tracey in 1975

Rather than have you make a batch of Mixed Spice before making a batch of Bun, I added the individual spices, in the correct amounts, to the recipe.

After resurrecting this recipe from one of my two 5 x 7 metal index card boxes of recipes that I started back in college and sharing the Bun with a number of friends, I began to seriously wonder why I hadn’t made it in over 40 years!

I can assure you, I won’t wait long to make it again.

I like to toast the Bun and add some butter and jam but in Jamaica it would often be served with a wedge of cheese.  However you serve it, I’m certain you’ll enjoy it.


If you have a favorite family recipe and a bit of a story to tell, please email me at santafecook@villasentieri.com and we can discuss including it in the blog. I am expanding the scope of my blog to include traditional recipes from around the country and around the world. If you haven’t seen Bertha’s Flan or Melinda’s Drunken Prunes, take a look.  They will give you an idea of what I’m looking for.


Print Recipe
Jamaican Easter Bread (Bun)
If you can find new sugar (also known as wet sugar) you can use 2 ½ cups of new sugar in place of the brown sugar and molasses. The dough for this version of Bun is quite wet, more like cake batter than bread dough. When I was making this back in college days and had to mix it by hand, I added enough flour to make a dough that could be kneaded. With a stand mixer, I allow the mixture to be wet. You might want to try both variations and see which you prefer.
Votes: 0
Rating: 0
You:
Rate this recipe!
Course Sweet Breads
Cuisine West Indian
Prep Time 30 minutes
Cook Time 90 minutes
Passive Time 2 hours
Servings
loaves
Ingredients
Bread
Glaze
Course Sweet Breads
Cuisine West Indian
Prep Time 30 minutes
Cook Time 90 minutes
Passive Time 2 hours
Servings
loaves
Ingredients
Bread
Glaze
Votes: 0
Rating: 0
You:
Rate this recipe!
Instructions
Bread
  1. Scald the milk by heating over medium high heat, stirring frequently to prevent a skin from forming, until bubbles begin to foam up around the side.
  2. Allow the milk to become lukewarm (approximately 110°F).
  3. Combine lukewarm milk, yeast, 1 teaspoon of sugar from the amount above, and 1 pound of flour in the bowl of a mixer.
  4. Using the paddle, mix well then allow the sponge to sit, covered, until it doubles in bulk.
  5. After the sponge has doubled, mix in 1/3 of the remaining flour and 1/3 of the remaining sugar.
  6. When combined, add the butter, molasses and all the spices and flavorings. Mix well.
  7. Add ½ of the remaining flour and ½ of the remaining sugar. Mix well.
  8. Add the eggs and mix well.
  9. Add the remaining flour and sugar. Mix for about 10 minutes on medium speed.
  10. Mix in the fruit.
  11. Divide the batter into 4 well-buttered 8” x 4” bread pans. Cover and sit at room temperature for about an hour. The batter will not really rise but the yeast is the only leavening so it needs to have time to make air bubbles that can expand and leaven the bread.
  12. Bake at 300°F for approximately 90 minutes, until a tester comes out clean.
Glaze
  1. When the bread is nearing completion, make the glaze by bringing the sugar and water to a boil and simmering a few minutes until syrupy.
  2. As soon as the bun comes out of the oven, brush some of the glaze on top. Allow to cool 10 minutes in the pans.
  3. Remove the bun from the pans and brush with more glaze. Allow to cool another 10 minutes.
  4. Brush with remaining glaze and cool completely.
Recipe Notes

Copyright © 2018 by VillaSentieri.com. All rights reserved.

Share this Recipe

Baklava with Walnuts and Almonds

February 23, 2018

Syrup desserts are popular from the Eastern Mediterranean through the Arabian Peninsula.  Among syrup desserts, baklava is one of my favorites.

I rarely make baklava but the first time I did was junior year in college.  That same recipe is the one that I still make.

Styles of baklava vary.  More nuts.  Less nuts.  More syrup.  Less syrup.  Different aromatics.  While I like them all, I tend towards the more Arabic preparations which, in my experience, include more nuts and syrup than their more restrained Greek counterparts.

Perhaps that’s why a friend, of Greek heritage, said that my baklava didn’t look like anything a Greek ever made!  Admittedly, however, the recipe came from a Greek and I think I have been true to the recipe but, hey, I’m not Greek so who am I to say what could have come out of a Greek kitchen.


Click HERE to join our mailing list and you’ll never miss a recipe again!


I spent much of 2010 living in Dubai.  The consulting company that I started in the mid 1990’s landed a contract with the United Arab Emirates Ministry of Health in late 2009.  In January 2010 I moved to Dubai.

A view of one part of the kitchen in my Dubai apartment

Shopping for food in Dubai is just amazing.  The sheer number of expats (at the time it was estimated that 95% of the people living in Dubai were expats!) means that the supermarkets are truly multinational affairs, even the relatively small ones.

It was rare that I could not find brands with which I was familiar.  I’m sure expats from almost every country had the same experience.  The supermarkets were stocked with brands from around the world.  It truly was the most amazing grocery shopping I have ever experienced outside of the food halls at Harrods and KaDeWe.  But remember, Harrods and KaDeWe are most decidedly upscale affairs.  In Dubai I was just going to the (plain, ordinary) supermarket!

A small section of the food hall at KaDeWe in Berlin (By Blorg (Own work) [GFDL (http://www.gnu.org/copyleft/fdl.html), CC-BY-SA-3.0 (http://creativecommons.org/licenses/by-sa/3.0/)], via Wikimedia Commons)
I spend a week in Germany during the summer of 2010, right in the middle of my Dubai experience.  I found shopping in German supermarkets to be a much more “foreign” affair than shopping in the supermarkets in Dubai.  Rarely was there a brand I recognized in Germany.  Shopping involved intense reading of labels because I was not familiar with the products and their contents…or their quality.

A view of the Arabian Gulf and the man-made Palm Jumeriah Island in the distance from my apartment

Produce in Dubai could be hit or miss due to the distance most of it traveled.  Although there was a nascent horticultural industry in Dubai, I could never find truly local produce.  On several occasions I tried to find a store that purported to sell local produce but my driver could never locate it, even with the address!


Follow us on your social media platform of choice


The closest we had to “local” produce was from Iran, the source of Romaine lettuce and cauliflower, as I recall, among other produce.  Considering that Iran and the United Arab Emirates are only 90 miles away at their closest point, and considering how far produce can travel in North America from fields in California to the Northeast, 90 miles really counts as local, even if there is an international border among two not-so-friendly countries involved!

Another view from the apartment looking at Dubai Marina

In the supermarkets, prepared food counters overflowed with Middle Eastern items and my fridge was always stocked with hummus, pita with zatar, olives, and other meze.

I also had access to world-class syrup desserts, including baklava!!!

Another fascinating aspect of most of larger supermarkets in Dubai was the existence of a room at the back that was usually labeled with something like “Pork for Non-Muslims.”  In this space once could find the most amazing cured pork products from Italy, Spain, and Europe in general!

Dubai Marina at ground level

Alas, items containing alcohol were difficult to obtain.  This included vanilla extract.  The available non-alcohol-based “extract” was just not the same.  Luckily vinegar was just as good, even if it was labeled “Grape Vinegar” rather than “Wine Vinegar!”

I hope you enjoy this baklava.  Just don’t make it for a Greek friend!


If you have a favorite family recipe and a bit of a story to tell, please email me at santafecook@villasentieri.com and we can discuss including it in the blog. I am expanding the scope of my blog to include traditional recipes from around the country and around the world. If you haven’t seen Bertha’s Flan or Melinda’s Drunken Prunes, take a look.  They will give you an idea of what I’m looking for.


Print Recipe
Baklava with Walnuts and Almonds
Try to find phyllo that is either 9” x 13” or 18” x 13”. If it’s the latter, cut the stack of sheets in half to make them all 9” x 13”. I have found that covering the stack of phyllo with a damp towel, as some authors recommend, after you remove every sheet isn’t necessary if you move quickly. However, before you start, moisten a dish towel and keep it handy in case there are any breaks in the action, in which case you should definitely cover the stack of unused phyllo. While it is not essential to clarify the butter, removing the milk solids will prevent uneven browning of the top of the baklava.
Votes: 0
Rating: 0
You:
Rate this recipe!
Prep Time 1 hour
Cook Time 1 1/2 hours
Passive Time 24 hours
Servings
pieces
Ingredients
Bakalva
Syrup
Prep Time 1 hour
Cook Time 1 1/2 hours
Passive Time 24 hours
Servings
pieces
Ingredients
Bakalva
Syrup
Votes: 0
Rating: 0
You:
Rate this recipe!
Instructions
Baklava
  1. Clarify the butter.
  2. Finely grind the almonds and walnuts.
  3. Mix nuts, cinnamon, allspice and sugar.
  4. Brush a 9-inch b 13-inch baking pan with butter.
  5. Lay a sheet of phyllo and brush it with butter.
  6. Repeat until 12 sheets have been used.
  7. Spread a layer of nuts, approximately 1 cup, on top of the phyllo.
  8. Cover with a sheet of phyllo, brushing it with butter.
  9. Repeat 1 cup of nuts covered with one sheet of phyllo until all the nuts have been used up.
  10. Top with all the remaining sheets of phyllo individually adding them and brushing each sheet with butter.
  11. Score the top few sheets of phyllo in a diamond pattern. Cut from one corner to the opposite corner.
  12. Make three more rows of cuts, evenly spaced, in each direction parallel to the first cut for a total of 7 cuts.
  13. Repeat in the opposite direction.
  14. Put a clove in the center of each diamond.
  15. Sprinkle the top lightly with water to reduce curling while baking.
  16. Bake 350°F for 1½ hours, until golden.
  17. Pour hot honey syrup over the hot baklava as it comes from the oven.
  18. The baklava is best if allowed to sit at room temperature, uncovered for about a day before serving.
Syrup
  1. As the baklava is nearing completion, make the syrup.
  2. Combine lemon zest, sugar, water, cinnamon, and cloves in a heavy-bottomed sauce pan.
  3. Bring to a boil, lower heat and continue cooking without stirring until syrupy, approximately 15 minutes. (218°F to 220°F if you want to measure using a candy thermometer.)
  4. Stir honey into hot syrup.
  5. Remove from the heat.
  6. Using a small strainer, remove the solids.
  7. Reheat the syrup immediately before removing the baklava from the oven.
  8. Stir in lemon juice and rum or brandy.
Recipe Notes

Copyright © 2018 by VillaSentieri.com. All rights reserved.

Share this Recipe

Totos (Italian Chocolate Spice Cookies)

December 21, 2016

Homemade cookies and pastries were staples of my childhood.  Trays of cookies showed up for holidays, celebrations, weddings, funerals, and, sometimes, for no apparent reason.

My mother along with relatives and friends set up a cookie-making operation that went on every night for weeks leading up to my sister’s wedding.  The overseer was Annie Castagnola, a family friend.  She had a thin spiral-bound 3-inch-by-5-inch notebook of cookie recipes.  The notebook was the kind we used in grade school to write down our homework assignments.  Annie’s recipes were a curated collection gathered from a host of “old Italian women,” my grandmother included.

The little notebook was coveted by more than a few cooks.  Annie, however, did not share her recipes, even when those recipes came from relatives of the very people who were asking for them.  I know, my mother was one of those people who wanted some of her mother’s recipes.  Annie wouldn’t budge.  The situation got resolved, however, during the cookie-baking marathon for my sister’s wedding.  One night, Annie left her little notebook at our house overnight.  Nobody’s confessing, but there are a few cookie recipes in my mother’s recipe box (sitting on my bookcase) written in my twelve-year-old hand.

Annie died a while back.  Her little notebook is most likely gone forever and along with it the baking secrets of a whole group of “old Italian women.”

Of all the cookies that showed up throughout the year, my favorites were the various kinds of cakey cookies, my mom’s Genets, Aunt Margie’s aptly named “Colored Cookies,” and my cousin Angie Catanese’s Sesame Seed Cookies, to name a few.  These cakey cookies, which were not very sweet by American standards, were usually little balls but not always.  Genets are lemon flavored knots.  Colored Cookies are vanilla flavored balls, each made with four or five pinches of dough of different colors rolled together.  Sesame cookies are little logs, perfect for dunking into some Vin Santo.  For me, though, the best of these cakey cookies are Totos, little chocolate spice balls.

Print Recipe
Totos (Italian Chocolate Spice Cookies)
These little chocolate balls are intended to have a good kick from an array of spices. Lard is the traditional shortening to use. I render my own. If you need these to be vegetarian, or you just don't want to use lard, you can use solid vegetable shortening. Heck, you can even use clarified butter but that is way off the traditional scale!
Votes: 18
Rating: 3.83
You:
Rate this recipe!
Cuisine Italian
Prep Time 45 minutes
Cook Time 2 hours
Servings
dozen cookies
Ingredients
Cookies
Icing
Cuisine Italian
Prep Time 45 minutes
Cook Time 2 hours
Servings
dozen cookies
Ingredients
Cookies
Icing
Votes: 18
Rating: 3.83
You:
Rate this recipe!
Instructions
Cookies
  1. In a small saucepan, melt the lard over low heat. When just melted, remove the lard from the heat and allow to cool slightly.
  2. Meanwhile, combine the flour, cocoa, baking powder, baking soda, salt, cloves, cinnamon, allspice, and nutmeg together. Reserve.
  3. Make the icing and reserve.
  4. Put the sugar into a large mixing bowl. Add the cooled but still liquid lard and mix well until thoroughly combined. The mixture will be gritty. I recommend doing this by hand with a mixing spoon but you could use a portable electric mixer.
  5. Add the eggs one at a time to the sugar and lard mixture, mixing well after each addition. The sugar should dissolve as the eggs are added.
  6. Add the milk, honey, vanilla extract and lemon extract to the egg mixture. Mix until well combined.
  7. Add the reserved dry ingredients. At this point there really is no better option than to reach into the mixture with your hand and get everything well combined. The dough will be somewhat sticky. Be certain that all the dry bits are scraped off the bottom and sides of the bowl and combined into the dough.
  8. Roll the dough into walnut-sized balls. If you want to weigh the first few to get the size correct, they should be between 21 and 22 grams.
  9. Space the cookies several inches apart on ungreased cookie sheets. Bake at 375°F for 8-10 minutes until the cookies are very slightly browned on the bottom but still soft when touched. They have a tendency to crack as they bake. This is normal. You can bake two trays at a time, one in the lower third of the oven and one in the upper third. Be sure to switch the top and bottom cookie sheets after five minutes and also turn them front to back.
  10. As soon as you remove the cookies from the oven, carefully put them on cooling racks.
  11. Ice them immediately by holding a cookie with one hand and using the tip of your finger to spread a dollop of icing on the top half of each cookie. The icing should be a glaze, not a thick coating. Put the iced cookies on cooling racks to cool completely.
  12. Well wrapped, the cookies can be refrigerated for several weeks or frozen for several months.
Icing
  1. Melt the butter. Add the sugar, vanilla (or lemon) extract and 2 tablespoons of milk. Mix well. Add more milk, a teaspoon at a time, if needed, to make a thick icing that will hold its shape and spread well.
  2. It may be necessary to add a bit of milk from time to time if the icing stiffens up over the course of icing each batch of cookies as they come out of the oven.
Recipe Notes

Check out my method for rendering lard.

I prefer to grind my own spices using a small electric coffee grinder, except for the nutmeg, of course, for which I use a small grater. It is best to pass the ground spices through a small strainer to get out any small bits. If you don’t grind your own spices be sure to buy really fresh ground ones so the flavor is vibrant.

This recipe doesn’t involve any strenuous beating so the first few steps can easily be completed by hand with a sturdy mixing spoon rather than with a mixer. Similarly, after adding the dry ingredients, the dough only needs to be mixed enough to come together. This is easily (and traditionally) done with your hand though I suppose a dough hook would work, too.

Copyright © 2016 by VillaSentieri.com. All rights reserved.

Share this Recipe