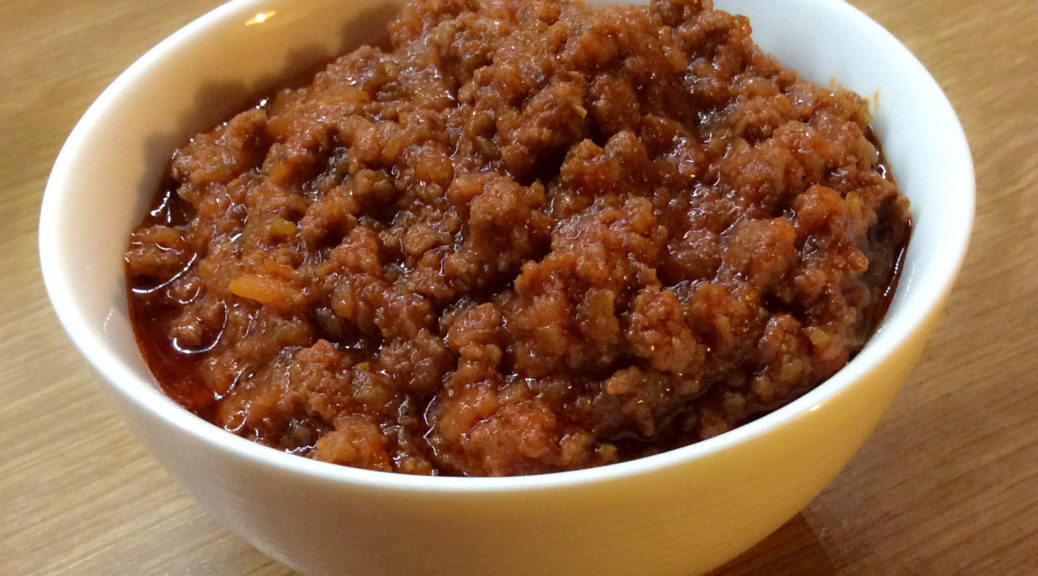
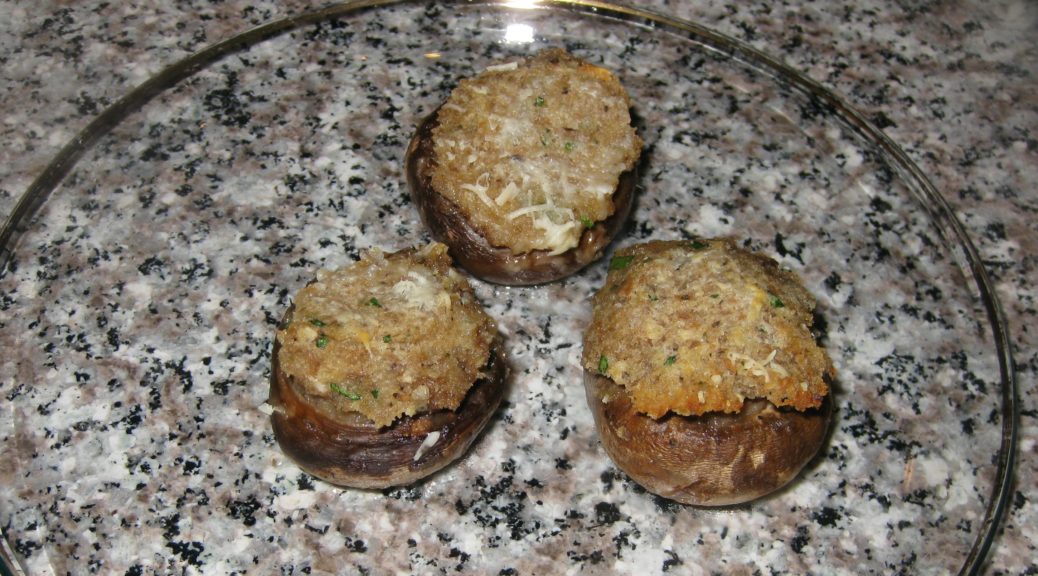
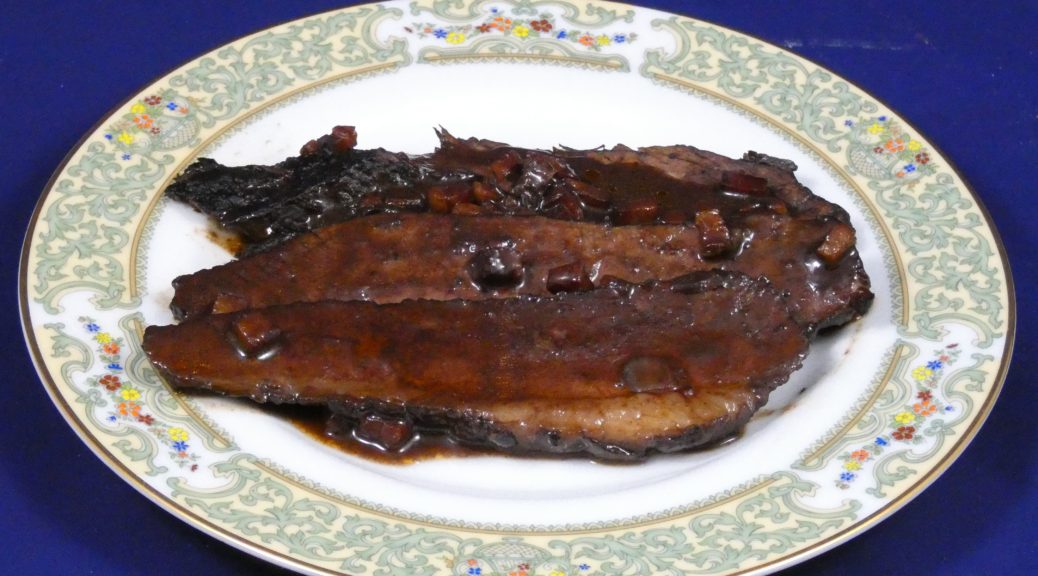
Polpette di Tonno (Tuna Croquettes)

6 March 2024

Polpette!

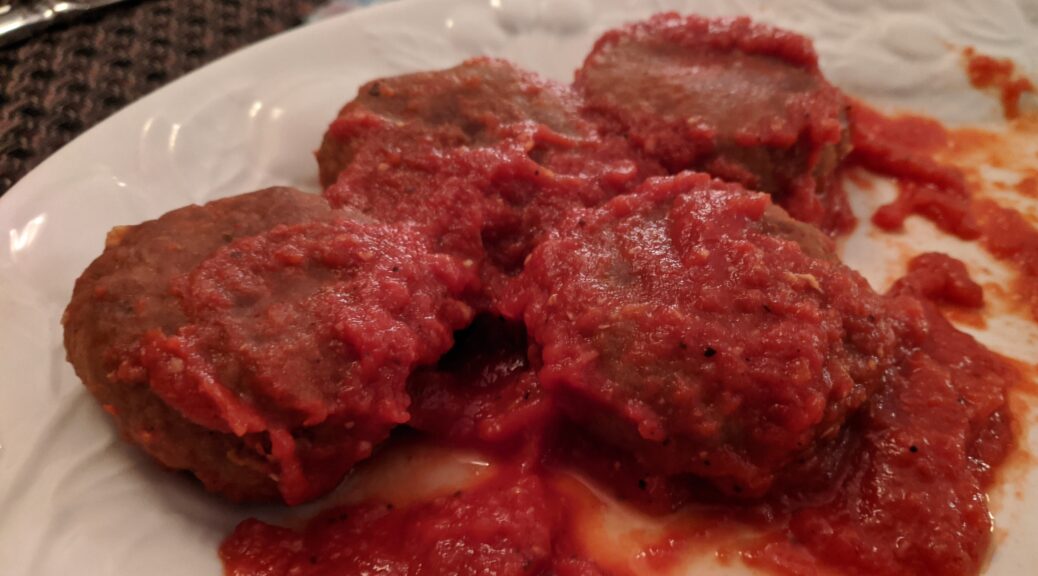
The usual translation of the Italian word polpette is “meatballs.”

But polpette are so much more.  Italians use the word polpette to refer to any “balls” made of chopped or ground up stuff including meat, fish, vegetables… you name it!

That leaves the translation a bit up in the air.  If the “balls” are made of meat I usually translate polpette as meatballs but if they’re made of other ingredients, as in this recipe, I usually translate it as croquettes.  Tuna meatballs just doesn’t sound right!  And eggplant meatballs is even worse!


Join our mailing list and you’ll never miss a recipe again!


By the way, the singular of polpette is polpetta but who ever had just ONE meatball… or croquette!

I have other polpetta recipes coming in future blog posts but in the meantime, if you’re up for more meatball recipes, take a look at these two:

Marisa’s Mystical Meatballs

Italian Wedding Soup

The meatball mixture in the Wedding Soup makes scrumptious meatballs that can be fried and then simmered in tomato sauce rather than put into soup!


Once again, I find myself apologizing for a prolonged absence from my blog.  I have been working diligently on my latest cookbook, due out this spring, called
Dispatches from Calabria: Eating My Way Through Culinary School in Italy.

In the meantime, if you haven’t seen my first book,
Mastering Artisan Italian Gelato: Recipes and Techniques,
you can read about it HERE.


In the typical progression of an Italian meal, these croquettes would be served as a “secondo,”  what we Americans might call the main course except that in a full-on Italian meal the secondo would be preceded with a “primo,” which is usually pasta, soup or a rice dish.  A secondo is usually accompanied by one or more side dishes, “contorni.”

You might consider starting a meal with:

Pear, Celery and Arugula Salad with Lemon Dressing

For a pasta course, any of these would go well:

Pasta with Silky Zucchini Sauce

Bowtie Pasta with Peas

Angel Hair Pasta with Crispy Breadcrumbs

Along with the croquettes, you could select from the following side dishes:

Argentine Marinated Eggplant

Roasted Sweet Peppers

Green Beans with Parmesan Cheese

Rapini with Olive Oil, Garlic, and Red Pepper

Happy eating!


Follow us on social media


Print Recipe
Polpette di Tonno (Tuna Croquettes)
This recipe is from the Italian region of Molise. It can be made with fresh tuna instead of canned, if you desire. Gently cook and flake the fresh tuna. You’ll need about 12 ounces of flaked tuna to equal the amount in two 7-ounce cans. Simmer the croquettes in a simple, meatless tomato sauce. If you need a suggestion, try my Basic Tomato Sauce. A link to the recipe in the Notes below.
Votes: 0
Rating: 0
You:
Rate this recipe!
Cuisine Italian
Prep Time 20 minutes
Cook Time 25 minutes
Passive Time 1 hour
Servings
people
Ingredients
Cuisine Italian
Prep Time 20 minutes
Cook Time 25 minutes
Passive Time 1 hour
Servings
people
Ingredients
Votes: 0
Rating: 0
You:
Rate this recipe!
Instructions
  1. Drain the tuna and squeeze out excess oil.
  2. Soak the bread in water. Squeeze out excess water.
  3. Combine all ingredients and mix with your fingers until you get a uniform mixture.
  4. Form into 14 portions.
  5. Roll into balls then flatten slightly.
  6. Dredge in flour then refrigerate one hour, if possible.
  7. Deep fry the croquettes then simmer in tomato sauce for about 10 minutes.
Recipe Notes

You can find the recipe for Basic Tomato Sauce HERE.

Copyright © 2024 by Gary J Mihalik. All rights reserved.

Share this Recipe

Spaghetti alla Carbonara

21 March 2023

Cacio e Pepe, Pasta alla Gricia, Spaghetti all’Amatriciana, and Spaghetti alla Carbonara are the Holy Quaternity of Roman pasta dishes.

The sauce for Cacio e Pepe is little more than Pecorino Romano cheese emulsified into some of the pasta-cooking water to make a glossy sauce.  Pasta alla Gricia adds cured pork, usually guanciale, to Cacio e Pepe.  Amatriciana adds tomato to Gricia while  Carbonara adds egg to Gricia.

And there you have it, arguably the four most important pasta dishes of Roman cuisine.

The origins of Spaghetti alla Carbonara are murky.  Given the obvious relationship between these four pasta dishes one might think that there’s not much to talk about, one just naturally leading into the other.  However, there is some intriguing evidence, and a little speculation, about the origins of Carbonara.


Join our mailing list and you’ll never miss a recipe again!


The evidence and speculation go like this.  During the Allied liberation of Rome during WWII, the bacon and (powdered) eggs of American GI rations were combined with pasta to make a proto-Carbonara.  Some Italians agree with this, and some do not.  Those who do not usually insist that the cured pork product of choice is guanciale (cured pork jowl) not pancetta (cured pork belly) let alone American bacon.

But think about it.  How likely is it that the Romans had any cured pork hanging around near the end of WWII?  It’s more likely that they consumed anything that was consumable by then.  The existence of guanciale in any significant quantity is unlikely.  In addition, the first reference to Spaghetti alla Carbonara appeared in the newspaper La Stampa in 1950, indicating it was a favorite of American GIs.

Of course, it’s entirely possible that Spaghetti alla Carbonara existed prior to WWII and was made with guanciale.  After the Allied liberation of Rome, it’s reasonable to see how GI rations of (powdered) egg and bacon could have been substituted for fresh eggs and guanciale.  It’s also possible, even probable, that if it existed before the 1940s, Carbonara wasn’t written about because it was part of the cuisine of the poor (cucina povera).  Despite our current fascination with traditional cuisine, until recently culinary history largely focused on foods eaten by the upper classes, not the poor.


Follow us on social media


Unless more evidence comes to light, we may never know the origins of Spaghetti alla Carbonara.  Even so, there are some things we can say definitively:

  1. Adding cream to Carbonara is an abomination!
  2. If not the original meat, American bacon has a legitimate place in the history of Carbonara.
  3. Carbonara is delicious, whether made with guanciale, bacon, or pancetta.  Yes, each is different but each is delicious!  I’ve used all of them.  I prefer bacon but I’ll never turn down a well-made dish (or three) of Spaghetti alla Carbonara regardless of what cured pork product went into it.

The most challenging part of making carbonara is to incorporate the eggs, getting them to thicken into a sauce without either remaining raw or turning into scrambled eggs.  I’ve got a little trick that eliminates these concerns.

Read on!

Print Recipe
Spaghetti alla Carbonara
Spaghetti alla Carbonara is one of the four classic Roman pasta dishes, along with Cacio e Pepe, Pasta alla Gricia, and Spaghetti all’Amatriciana. It can be made with guanciale, American bacon, or pancetta though guanciale and bacon probably have the greatest claim on tradition. My preference is bacon. If using guanciale, I sometimes decrease the amount by 10% because it usually has more fat than either bacon or pancetta.
Votes: 0
Rating: 0
You:
Rate this recipe!
Prep Time 15 minutes
Cook Time 20 minutes
Servings
people
Ingredients
Prep Time 15 minutes
Cook Time 20 minutes
Servings
people
Ingredients
Votes: 0
Rating: 0
You:
Rate this recipe!
Instructions
  1. Cut the bacon into matchstick-size pieces.
  2. Sauté the bacon in a dry sauté pan until some fat renders.
  3. Add the garlic and sauté until the garlic is quite golden, but not brown. Remove the garlic and reserve. If the bacon is not well browned, continue cooking.
  4. Meanwhile, combine the eggs, egg yolks, Pecorino Romano cheese, 2 teaspoons black pepper, and reserved cooked garlic in a blender jar. Reserve.
  5. When the bacon is brown, add the wine and remove from the heat unless you are adding the pasta immediately. The dish can be made several hours ahead to this point.
  6. Cook the spaghetti in salted water until just shy of al dente.
  7. Just before draining the pasta, reheat the bacon and cook off the wine.
  8. Add the pasta to the bacon and sauté on medium to medium-high heat.
  9. Add pasta-cooking water, about one ladleful at a time, and continue cooking the pasta, stirring frequently, until al-dente. There should be enough liquid to coat the pasta in a thick "sauce."
  10. Just as the pasta reaches al dente, turn on the blender. Blend the contents thoroughly and then add about 120 ml (½ cup) of the hot pasta cooking liquid while the blender is still running.
  11. Off the heat, add the blended egg mixture to the pasta along with the parsley, if using, and even more freshly ground black pepper.
  12. Mix well to turn the eggs into a creamy sauce, adding pasta-cooking water if needed. Taste and adjust salt and pepper.
  13. Pour into a warmed serving bowl and serve immediately.
Recipe Notes

Copyright © 2023 by Villa Sentieri, LLC. All rights reserved.

Share this Recipe

Focaccia Barese (Focaccia from Bari)

January 11, 2023

Never Explain.  Never Apologize.

Somebody famous once said that.

Well, according to Wikipedia, lots of famous people said that but the first, perhaps, is John Arbuthnot Fisher, a British Admiral of the Victorian and Edwardian eras.

I’m about to do both!

It’s been nearly a year since my last blog post.  And many months had elapsed between my next-to-last blog post and that one.  I’m sorry!

Semola Remacinata, the finest grind of durum wheat flour in Italy.

It amazes, and gratifies me, however, that during that long dry spell I continued to get messages from new readers of the blog and new subscribers to my emails.


Join our mailing list and you’ll never miss a recipe again!


Now let me explain.

Since August 2021 I have been working on a book about how to make artisan Italian gelato.  All the time that I would have devoted to testing recipes and writing blog posts, and more, went to testing recipes for and, ultimately, writing the book.

I sent the manuscript to the publisher on November 1st.  I’ve since revised the manuscript based on multiple rounds of feedback from the developmental editor.  The text is now undergoing line editing.  The photoshoot was completed a few weeks ago and photos were tentatively selected for the book.

A shot of the photoshoot for my upcoming book on artisan Italian gelato.

I’m anxiously awaiting options for page layout and cover design.  And not-so-anxiously awaiting feedback from the line editor.

Finding myself with more flexibility, I am planning on doing more baking than gelato-making for the next few months.  Winter in Palm Springs is the time to use the oven!

In fact, I had planned to make a coconut almond cake today, my second in less than two weeks.   My goal is to keep at it until I reproduce a taste memory of a coconut almond cake that I ate, one and only one time, in 1967 (or summer arrives in Palm Springs, whichever comes first).  It’s probably a fool’s errand but it is giving focus to my baking efforts.

My first coconut almond cake of the winter baking season.

Follow us on social media


A water leak last evening, while I was making dinner, means that the water to the house is shut off until the plumber gets here later today.  No water means no baking.  No baking means that I can repurpose my time to do my first blog post in nearly a year.

I promise to do my best to be more regular in posting.

Gelato alla Zuppa Inglese, one of over 75 gelato recipes in my upcoming book. This is an egg-based gelato studded with cake soaked in Italian Alkermes liquore and dark chocolate chips.

Now, let’s pivot to a recipe:  Focaccia Barese (Focaccia from Bari).

I like to serve homemade bread with dinner as much as possible.  This is a recipe that I turn to over and over to put a really tasty bread on the table with minimal active time and often little advance planning.

Print Recipe
Focaccia Barese (Focaccia from Bari)
Focaccia is a yeast-risen bread that is made from a dough that has such a high proportion of water that it is almost a batter. Crushed tomatoes as well as capers and/or olives are strewn on top. A good sprinkling of dried oregano and a few glugs of good olive oil round out the flavor. In Italy, flour made from durum wheat comes in three grinds: fine, medium, and coarse, called semola (or semola remacinata, meaning “twice ground”), semolina, and semolino respectively. I usually use semola imported from Italy for this bread. If buying domestic semolina (in English, we use the same word, regardless of the grind) look for one that is finely ground.
Votes: 0
Rating: 0
You:
Rate this recipe!
Cuisine Italian
Prep Time 25 minutes
Cook Time 35 minutes
Passive Time 3 hours
Servings
loaf
Ingredients
Cuisine Italian
Prep Time 25 minutes
Cook Time 35 minutes
Passive Time 3 hours
Servings
loaf
Ingredients
Votes: 0
Rating: 0
You:
Rate this recipe!
Instructions
  1. Put flour, semola, and yeast in the bowl of a stand mixer. Using the paddle, NOT the dough hook, begin to mix on low.
  2. Slowly drizzle in the water. When the water is fully mixed in, sprinkle in the sugar.
  3. Add the salt and beat on medium high you see strings of gluten form in the dough, approximately 4-5 minutes. The dough will get stretchy and if you pull a bit, it should look stringy.
  4. Drizzle in the extra-virgin olive oil and mix on medium until well combined.
  5. Cover the bowl with plastic wrap and allow to rise for about two hours.
  6. Meanwhile, drain the canned tomatoes through a sieve. If the tomatoes are whole, coarsely crush them by hand and allow to drain further. If you are using diced tomatoes, crushing is not needed.
  7. Oil a circular baking pan, 12” in diameter x 2” high with more extra-virgin olive oil.
  8. Pour in the dough. Lightly oil your fingertips and press into the dough, without stretching, until it is evenly spread out in the pan.
  9. Arrange crushed tomatoes, capers, and olives, if using, on top. Drizzle with more extra-virgin olive oil. Sprinkle with oregano.
  10. Cover the pan and allow to rise. If you have another baking pan of the same size, turn it upside down and use it as a cover. If not, invert a large bowl over the baking pan. Whatever you do, be sure there is some space above the rim of the pan so that the dough has room to rise.
  11. When the dough reaches the top of the pan, carefully transfer it to the oven so it doesn’t deflate.
  12. Bake at 375°F with convection (or 400°F without convection) for approximately 35 minutes, turning once or twice, until browned and just beginning to pull away from the sides of the pan.
  13. Cool the bread in the pan set on a rack before removing it.
Recipe Notes

Copyright © 2023 by Villa Sentieri, LLC. All rights reserved.

Share this Recipe

Ragù Bolognese: The Official Recipe

February 11, 2022

I’m a little more than halfway through a week’s visit to Bologna.  Bologna is referred to as la dotta, la grassa, la rossa: the learned, the fat, the red.

“The learned” relates to Bologna as the seat of the oldest university in the western world and the top-rated university in Italy.  It has a highly educated population.

“The red” refers to the color of the terra cotta tiles on many of the roofs.

“The fat” is well earned based on the food.  This is the land of mortadella, ragù Bolognese, tagliatelle, tortellini, lasagna al forno (aka lasagna Bolognese), prosciutto, parmigiano reggiano, and balsamic vinegar of Modena among other traditional, and dare I say, famous foods.


Join our mailing list and you’ll never miss a recipe again!


Let’s not forget gelato.  While I don’t think Bologna can claim title to the originator of gelato, they have perfected a style made with eggs that is consummately smooth.  A gelateria is often referred to as a cremeria in Bologna.

Tagliatelle al Ragu at at Osteria dell’Orsa in Bologna.

My main goal being here is to eat.  I want to taste some of the iconic foods of the region in the cathedral to food that is Bologna.  To that end, I’ve had dishes with ragù Bolognese three times in the last three days.  Though there were slight differences, the preparations tasted amazingly similar.  That got me to thinking about consistency.

I know that there’s an official recipe for Pesto alla Genovese which I reference in my post on pesto.  That got me to thinking about other official recipes.  After some internet sleuthing, I discovered that there’s an Italian Academy that, after substantial research, codifies and registers what it considers to be the official recipes for traditional dishes.  (Of course there is!  This is Italy.  Food is paramount.) Access to these recipes is quite limited.  (Of course it is!  This is Italy.  Food is rigorously protected.)


Follow us on social media


My primary culinary interest is traditional recipes.  Discovering the existence of this academy has been a revelation for me.  So much so that I decided to occasionally post their recipes, translated into English with notes on ingredients and techniques as appropriate to enable my readers to recreate the taste of the original.

So much of what passes for Italian food in the States is far from the original.

Lasagna al Forno (aka Lasagna Bolognese) at Trattoria Anna Maria in Bologna.

I’ll be quick to add that credible variations on these official recipes exist but the very existence of the official ones sets a standard of comparison.  Several years ago, I posted a recipe for Ragù Bolognese.  You will see the similarity.  The main differences in my version are a greater proportion of tomatoes and the absence of dairy.  It is a very good ragù, and one that I continue to make on a regular basis.  But today, I’m giving you the official recipe.

Enjoy!

(Photo: Erikatrioschi, CC BY-SA 4.0 <https://creativecommons.org/licenses/by-sa/4.0>, via Wikimedia Commons)

Print Recipe
Ragù Bolognese: The Official Recipe
Butchering in Italy produces different cuts from butchering in the United States. I’ve noted some US cuts of beef that would be appropriate based on the recommended Italian cuts. For those of you who want to try your hand at this, the original cuts of meat listed are cartella, panica, fesone di spalla, and fusillo. Broth in Italy is light. It is not an intensely flavored stock as might be common in much of French cooking.
Votes: 0
Rating: 0
You:
Rate this recipe!
Prep Time 15 minutes
Cook Time 2 1/2 hours
Servings
people
Ingredients
Prep Time 15 minutes
Cook Time 2 1/2 hours
Servings
people
Ingredients
Votes: 0
Rating: 0
You:
Rate this recipe!
Instructions
  1. Sauté the pancetta in a heavy-bottomed pot, approximately 7-8 inches in diameter (20 cm). Render as much fat as possible without browning the pancetta. A little gold color is fine.
  2. Add the olive oil or butter along with the carrot, celery, and onion. Sauté gently until softened, without browning, approximately 10 minutes.
  3. Add the beef and mix well. Sauté until it sizzles (that is, until all liquid has evaporated and the beef begins to cook in the fat).
  4. Add the wine and cook gently until it completely evaporates.
  5. Add the tomato puree. Season with salt and pepper. Cover and simmer for two hours, adding broth as needed when the ragù becomes too thick.
  6. During the last few minutes add the milk. This will counteract the acidity of the tomatoes.
  7. Taste and adjust the seasoning.
  8. If the ragù is going to be used for dried pasta (instead of fresh pasta or lasagna), it is customary to add the cream, otherwise not.
Recipe Notes

Copyright © 2022 by Villa Sentieri, LLC.  All rights reserved.

Share this Recipe

Pollo allo Scarpariello (Chicken Shoemaker Style)

October 8, 2021

Unappetizing pictures!

Sometimes really delicious food makes unappetizing pictures.

Take Chicken Scarpariello, for example.  By the time the chicken is unctuous, the potatoes creamy, and the sauce tangy the dish is unappetizingly brown (at least in a photograph).  I discovered this when looking at the photographs I had taken for this blog post.

This is really a shame because the taste is superb.

We’re several weeks into planting our new vegetable beds but these herbs have been going strong since March 2021. They were cut back drastically last week to encourage growth.

Brown food can be challenging to photograph, especially brown food in a brown sauce.  Food stylists might solve this problem by using barely cooked potatoes that look pale and peppers that are still yellow and green, not really cooked as required by the dish.  This doesn’t represent reality.  The dish, cooked properly, will never look like the photograph.  This is an approach that I think is inherently unfair.

I’m willing to admit that some of the problem relates to my picture-taking ability.  My photographic ability isn’t great but even that meager ability sometimes suffers because I’m hastily taking photographs as I’m trying to put the food on the table.


Follow us on your social media platform of choice


If I weren’t doing that, I could carefully plate a piece of chicken with the potatoes and peppers artfully arranged off to the side, lots of white space on the plate, and a few colorful garnishes or side dishes.  I could even wipe a little of the sauce off of the potatoes to make them lighter in color.  All this would mitigate the “brown problem” but it just isn’t practical because the food I post on the blog is something that I actually made to eat at the moment it is ready.

One of three vegetable beds beginning to sprout.  In the back, not in the bed, are four plants: rosemary, bay, chile pepper, and niepita.

I guess I could spend time carefully taking pictures and serve cold food but that approach wouldn’t last long in my household.

I could cook specifically for the blog and not worry about serving the food, at least not the day I cook it.  That would create a major leftover problem.  Besides, many dishes aren’t at their best when reheated.  On the other hand, many foods are better if made in advance.  So, I guess this is a partial solution to the problem that could work on a case-by-case basis depending on what the dish is.


Join our mailing list and you’ll never miss a recipe again!


I can think of other potential solutions but each has its problem.  This could include having a photographer arrange the plate and photograph it (presumably while I’m having dinner with the rest of the household).

We’re looking forward to a winter crop of tomatoes!

Alternatively, I could serve everyone then spend time arranging a plate to photograph, hoping to join the dinner table before everyone is finished.

I’ll keep working on a fix to the issue but, in the meantime, I encourage you to try this Italian-American dish.  It scales up easily so you can feed a crowd if you need to.  The leftovers are pretty incredible, too!

Greens for salad being started directly in the bed.

American websites, including the New York Times, usually say the name of this dish translates as Chicken Shoemaker Style.  However, you won’t find the word “scarpariello” in an Italian dictionary.  To be sure, the word “scarpa” means shoe but the Italian word for shoemaker is “calzolaio.”  Scarpariello, however, is the word for shoemaker in the Neapolitan dialect, which gives a clue as to which immigrant group might have been responsible for creating this Italian-American favorite.

Print Recipe
Pollo allo Scarpariello (Chicken Shoemaker Style)
Scarpariello means shoemaker in the Neapolitan dialect. This may give a clue as to the origins of this Italian-American favorite. The dish builds on a classic combination in the cooking of many regions of Italy: chicken cooked with wine and vinegar. The capers are optional. Use sweet or hot pickled peppers as you prefer or, if you want to spice it up, add some crushed red pepper when sautéing the garlic. If you don't have a stove-to-oven pot large enough to hold all the ingredients, do the browning in a large saute pan then assemble everything in a large baking dish.
Votes: 0
Rating: 0
You:
Rate this recipe!
Course Mains, Poultry
Prep Time 30 minutes
Cook Time 2 1/2 hours
Servings
people
Ingredients
Course Mains, Poultry
Prep Time 30 minutes
Cook Time 2 1/2 hours
Servings
people
Ingredients
Votes: 0
Rating: 0
You:
Rate this recipe!
Instructions
  1. Dredge the chicken in flour. Reserve.
  2. Peel the potaotes and cut in large chunks.
  3. Cut the Bell peppers in triangles
  4. Cut the onions in eighths
  5. In a large stove-to-oven pot, heat the olive oil. Brown the chicken, sausage, and potatoes. Do this in batches, if necessary.
  6. Remove everything from the pot. Cut the cooked sausage into 1 ½ inch long pieces.
  7. Add the garlic to the oil remaining in the pot and sauté until it is fragrant and golden.
  8. Add the bell pepper and onion, season with salt, and sauté until the onion is beginning to soften and turns gold and brown in spots.
  9. Add the rosemary and bay leaves and sauté briefly.
  10. Add the wine and deglaze.
  11. When wine is almost completely evaporated, return chicken, sausage, and potatoes to the pot along with any accumulated juices.
  12. Add about 1 cup of chicken broth and the vinegar along with the pickled peppers. Season well with salt, pepper, and oregano.
  13. Bring to a boil, cover, and put in the oven at 350°F.
  14. An hour later, stir the contents of the pot. Add the drained artichoke hearts and capers, if using. Add more broth if needed to keep the contents from sticking. Adjust the seasoning.
  15. Cook for another hour until chicken is very tender and potatoes are cooked through.
  16. Stir in parsley and serve.
Recipe Notes

Copyright © 2021 by Villa Sentieri, LLC. All rights reserved.

Share this Recipe

Funghi Ripieni (Stuffed Mushrooms)

September 29, 2021

“Your grams are killing me!”

That’s what a friend told me recently regarding some of the recipes on my blog.

His comment came as he was considering how much pasta to cook for dinner.  I repeated what Great Aunt Fidalma told me:  80 grams per person.

Making the change to the metric system (International System or SI) of measurement isn’t easy and we don’t do much as a country to catalyze the change.  In some areas, though, we’ve made the transition.

The digital scale I use on a daily basis. I also have two battery powered scales that are just as accurate that cost $20 each.

Have you looked carefully at a wine or liquor bottle recently?  The contents are specified in the metric system even as we continue to refer to a bottle of liquor as a “fifth.”  Until January 1979, a liquor bottle, indeed, held one-fifth of a US gallon, approximately 757 ml.  Standard liquor bottles now contain 750 ml, just a smidge less.


Join our mailing list and you’ll never miss a recipe again!


Cooking, and especially baking, is much easier with the metric system.  And that doesn’t even take into account the ease of weighing ingredients rather than trying to measure cups and fractions of cups.

I find that I am frequently scaling recipes up and down, but usually up.  If the recipe calls for 3/4 cup of water, and I’m upscaling by 20%, I end up with the unwieldy amount of 9/10 cup of water.  If I were using metric measures, I’d be starting with something like 180 ml and increasing by 20% to get to 216 ml which is much easier to measure out than 9/10 of a cup.

The manual scale that I used for many years. It has since been mothballed.

Let’s face it, how do you measure 9/10 cup.  You first start by determining what 1/10 cup is, which is 1.6 tablespoons.  Multiplying that by 9 gets you 14.4 tablespoons.  But since you’re not going to measure out that many tablespoons one by one (and you’re likely to get pretty inaccurate after a few tablespoons, if you do) you work backwards to figure out what standard measure comes close.  That gets you back to the 3/4 cup (12 tablespoons) you started with plus 2.4 tablespoons.

For most purposes, you can treat 2.4 tablespoons as if it were 2.5 tablespoons since the difference is likely within the margin of error for measuring with kitchen equipment.  But unless you have a set of measuring spoons that contains a 1/2 tablespoon measure, you’ll be measuring out 2 tablespoons plus 1 teaspoon plus 1/2 teaspoon… if you can remember how many teaspoons are in a tablespoon.

So rather than just pouring 215 ml into a measuring cup (a reasonable approximation for 216 ml and one that can be found marked on some metric measuring “cups”) you’d be measuring out ¾ cup plus 2 tablespoons plus 1 teaspoon plus 1/2 teaspoon.  In my book, that’s crazy!


Follow us on your social media platform of choice


It gets even easier if you give up the notion of measuring by volume and measure everything by weight, even liquids, as is typically done in professional kitchens.  You can get a very accurate scale for less than $20.  With that, you could weigh out the 216 grams of water (equivalent to 216 ml of water) and call it a day:  no guessing, no eyeballing, no complex calculations needed.

For weighing small quantities this little scale can’t be beat for accuracy.

So really, what’s holding you back from giving the Metric System a go?

It’s time for me to get off my soapbox (for now) and actually cook something.  How about stuffed mushrooms?  I’ll even write the recipe in American measures!!

Print Recipe
Funghi Ripieni (Stuffed Mushrooms)
These stuffed mushrooms come together quickly and can be made early in the day and refrigerated until it’s time to pop them in the oven.
Votes: 0
Rating: 0
You:
Rate this recipe!
Prep Time 20 minutes
Cook Time 35 minutes
Servings
people
Ingredients
Prep Time 20 minutes
Cook Time 35 minutes
Servings
people
Ingredients
Votes: 0
Rating: 0
You:
Rate this recipe!
Instructions
  1. Wipe the mushrooms with a damp cloth.
  2. Remove the stems.
  3. Finely grind the stems in a food processor.
  4. Sauté the ground stems in the butter with a pinch of salt until the liquid is drawn out and then completely evaporated.
  5. Mix the cooked stems with the breadcrumbs, eggs, parsley, garlic, oregano, and salt and pepper to taste.
  6. Cool slightly and add 3 tablespoons Parmesan cheese.
  7. Butter a baking dish large enough to hold the mushroom caps in a single layer, snugly.
  8. Fill each mushroom cap with some of the stuffing mixture.
  9. Arrange the stuffed mushroom caps in the buttered dish.
  10. Sprinkle with additional Parmesan cheese, dot with butter and add a small amount of broth or water to the bottom of the dish to keep the mushrooms from sticking.
  11. Bake at 375°F for 20 minutes, until golden brown on top.
  12. Baste occasionally with the liquid in the pan during baking.
Recipe Notes

Copyright © 2021 by Villa Sentieri, LLC. All rights reserved.

Share this Recipe

Sformato di Zucchini (Italian Zucchini Bake)

September 15, 2021

A lot has happened in the seven months since my last blog post.  I’m sure you’ll understand why I haven’t posted in a while.

We’re no longer in Santa Fe!

That’s right, we’ve moved full time to Palm Springs, California.

An aerial view of the “new” Villa Sentieri, foreground, with the hiking trail just beyond, that prompted the name of the Villa.

It was, and remains, exceedingly difficult to have left all our close friends in Santa Fe but Palm Springs called to us.


Join our mailing list and you’ll never miss a recipe again!


We get two growing seasons each year.  Since we’re just a few hundred feet above sea level, I don’t need to be concerned about testing recipes at high altitude.  The weather is pretty darn great, too!

The variety of what we can grow here is amazing.  We have ten citrus trees, three fig trees and an apricot tree.  We’re considering adding a pomegranate tree.  We have table grapes trellised up a side wall.  There are four raised beds for herbs and vegetables.

Frank grew the most awesome tomatoes this year.  I have quite a stash of homemade passata (tomato puree) in the freezer.

Naso di Cane (Nose of the Dog) peppers from Calabria. Seeds I brought back in 2019 just got planted in our garden in Palm Springs. I’m hoping to make “Olio Santo” (Holy Oil, aka Hot Chile Oil) in a few months.

The timing of our seasons takes a bit of getting used to.  Our first season pretty much ended in June.  That’s probably the time that most of you were just getting started with your gardens.  Though the herbs have continued to grow through the summer heat, all the vegetables were done by the end of June.


Follow us on your social media platform of choice


Right now we have an abundance of fresh limes.  The other citrus trees have fruit but it won’t be ripe for a few more months.

The vegetable beds sat fallow for the summer.  Just a few days ago, Frank planted them with seeds for what will be our second harvest of the year.  That will take place in November and December.

The “new” Villa Sentieri has an interior atrium with a koi pond filled with 17 koi.

Though we’re not harvesting vegetables at the moment, this is the perfect time for zucchini in most of the country.  When there’s an abundance of zucchini, sformato is the answer.

Print Recipe
Sformato di Zucchini (Italian Zucchini Bake)
This was the first item that I cooked with Zia Fidalma at her home in Tuscany in August 2019. Green beans, cut in small pieces, can be prepared the same way except the beans are boiled and not sautéed. A combo of beans and zucchini is also possible. Zia does not usually add herbs to her sformato but since she had some niepita she added it. Though you’re not likely to have niepita (aka mentuccia romana), unless you grow your own, adding a small amount of marjoram or oregano is a welcome addition. If you don’t have fresh herbs, use a light sprinkling of dry herbs. In any case, herbs are totally optional.
Votes: 0
Rating: 0
You:
Rate this recipe!
Cuisine Italian
Prep Time 20 minutes
Cook Time 2 hours
Servings
people
Ingredients
Cuisine Italian
Prep Time 20 minutes
Cook Time 2 hours
Servings
people
Ingredients
Votes: 0
Rating: 0
You:
Rate this recipe!
Instructions
Besciamella
  1. In a small heavy-bottomed saucepan, melt the butter.
  2. Add the flour and sauté briefly until the raw smell is gone. Do not brown the flour.
  3. Add the milk a little at a time, stirring well after each addition to avoid lumps.
  4. After all the milk has been added, bring the mixture to a boil, stirring constantly and scraping the bottom of the pan. Boil for one minute.
  5. Remove from the heat and stir in the nutmeg.
  6. If not using immediately, pour the besciamella into a heat-proof bowl and cover with plastic wrap touching the surface to avoid the formation of a skin.
  7. Refrigerate if the besciamella will not be used within an hour or two.
Sformato
  1. Do not peel the zucchini. Cut off the stem ends and slice the zucchini lengthwise about 3/16 inch thick then crosswise the same thickness to make thick matchsticks.
  2. Sauté the garlic in the olive oil until fragrant.
  3. Add the cut zucchini, chopped flowers and minced niepita if using. Season with salt and pepper and sauté briskly until just barely tender.
  4. Mix the cooked zucchini with the besciamella, nutmeg, and Parmigiano.
  5. Stir in the eggs after the mixture is cool enough to not cook the eggs.
  6. Taste and adjust salt and black pepper.
  7. Butter a baking dish, approximately 7 ½” x 11”.
  8. Sprinkle the buttered dish with fine dry breadcrumbs.
  9. Pour the zucchini mixture into the prepared baking dish. It should be about ¾ inch thick.
  10. Bake at 400°F till very brown on top, approximately 90 minutes. Cool 10 minutes before cutting.
  11. Serve warm or at room temperature.
Recipe Notes

Copyright © 2021 by Villa Sentieri, LLC. All rights reserved.

Share this Recipe

Olive Oil Cake (Torta all’Olio d’Oliva)

January 27, 2021

“Can’t you come up with another name?”

That was my husband’s response when I said I was going to post a recipe for olive oil cake.

I suggested the Italian, Torta all’Olio d’Oliva.  He wasn’t amused.

I guess he thinks the idea of olive oil in cake isn’t appetizing.

Nonetheless, the cake is a staple in regions surrounding the Mediterranean Sea.  And a delicious one, at that!

Oranges at a biodynamic citrus grove in Calabria near the Italian Culinary Institute

There are endless variations.  Some are thin, barely an inch tall.  Some are savory-sweet.  Some barely reveal the presence of olive oil.  Others proclaim the flavor of olive oil loudly.  Some are good for snacking (with tea or coffee).  And a few are actually good enough to serve for dessert with no embellishment.


Join our mailing list and you’ll never miss a recipe again!


Then there’s the olive oil to consider.  Even among really good extra-virgin olive oils, and I do suggest you use really good extra-virgin olive oil, there is a range of flavor profiles.  Words like grassy, bitter, peppery, fruity, and buttery come to mind.

Which you use will influence the flavor of the cake.  All will be good but some may be more to your liking than others.

Freshly grated orange zest is key to the flavor of this olive oil cake

Honestly, though, does the world need another recipe for Torta all’Olio d’Oliva?

That’s a rhetorical question, right?

I mean, really, we wouldn’t ask if the world needed another recipe for chocolate cake.  We’d just lean into it and make it happen.

If you’ve never had olive oil cake, and if you like to bake, I suggest giving this version a try.  It has a moist crumb, crunchy top (from brown sugar), and a hint of orange from orange zest and orange liqueur.


Follow us on your social media platform of choice


This cake is suitable as dessert, not just snacking.  It’s not going to be a spectacle of a dessert, like the Maraschino Cherry Cake I made from the first edition Betty Crocker Picture Cookbook, but I believe it will surprise many of your guests with just how good it is.

Large crystals of brown sugar, such as Turbinado or Zucchero di Canna add crunch to the top of the cake

Now for the apology:  I prefer to cook, and I DEFINITELY prefer to bake, using the metric system.  It’s just so much easier to scale recipes up and down.  Also, among professional bakers, most ingredients are weighed, even liquids.  Without a scale that measures in fractions of a gram, however, it is not practical to weigh small amounts of ingredients like baking powder and salt.  For these, I stick to teaspoons and tablespoons when I publish recipes though I often weigh these ingredients, too.  Remember, though, that a standard teaspoon is now treated as if it were 5 ml, and a tablespoon 15 ml, even though both are just a smidge less, at least in America.

We picked a few oranges for a course on preserves at the Italian Culinary Institute

Although the recipe app will convert metric measures to non-metric, I’ll be happy to supply anyone with ingredient quantities in the typical volume-based American system upon request.

Print Recipe
Olive Oil Cake (Torta all’Olio d’Oliva)
This is a cake which definitely benefits from sitting, tightly covered, at room temperature for two days before serving. The flavors mellow and the olive oil diffuses throughout the cake. For the topping, use a brown sugar that is not soft and moist but rather granular. Use a good quality orange liqueur such as Arancello (sometimes called orangecello in the United States) or Grand Marnier.
Votes: 0
Rating: 0
You:
Rate this recipe!
Cuisine Italian
Prep Time 20 minutes
Cook Time 60 minutes
Passive Time 2 hours
Servings
people
Ingredients
Cuisine Italian
Prep Time 20 minutes
Cook Time 60 minutes
Passive Time 2 hours
Servings
people
Ingredients
Votes: 0
Rating: 0
You:
Rate this recipe!
Instructions
  1. Oil a 9” springform pan with olive oil.
  2. Cover the bottom with parchment and oil the parchment.
  3. Sprinkle the pan with sugar and dump out the excess. Even if you spread out the oil precisely it will tend to bead up, unlike butter, so there will be some sugar clumps. Don't be concerned.
  4. Combine the flour, cornmeal, baking powder, baking soda and salt. Mix well and reserve.
  5. Combine the liqueur, lemon juice and vanilla. Reserve.
  6. In a planetary mixer, using the whisk, beat the sugar, eggs and orange zest on high speed until thick and ribbon-like, approximately 3-4 minutes.
  7. Still on high speed, slowly drizzle in the olive oil and beat until fully incorporated.
  8. The batter should get thicker.
  9. On low speed, add the flour mixture, in three additions, alternating with the liquid mixture, in two additions, starting and ending with flour. Scrape the bowl once or twice to ensure an even mix.
  10. Pour into the prepared springform pan.
  11. Sprinkle the top with brown sugar.
  12. Bake at 350°F until brown, firm on top, and a cake tester comes out clean; approximately 60 minutes. Do not underbake the cake or it will fall as it cools.
  13. Cool the cake for 15 minutes in the pan then poke the top all over with a skewer.
  14. Drizzle 2 tablespoons of olive oil on the cake and allow it to absorb.
  15. Remove the side of the pan and cool completely.
  16. When the cake is cool, remove it from the base of the springform pan. Wrap it in plastic and allow to rest at room temperature for at least one day, preferably two, before serving.
Recipe Notes

Copyright © 2021 by Villa Sentieri, LLC. All rights reserved.

Share this Recipe

Brasato al Barolo (Beef Braised in Red Wine)

January 21, 2021

Pre-pandemic my husband randomly chose a region of Italy.  Most of our meals for the month were traditional foods of that region.

In response to the pandemic, I reduced my marketing, with rare exception, to one supermarket trip once a week.  Obtaining the ingredients to create very specific regional Italian cuisine became difficult with such a shopping regimen.  Meal planning, though still Italian, reverted to dishes for which I could obtain the necessary ingredients at the supermarket supplemented by deliveries from Amazon.

Home-cured pancetta diced and ready to be cooked. Good quality pancetta can be purchased. Be sure to have it sliced thickly.

Amazon is my source for Italian flour, several types of which I use for making pasta, bread, pizza and cake.  Carnaroli rice can be difficult to obtain under the best of circumstances but is available on Amazon.  Some of the ingredients for gelato are impossible to find in retail shops making Amazon the go-to source.

Other items, like specific types of cheeses or cured meats or olives, can only reasonably come from local retail markets.  The same is true for produce and an array of other ingredients.  One marketing trip a week to a general supermarket made it impossible to gather many of the required ingredients so the one-region-a-month-cooking-and-eating regimen fell victim to the pandemic, at least temporarily.


Follow us on your social media platform of choice


I made food from Piemonte (Piedmont) while our region-a-month plan was still active.  Piemonte has cows, so beef and dairy figure prominently in the cuisine.  Piemonte is also home to Barolo, among other wonderful wines.

Piemontese food does not shy away from calories or flavor!

This dish makes use of two of the stars of Piemontese cuisine, beef and wine.  The most traditional recipes call for a whole filet.  The wine is traditionally Barolo.

Fresh bay leaves have tremendously more aroma than dried ones.

There was a time when Barolo was affordable.  It is no longer a budget-friendly wine and certainly not one that I would use to braise beef in, even if it’s filet.  If you’re interested in how Barolo became so well-known, watch the movie Barolo Boys.

It’s rare to find a modern recipe that simply specifies Barolo as the red wine.  Even when the traditional name of the dish, Brasato al Barolo, is used, the wine is rarely Barolo.  Calling this Brasato al Vino would be more accurate but that name doesn’t really convey the historic context of the dish.


Join our mailing list and you’ll never miss a recipe again!


I’ve made this with filet that I dutifully larded with my home-cured pancetta.  While the taste was good, the texture of filet after braising was not good, even with the larding.

After that first attempt, I decided to use a cut more commonly used for long, slow, moist cooking even if it was not as high-brow as filet.  Once I made that decision, I started doing recipe research that stretched beyond my several very traditional multi-volume sets of Italian regional cuisine published in Italy in Italian.  I discovered that other (iconoclastic English-speaing) cooks had made the same shift to “lesser” cuts of meat.

I particularly like brisket that’s been braised though a nicely marbled chuck roast would work too.

Fresh sage leaves are better than dried when it comes to flavor.

The dish was a hit when made with brisket.  Truth be told, the family didn’t care to ever have it again when I made it with filet.  With the textural change from the brisket it’s become part of our standard menu rotation.

This is a perfect dish for winter.  It’s great for entertaining as it is actually better if made the day before and reheated just before serving.

Oh, and if you actually make it with Barolo, please invite me to dinner!

Print Recipe
Brasato al Barolo (Beef Braised in Red Wine)
Since Barolo is so expensive, most contemporary recipes call for another full-bodied red wine. I have used Zinfandel as well as an Argentine wine that was 60% Merlot and 40% Syrah with great success. The meat can be served without refrigerating first but refrigeration makes it easier to get neat slices. If not refrigerating, pour the hot sauce on the sliced meat and serve immediately. If you don’t have a stash of garlic oil on hand, smash two cloves of garlic and sauté in the olive oil until golden then remove the garlic.
Votes: 0
Rating: 0
You:
Rate this recipe!
Course Mains, Meats
Cuisine Italian
Prep Time 30 minutes
Cook Time 4 hours
Passive Time 24 hours
Servings
people
Ingredients
Course Mains, Meats
Cuisine Italian
Prep Time 30 minutes
Cook Time 4 hours
Passive Time 24 hours
Servings
people
Ingredients
Votes: 0
Rating: 0
You:
Rate this recipe!
Instructions
  1. Combine beef with the onion, carrot, celery, garlic, and wine. Cover and refrigerate overnight.
  2. The next day, remove the beef and wipe dry.
  3. Strain the marinade. Reserve the solids and liquid separately.
  4. Dredge the beef in flour.
  5. Sauté pancetta in garlic oil over low heat until it renders its fat and browns. Remove pancetta and reserve.
  6. Brown the beef in the rendered fat. Remove the beef.
  7. Add the vegetables to the pan and sauté until softened and the onions are translucent.
  8. Add the tomato paste. Sauté the tomato paste briefly to darken and sweeten it.
  9. Add the reserved marinade to the pan along with the bay leaves, cloves, rosemary, sage leaves, cinnamon, juniper berries and peppercorns. Bring to a boil, scraping up any browned bits.
  10. Add the beef. Season with salt. Braise till tender, partially covered, approximately 3 hours.
  11. Remove the beef and refrigerate, tightly covered.
  12. Strain the braising liquid. Discard the solids and refrigerate the liquid.
  13. When the beef is cold, slice it against the grain and put in an ovenproof pan or casserole.
  14. Skim the chilled braising liquid.
  15. Heat the de-fatted braising liquid with the reserved fried pancetta.
  16. When the braising liquid comes to a boil, remove from heat and add the Marsala. Pour the liquid over the beef, cover the pan, and heat at 350°F for approximately 1 hour.
Recipe Notes

Copyright © 2021 by Villa Sentieri, LLC. All rights reserved.

Share this Recipe

Carciofi e Patate (Artichokes and Potatoes)

January 13, 2021

January 7th is International Porchetta Day.

It was declared so by the participants in a charcuterie class at the Italian Culinary Institute in January 2019.

There is a private Facebook group of individuals who subscribe to the cult of porchetta.  We agree to make porchetta annually on January 7th.

The charcuterie class in question began on January 7, 2019, one week before my three-month Master of Italian Cuisine course began.  I made a point of getting to Italy early, really early, as I didn’t want to find myself in class with a sharp knife in my hand the day after landing, jetlagged from a 29-hour trip and an eight-hour time change.

A traditional porchetta at a street fair in Bagni di Lucca.

I arrived the evening of January 8th, almost a week before my course started. I was invited to go to dinner with the charcuterie class.  I described that first chaotic day in my first dispatch from Calabria.


Join our mailing list and you’ll never miss a recipe again!


The next day, Chef John invited me to sit in on the charcuterie class.  Although not officially part of the class, I shared meals and course time with the group.

When International Porchetta Day was declared, with the date matching the first day of the charcuterie course, I became a member.

Traditionally porchetta is made with a whole pig, and not a small suckling pig, but a BIG one!

Roasted cauliflower is an easy and dramatic side dish.

When porchetta is made at home, it’s done with a smaller cut of meat.  I use the shoulder, aka Boston Butt.  At the Italian Culinary Institute, they use two cuts, the capo collo and a pork belly.  The capo collo is a long muscle group in the shoulder that, in essence, is a large cylinder.  The shoulder, and by extension the capo collo, contain beautiful marbling that makes a luscious roast.

At the Italian Culinary Institute, the belly is rolled around the capo collo.  The fat of the belly protects the capo collo.  It also makes a beautiful presentation.  It also adds about 8 pounds to the weight of the roast.  So, unless you’re cooking for a very large crowd, using the shoulder alone will more than likely be ample.

Given the limitations of the lock-down in Palm Springs where I’ve been sheltering in place, six of us, members of our COVID Pod, celebrated International Porchetta Day.

My porchetta ready for the serving platter.

Porchetta was obviously the centerpiece of the meal and I made my traditional version.  Here’s a link to my Porchetta recipe.

I focused on side dishes that would compliment the roast and settled on a whole roasted cauliflower and a Roman dish called Carciofi e Patate (artichokes and potatoes).  For dessert we had an Olive Oil Cake.


Follow us on your social media platform of choice


Carciofi e Patate is traditionally made with whole artichokes, lots of them!  In season, one can buy 12 artichokes for €1 in Italy!  That’s right, about 10¢ each!!! I once used 12 artichokes when I made the dish as part of Easter Dinner.  I spent more than $50 on artichokes for that one dish.  Clearly when Italians describe the dish as “economical” they have no idea about artichoke prices in the United States.

Artichokes in a market in Calabria.

While I prefer the dish made with fresh artichokes, I won’t do that again until I’m in Italy during artichoke season.  Frozen artichokes work well and are much more budget-friendly.

Print Recipe
Carciofi e Patate (Artichokes and Potatoes)
Carciofi e Patate is a classic Roman recipe. It pairs well with most roasts.
Votes: 0
Rating: 0
You:
Rate this recipe!
Prep Time 20 minutes
Cook Time 45 minutes
Servings
people
Ingredients
Prep Time 20 minutes
Cook Time 45 minutes
Servings
people
Ingredients
Votes: 0
Rating: 0
You:
Rate this recipe!
Instructions
  1. Peel potatoes and cut in 8 wedges unless the potatoes are very large or very small.
  2. Brown the potatoes in the three tablespoons of extra-virgin olive oil in a large sauté pan over high heat.
  3. When the potatoes are well-browned, reduce the heat to medium. Add half the onions and garlic.
  4. Sauté until the onion is golden.
  5. Season with salt and freshly ground black pepper to taste. Add approximately ½ cup of water. Cover and cook on medium heat until cooked through, adding more water as needed, approximately 25 minutes. There should be no water left when the potatoes are cooked.
  6. Meanwhile, sauté the remaining onions and garlic in the remaining extra-virgin olive oil in a sauté pan.
  7. When the onions are golden, add the artichokes and salt and pepper to taste. Sauté briefly.
  8. Add white wine, cover and braise until barely tender, approximately 10 minutes. The artichokes will cook further with the potatoes so do not over-cook them.
  9. Add artichokes to the pan with the potatoes.
  10. Sauté, uncovered, about 10 minutes longer, to meld flavors. Adjust salt and pepper.
  11. Stir in parsley and serve.
Recipe Notes

Copyright © 2021 by Villa Sentieri, LLC. All rights reserved.

Share this Recipe