Spiedini (Italian Skewered Meat and Vegetables)

November 20, 2019

Spiedini means skewers.  By extension it also refers to food cooked on skewers.

Zia Fidalma’s spiedini ready to be served. The extra cut-up vegetables were roasted along with the spiedini.

There is evidence that humans cooked food on skewers as far back as 300,000 years ago in an area that is encompassed by present-day Germany.

It’s an ancient cooking method.  So, it’s not surprising that food cooked on skewers is found almost everywhere.

Zia Fidalma cutting sausage for spiedini at her home in Benabbio.

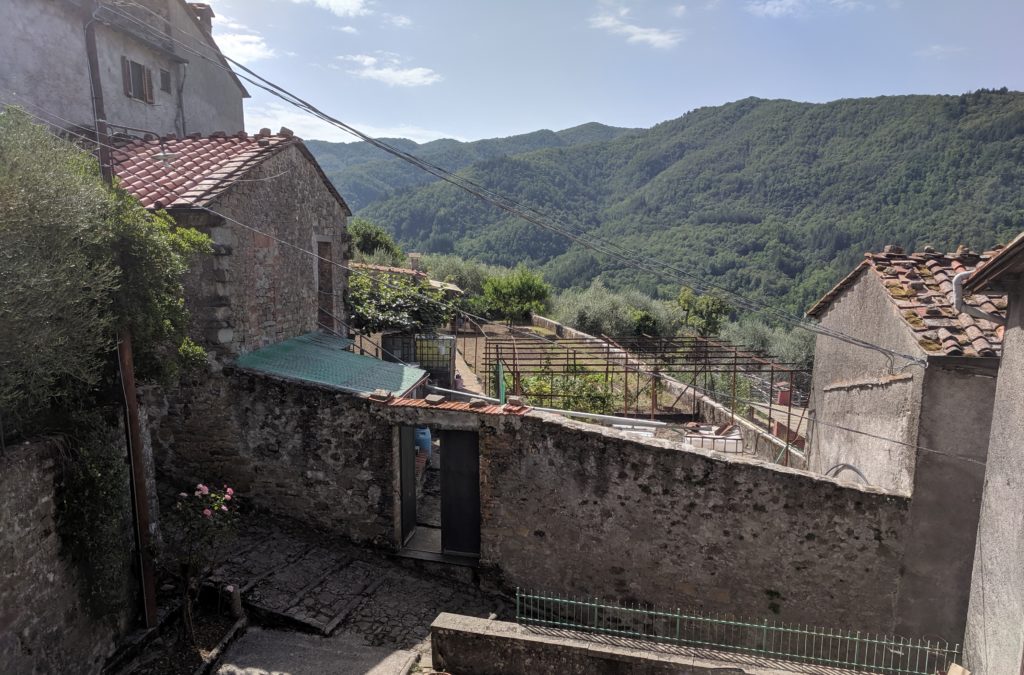
During my month of cooking in Tuscany with Zia Fidalma this past August, spiedini were on the lesson plan.

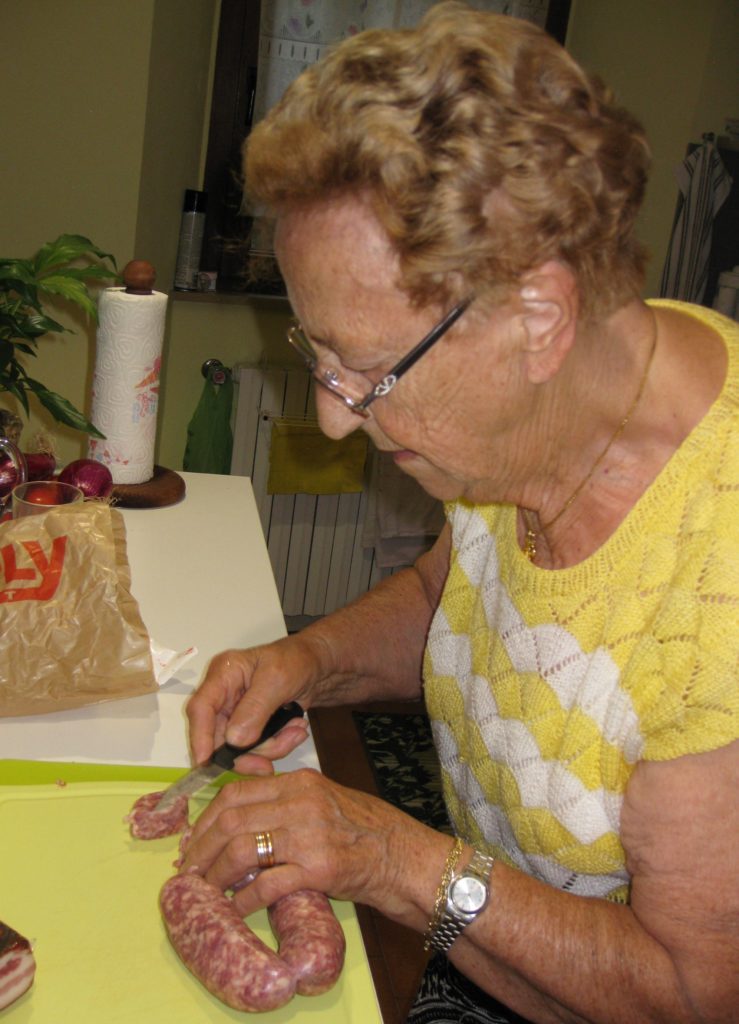
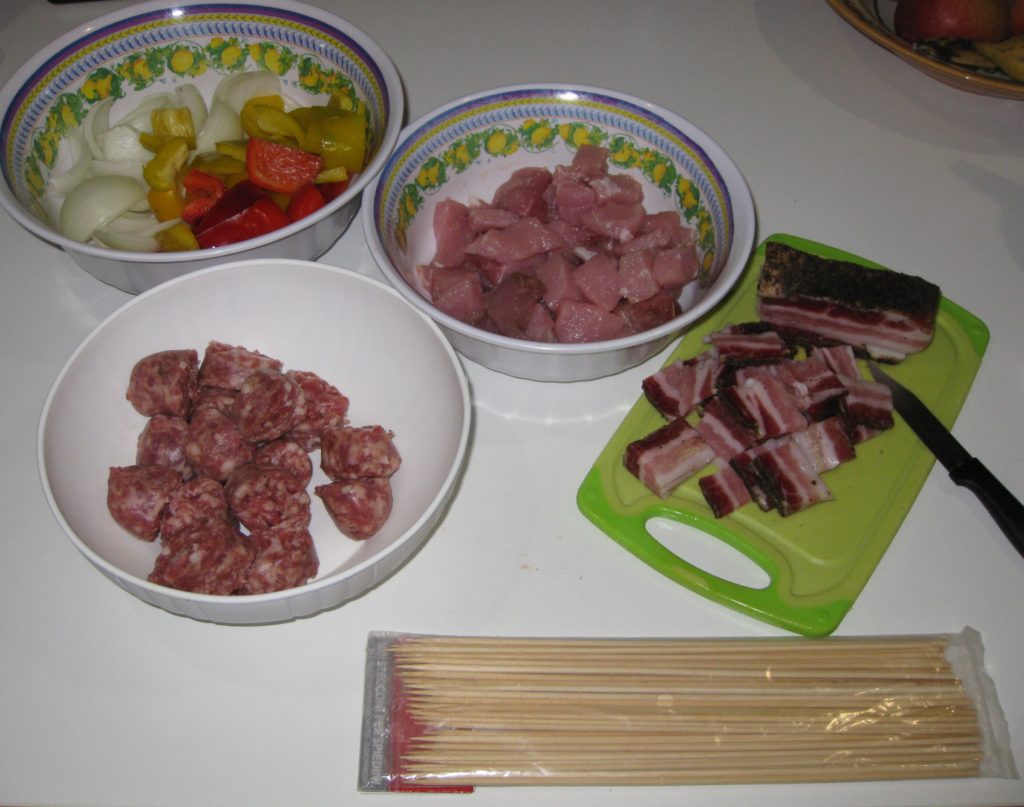
But first, there was the shopping.  Onions and peppers came from the weekly market in Bagni di Lucca.  Pork and sausage came from her favorite local butcher.  Pancetta tesa came from yet another vendor.  The pantry staples, including olive oil from her own olive grove, were on the ready at home.


Join our mailing list and you’ll never miss a recipe again!


The sausage that Zia Fidalma used is Salsiccia Toscana, Tuscan Sausage.  It does NOT have fennel seed.  What it DOES have appeared to be a mystery, at least temporarily.

Pancetta Tesa produced in the Garfagnana area of Tuscany.

Butchers in Italy who make it say they don’t know because they buy the spice mix from a company.  Whether or not this is completely true is also unknown, to me at least.  Requests from friends and family in Tuscany also came up empty-handed.

A Google search, in Italian, turned up more useful information.  As expected, there is a range of ingredients.  Every recipe has salt and pepper.  Most have garlic (minced, chopped, or in one recipe, rubbed on one’s hands before one mixes the sausage!).  Many have a bit of wine, both white and red are called for.  I found one recipe that indicated that finely minced sage could be added if desired but NOT fennel!

Ingredients ready to be skewered in Zia Fidalma’s kitchen.

So, basically, Tuscan sausage is very sparingly flavored with salt, pepper, garlic and maybe a bit of wine.

For a traditional Tuscan taste for these spiedini, purchase (or make) an “Italian” sausage without fennel and without red pepper or paprika.  (Note, there is no such thing as “Italian” sausage in Italy.  Like most foods in Italy, sausage is hyper-local and varies from region to region, province to province, and often town to town.)

Zia Fidalma’s spiedini ready to be cooked.

Nobody is going to complain, however, if you use sausage with fennel seed as I had to do when I was unable to find sausage without fennel after trying four markets in Santa Fe.


Follow us on your social media platform of choice


Pancetta tesa (sometimes called pancetta stesa) may be more difficult to find than the correct sausage, however.  Pancetta tesa is flat, not rolled.  It is better to use for spiedini because it is easier to cut into shapes that facilitate skewering.

On the same day that I made spiedini with Zia Fidalma, we looked at a house for sale in her village. I’m still smitten by the house and the views and the idea of spending summers there!

While you might spend 30 to 45 minutes cutting up the meat and vegetables and threading them on a skewer, the cooking process is easy.  Feel free to experiment with the herbs, but I’ve called for the herbs that are most commonly used in Tuscan cooking.

Print Recipe
Spiedini (Italian Skewered Meat and Vegetables)
If you want a more elegant look, take the time to cut the ingredients to the same size, approximately 1-inch squares. For a more homestyle appearance, as shown in the pictures, some variability is fine as long as none of the pieces is extremely large or small. The exact sequence of how to skewer ingredients is up to you but I have provided a suggestion that worked well with the quantity of ingredients I had.
Votes: 0
Rating: 0
You:
Rate this recipe!
Course Mains, Meats
Cuisine Italian
Prep Time 45 minutes
Cook Time 30 minutes
Servings
people
Ingredients
Course Mains, Meats
Cuisine Italian
Prep Time 45 minutes
Cook Time 30 minutes
Servings
people
Ingredients
Votes: 0
Rating: 0
You:
Rate this recipe!
Instructions
  1. Cut each link of sausage into four pieces.
  2. Cut the pork into 24 pieces.
  3. Cut the pancetta tesa into 36 pieces
  4. Cut each pepper into 12 pieces.
  5. Separate the onion into layers and cut 36 pieces of onion about the same size as the pepper pieces
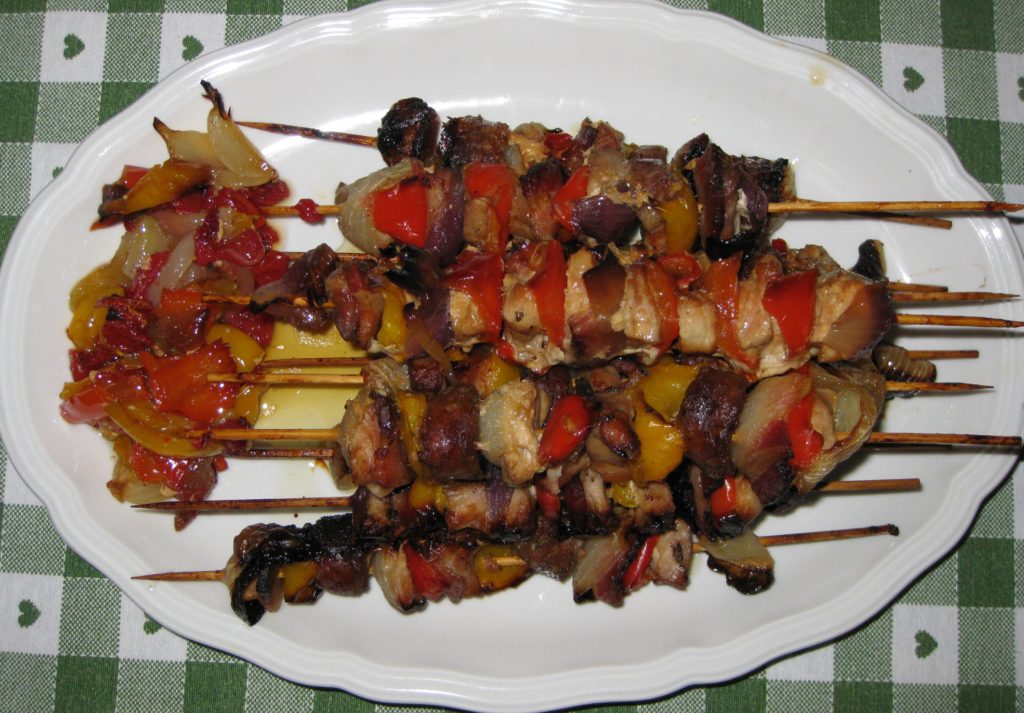
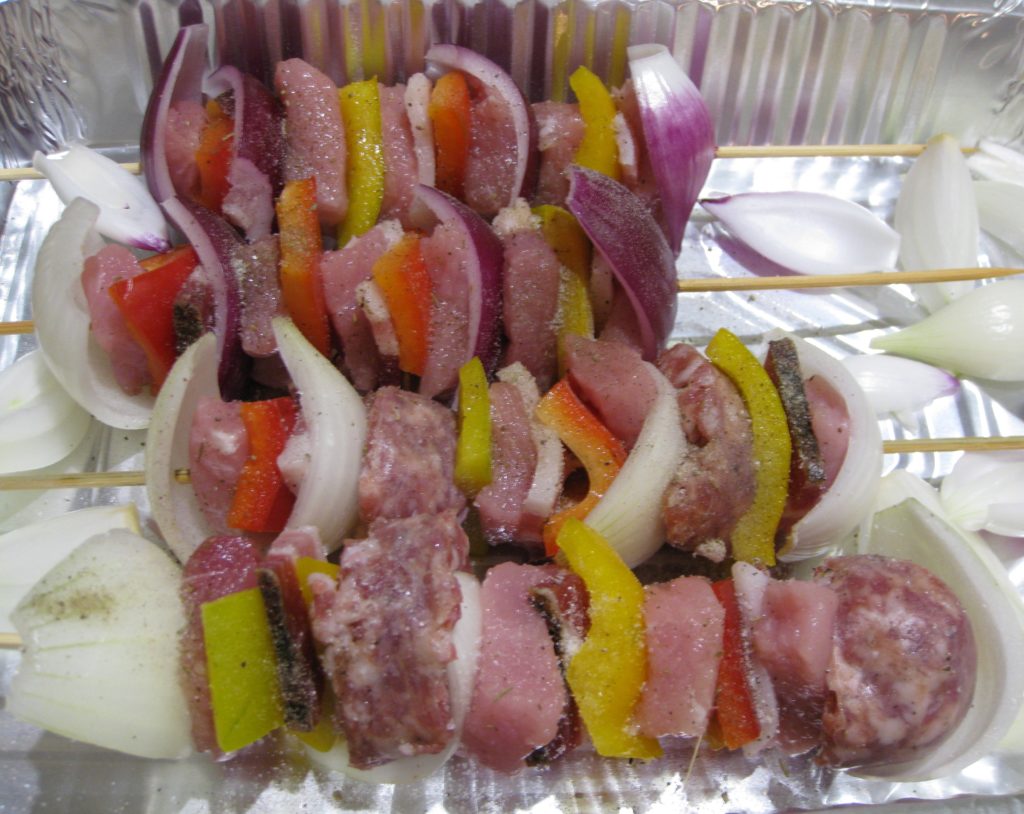
  6. Thread the meat and vegetables onto 12 skewers in the following order: Pepper, Pancetta, Onion, Pork, Pepper, Pancetta, Onion, Sausage, Pepper, Pancetta, Onion, Pork.
  7. On the bottom of a shallow roasting pan large enough to hold the skewers in a single layer, put the rosemary, sage, bay leaves, oregano, juniper berries and garlic.
  8. Put the skewers on top. Season generously with salt and pepper. Drizzle with olive oil.
  9. Roast at 400°F until the meat is cooked, approximately 20 to 30 minutes, basting occasionally with the oil from the pan.
  10. Arrange the skewers on a serving platter. Pour the oil over top being sure to add the cooked herbs and garlic. Serve immediately.
Recipe Notes

Copyright © 2019 by Villa Sentieri, LLC. All rights reserved.

Share this Recipe

Thanksgiving Gravy

November 7, 2019

I’m not much of a turkey person.

If it were up to me, I’d probably never make turkey, except for the fact that turkey is a GREAT excuse to make killer stuffing and gravy.

OK, OK, those of you who know me know that I’m enough of a traditionalist that I’d probably still make turkey on Thanksgiving, with or without stuffing and gravy, because it’s, well, traditional.

Turkey aside, though, I absolutely LOVE stuffing and I LOVE gravy.

After Thanksgiving, I carefully hide the leftover stuffing in the fridge and keep it all for myself.  There usually isn’t much leftover so I get maybe two days of snacking on cold stuffing.  And it has to be cold, not warm, with a bit of added salt because the taste of salt is dulled by the coldness of the stuffing.


Click HERE to join our mailing list and you’ll never miss a recipe again!


As for the gravy, when I was a kid, I liked gravy so much that I would stir enough into my mashed potatoes that they became runny and spread out over my plate!  I don’t do that anymore but I still love gravy.

I love gravy so much that I roast poultry specifically to make gravy then discard the poultry because I’ve browned it to a fare-thee-well to get a really flavorful gravy.  But I only do that once a year—on Thanksgiving—hence the name Thanksgiving gravy.

When I was growing up, my parents hosted Thanksgiving dinner.  My Aunt Margie and Uncle Joe hosted Christmas Eve dinner.

On Thanksgiving, while my mother and Aunt Margie were getting everything ready to bring to the table (everything included a full Italian meal with sausage, meatballs, lasagna, etcetera alongside a full traditional American Thanksgiving meal!) my Aunt Mamie would make gravy from the pan drippings.


Follow us on your social media platform of choice


From my current vantage point, however, there is a very limited amount of gravy that can be made that way, otherwise it doesn’t have enough meaty goodness.  Though I have to say that Aunt Mamie did a great job of making gravy.  Hers was the one that I most often stirred into my mashed potatoes.

The search for lots of meaty-tasting gravy is what got me started on the path of roasting poultry a few days in advance simply to make a brown stock to use as the base for my gravy.

I guess, in reality, my gravy is more of a variation on French brown sauce (Sauce Espagnole) with added pan drippings than traditional American-style gravy but it packs the flavor that I expect from good gravy.

If there’s any leftover gravy, I warm it with some cream and sautéed mushrooms and then gently reheat leftover turkey in the sauce.

Print Recipe
Thanksgiving Gravy
Roasting poultry to make a flavorful stock creates a gravy with an extra punch of flavor. Turkey wings and necks are ideal but chicken and Cornish hen work very well, too. Whatever poultry you use, cut it into lots of pieces to create more surface area for browning. I use a lot of Parmigiano Reggiano cheese and I put all the rinds in a container in the freezer. I use one whenever I make stock or broth, as I do for the stock for this gravy. It is not necessary to peel the onions and garlic.
Votes: 0
Rating: 0
You:
Rate this recipe!
Prep Time 30 minutes
Cook Time 11 hours
Passive Time 12 hours
Servings
cups
Ingredients
Brown Stock
Prep Time 30 minutes
Cook Time 11 hours
Passive Time 12 hours
Servings
cups
Ingredients
Brown Stock
Votes: 0
Rating: 0
You:
Rate this recipe!
Instructions
Brown Stock
  1. Cut the turkey or other poultry into chunks. Put the cut-up turkey into a heavy roasting pan. Mix with ¼ cup of extra-virgin olive oil. Season generously with garlic powder and salt.
  2. Roast the turkey at 425°F until dark brown, turning often, 1½ to 2 hours.
  3. Meanwhile, in a heavy-bottomed stock pot, large enough to hold all the ingredients, sauté the carrots and celery in ¼ cup of extra-virgin olive oil over high heat.
  4. As the carrots and celery begin to brown, add the onions and garlic.
  5. Continue cooking, adjusting heat to medium if necessary, to create nicely browned vegetables and fond without burning.
  6. When the vegetables are brown, add 1/2 cup of red wine and 1 cup of water to stop the cooking and set the pot aside until the turkey is ready.
  7. When the turkey is brown, add it and any pan drippings to the stockpot with the vegetables.
  8. Using some of the water, deglaze roasting pan and add the liquid to the stockpot. All these brown bits are important for flavor.
  9. Add the bay leaf, rosemary, sage, parsley, whole cloves, Parmigiano Reggiano cheese rind, if using, black pepper, and enough water to cover generously. Bring to a simmer and simmer, partially covered for six hours, stirring occasionally.
  10. Strain and refrigerate the stock. The stock may be made up to three days in advance.
Gravy
  1. Skim the fat from the top of the stock. Heat the fat to cook off any water. Measure ¾ cup of melted fat and reserve. Add butter, if necessary, to make ¾ cup.
  2. Gently boil the skimmed stock to reduce it to about six cups, if necessary.
  3. Meanwhile, in a heavy-bottomed saucepan, gently brown the flour in the fat from the stock.
  4. Add the six cups of hot stock, approximately ¾ cup at a time, stirring well after each addition, to avoid lumps.
  5. After all the stock has been added, bring to a simmer. Add the wine. Season with 1 teaspoon salt and pepper to taste. (The drippings from the turkey can be fairly salty so the gravy should be under-salted until the final adjustment of seasoning.)
  6. Simmer gently till thick, approximately 2 hours, stirring frequently. Set aside, covered, until the turkey is ready.
  7. After removing the turkey from the oven, deglaze the roasting pan with water. Skim the fat from the deglazing liquid. Pour the defatted drippings into gravy and simmer briefly to achieve the desired consistency. Adjust seasoning.
Recipe Notes

Copyright © 2019 by Villa Sentieri, LLC. All rights reserved.

Share this Recipe