Thanksgiving Gravy

November 7, 2019

I’m not much of a turkey person.

If it were up to me, I’d probably never make turkey, except for the fact that turkey is a GREAT excuse to make killer stuffing and gravy.

OK, OK, those of you who know me know that I’m enough of a traditionalist that I’d probably still make turkey on Thanksgiving, with or without stuffing and gravy, because it’s, well, traditional.

Turkey aside, though, I absolutely LOVE stuffing and I LOVE gravy.

After Thanksgiving, I carefully hide the leftover stuffing in the fridge and keep it all for myself.  There usually isn’t much leftover so I get maybe two days of snacking on cold stuffing.  And it has to be cold, not warm, with a bit of added salt because the taste of salt is dulled by the coldness of the stuffing.


Click HERE to join our mailing list and you’ll never miss a recipe again!


As for the gravy, when I was a kid, I liked gravy so much that I would stir enough into my mashed potatoes that they became runny and spread out over my plate!  I don’t do that anymore but I still love gravy.

I love gravy so much that I roast poultry specifically to make gravy then discard the poultry because I’ve browned it to a fare-thee-well to get a really flavorful gravy.  But I only do that once a year—on Thanksgiving—hence the name Thanksgiving gravy.

When I was growing up, my parents hosted Thanksgiving dinner.  My Aunt Margie and Uncle Joe hosted Christmas Eve dinner.

On Thanksgiving, while my mother and Aunt Margie were getting everything ready to bring to the table (everything included a full Italian meal with sausage, meatballs, lasagna, etcetera alongside a full traditional American Thanksgiving meal!) my Aunt Mamie would make gravy from the pan drippings.


Follow us on your social media platform of choice


From my current vantage point, however, there is a very limited amount of gravy that can be made that way, otherwise it doesn’t have enough meaty goodness.  Though I have to say that Aunt Mamie did a great job of making gravy.  Hers was the one that I most often stirred into my mashed potatoes.

The search for lots of meaty-tasting gravy is what got me started on the path of roasting poultry a few days in advance simply to make a brown stock to use as the base for my gravy.

I guess, in reality, my gravy is more of a variation on French brown sauce (Sauce Espagnole) with added pan drippings than traditional American-style gravy but it packs the flavor that I expect from good gravy.

If there’s any leftover gravy, I warm it with some cream and sautéed mushrooms and then gently reheat leftover turkey in the sauce.

Print Recipe
Thanksgiving Gravy
Roasting poultry to make a flavorful stock creates a gravy with an extra punch of flavor. Turkey wings and necks are ideal but chicken and Cornish hen work very well, too. Whatever poultry you use, cut it into lots of pieces to create more surface area for browning. I use a lot of Parmigiano Reggiano cheese and I put all the rinds in a container in the freezer. I use one whenever I make stock or broth, as I do for the stock for this gravy. It is not necessary to peel the onions and garlic.
Votes: 0
Rating: 0
You:
Rate this recipe!
Prep Time 30 minutes
Cook Time 11 hours
Passive Time 12 hours
Servings
cups
Ingredients
Brown Stock
Prep Time 30 minutes
Cook Time 11 hours
Passive Time 12 hours
Servings
cups
Ingredients
Brown Stock
Votes: 0
Rating: 0
You:
Rate this recipe!
Instructions
Brown Stock
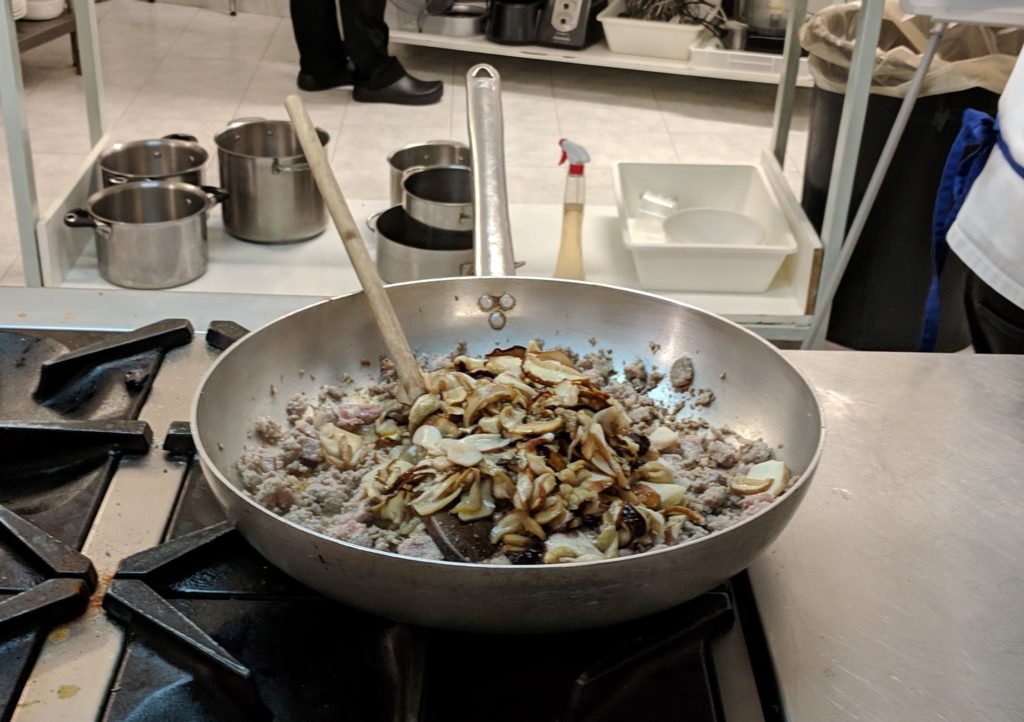
  1. Cut the turkey or other poultry into chunks. Put the cut-up turkey into a heavy roasting pan. Mix with ¼ cup of extra-virgin olive oil. Season generously with garlic powder and salt.
  2. Roast the turkey at 425°F until dark brown, turning often, 1½ to 2 hours.
  3. Meanwhile, in a heavy-bottomed stock pot, large enough to hold all the ingredients, sauté the carrots and celery in ¼ cup of extra-virgin olive oil over high heat.
  4. As the carrots and celery begin to brown, add the onions and garlic.
  5. Continue cooking, adjusting heat to medium if necessary, to create nicely browned vegetables and fond without burning.
  6. When the vegetables are brown, add 1/2 cup of red wine and 1 cup of water to stop the cooking and set the pot aside until the turkey is ready.
  7. When the turkey is brown, add it and any pan drippings to the stockpot with the vegetables.
  8. Using some of the water, deglaze roasting pan and add the liquid to the stockpot. All these brown bits are important for flavor.
  9. Add the bay leaf, rosemary, sage, parsley, whole cloves, Parmigiano Reggiano cheese rind, if using, black pepper, and enough water to cover generously. Bring to a simmer and simmer, partially covered for six hours, stirring occasionally.
  10. Strain and refrigerate the stock. The stock may be made up to three days in advance.
Gravy
  1. Skim the fat from the top of the stock. Heat the fat to cook off any water. Measure ¾ cup of melted fat and reserve. Add butter, if necessary, to make ¾ cup.
  2. Gently boil the skimmed stock to reduce it to about six cups, if necessary.
  3. Meanwhile, in a heavy-bottomed saucepan, gently brown the flour in the fat from the stock.
  4. Add the six cups of hot stock, approximately ¾ cup at a time, stirring well after each addition, to avoid lumps.
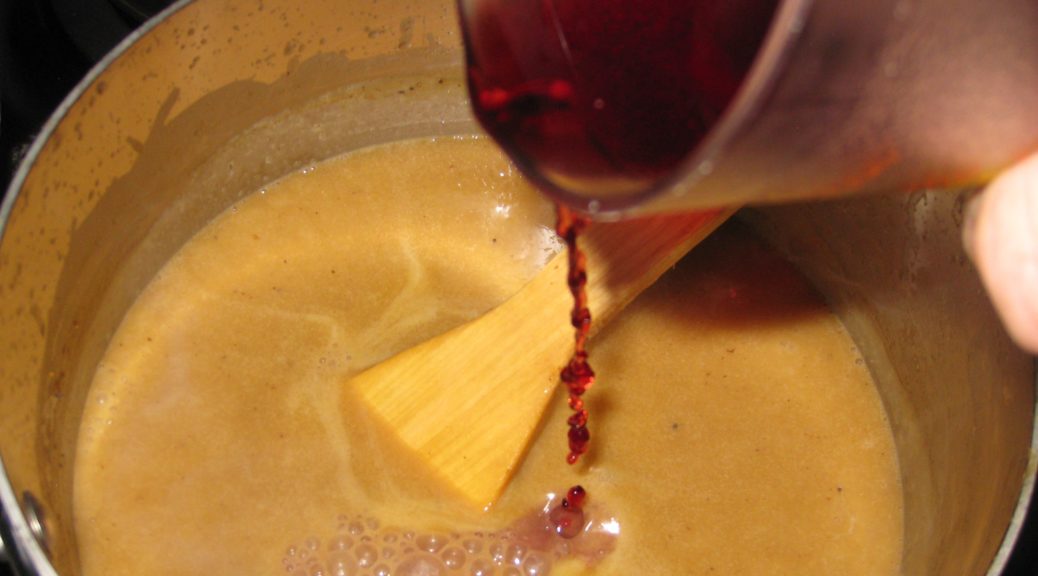
  5. After all the stock has been added, bring to a simmer. Add the wine. Season with 1 teaspoon salt and pepper to taste. (The drippings from the turkey can be fairly salty so the gravy should be under-salted until the final adjustment of seasoning.)
  6. Simmer gently till thick, approximately 2 hours, stirring frequently. Set aside, covered, until the turkey is ready.
  7. After removing the turkey from the oven, deglaze the roasting pan with water. Skim the fat from the deglazing liquid. Pour the defatted drippings into gravy and simmer briefly to achieve the desired consistency. Adjust seasoning.
Recipe Notes

Copyright © 2019 by Villa Sentieri, LLC. All rights reserved.

Share this Recipe

Lupara

May 29, 2019

A Lupara is an 8mm sawn-off shotgun favored by La Cosa Nostra.

It’s also the name of a pasta dish.

Lupara, the shotgun not the pasta. [Licensed from Bluedog, without changes].
Interestingly, if you search for lupara recipes online you’ll only find a few and you’ll be hard-pressed to discover much commonality among the recipes.  Some are spicy.  Some are not.  Some have sweet peppers.  Some do not.  Some have tomatoes.  Some do not.  And most of them will be made with spaghetti.

I learned to make lupara at the Italian Culinary Institute.  It was among the first pasta dishes demonstrated during the early days of the three-month course.  Made with short, cut pasta, like rigatoni, this rendition pays tribute to the shotgun for which it is named.

Lupara, the pasta not the shotgun, as prepared at the Italian Culinary Institute.

Join our mailing list and you’ll never miss a recipe again!

This dish makes use of a Basic Tomato Sauce, just tomatoes and a few aromatics cooked briefly.  You can make the tomato sauce in large batches and freeze it or you can make it as needed.  Although the sauce can be used on its own in some dishes, it is deliberately not aggressively seasoned.  This allows it to be used in a variety of preparations, with some final additional flavoring, without the sense that the same sauce is being used over and over.

I know this seems a little out of order, but I will publish the recipe for the Basic Tomato Sauce next week  For my first blog post since returning from Italy, I wanted to feature a dish that grabbed my attention.  This one did.  It’s got a great story and a great flavor.  Basic Tomato Sauce is good but it isn’t captivating (unlike a pasta dish named after the “Mob’s” favorite weapon!).  Basic Tomato Sause is meant to play a supporting role in most situations and that’s just not the type of recipe that I wanted to start with.

Lupara on the stove at the Italian Culinary Institute.

This version of Lupara is intended to be spicy but spicy means different things to different people.  There are two ways to build spice into this pasta.  You can use one or both of them.  The first method is to add dried, ground red pepper (peperoncino piccante in polvere, in Italian) during the final assembly of the pasta.  The other is to add thinly sliced fresh hot pepper (peperoncino fresco) when sautéing the sausage.  Getting authentic Italian peperoncino, powdered or fresh, is difficult in the States.  You can substitute Cayenne pepper for the ground one and a variety of long, red (always red!) chile, such as Thai or Cayenne, for the fresh.

Follow us on your social media platform of choice
         

This recipe also calls for fresh porcini mushrooms.  These can be a challenge to find.  Feel free to substitute thinly sliced portobello mushrooms.  Though the flavor won’t be exactly the same, the dish will still be yummy!  If you are lucky enough to find fresh porcini, I suggest buying a heap, thinly slicing them, and freezing them.  They can be used in all sorts of cooked dishes, especially Trifulata which will hit the blog in the near future…as soon as I can find fresh porcini!! (You might notice portobello mushrooms in the pictures.)

This recipe requires a small amount of sausage.  It’s not a major player though it does add a nice meaty background note to the sauce.  Pick a good quality Italian-style sausage, sweet or hot.  I think that sausage with fennel seed adds a nice flavor but that’s a matter of personal taste.

Buon appetito!!

Print Recipe
Lupara
A lupara is an 8-gauge sawn-off shotgun associated with La Cosa Nostra (the “Mob”). Rigatoni resemble the barrel of a lupara. Adjust heat level to your taste. If you can’t find Italian powdered peperoncino piccante, substitute Cayenne pepper. For a different type of heat, add some thinly-sliced hot red chile when sautéing the sausage, instead of, or in addition to, the powered chile. If you can’t find fresh porcini, substitute portobello mushrooms. It is really important to use a very good quality Italian rigatoni, preferably an artisanal variety that is thicker than the usual boxed rigatoni to get the most benefit out of sautéing the pasta. If you want to make half as much pasta, freeze half the sauce. The recipe for Basic Tomato Sauce will be posted next week.
Votes: 0
Rating: 0
You:
Rate this recipe!
Prep Time 30 minutes
Cook Time 30 minutes
Servings
people
Ingredients
Sauce
Assembly
For serving
Prep Time 30 minutes
Cook Time 30 minutes
Servings
people
Ingredients
Sauce
Assembly
For serving
Votes: 0
Rating: 0
You:
Rate this recipe!
Instructions
Sauce
  1. Using a heavy-bottomed pot, sauté the sausage in the olive oil until colored.
  2. Add the porcini, butter, and fresh peperoncini, if desired, and sauté 5-7 minutes. During this time, the sausage should brown much more and the mushrooms should give up much of their liquid and take on some color.
  3. Add the wine and evaporate completely over high heat.
  4. Add the broth, partially cover, and simmer until completely evaporated.
  5. Add the Basic Tomato Sauce, basil, and salt and pepper to taste. Simmer about 10 minutes. Reserve.
Assembly
  1. Bring three quarts of heavily salted water (according to the Italians, it should taste like the sea) to a boil.
  2. Meanwhile, sauté the garlic in the extra-virgin olive oil until light brown. Drain and reserve the oil.
  3. Cook the rigatoni just until it no longer has a crunch in the center but is still far from done.
  4. While the pasta is cooking, put the sauce in a large sauté pan and bring to a simmer along with peperoncino piccate to taste.
  5. Drain the rigatoni, saving at least one quart of the pasta-cooking liquid.
  6. Add the rigatoni to the sauce and increase the heat to medium to medium-high. Add pasta-cooking liquid, a ladle at a time, stirring the pasta frequently to finish cooking.
  7. After adding a ladle or two of the pasta-cooking liquid, add the cream. Continue adding pasta-cooking liquid as needed until the pasta is just al dente and coated with a thick sauce.
  8. Off the heat, mix in the Parmigiano Reggiano cheese, cream, and the reserved garlic oil. You may need to thin with a little more pasta-cooking liquid as the cheese will thicken and emulsify the sauce.
  9. Divide the pasta among serving bowls. Garnish each with a drizzle of extra-virgin olive oil and sprinklings of Pecorino Romano cheese and fresh basil chiffonade.
Recipe Notes

Here's my recipe for Basic Tomato Sauce.

Copyright © 2019 by Villa Sentieri, LLC. All rights reserved.

Share this Recipe