January 9, 2017
I really enjoy baking. There was a time when my Sunday morning routine included mixing up a batch of bread dough, then reading the New York Times and sipping coffee with our two Italian Greyhounds cuddled up next to me while the dough rose. The bread would be ready for our main meal, which frequently was around 1 PM on Sunday but often got moved to the evening depending on what was happening that day.
I lost that routine somewhere along the way when work got too busy. I still make bread frequently but I’ve lost the rhythm of baking every Sunday morning.
When I was growing up, my Aunt Margie baked bread rolls every week. I’m not sure why, but I think it was on Thursdays. I remember little balls of rising dough, in neat rows, resting on top of the same cabinet, covered by the same cloth, every week. As a child, I marveled at how they all were exactly the same size. It seemed impossible.
Those rolls were a staple of my childhood. Lunch often consisted of hot Calabrese salami sandwiched inside one of those rolls. Sometimes it was peanut butter and jelly. Other times it was peanut butter and banana, a combination my Italian-born mother-in-law still doesn’t understand!
I still eat sandwiches of Calabrese salami for lunch on a regular basis. Some habits don’t die. The sandwiches are often on my home-made bread baked in a loaf pan or on a split open chunk of focaccia, but unfortunately, not on Aunt Margie’s bread rolls.
Aunt Margie died a few years back. Even though she had stopped baking rolls every week long before that, periodically she would ship me a box filled with her home-made bread rolls. Some I put in the fridge, others went into the freezer. A quick zap in the microwave, a few slices of salami, and I was re-living a favorite childhood memory.
Memories are funny, though. We never know what experiences will become favorite memories. We just have to take them as they come. Maybe the best we can do is to create experiences that will become favorite memories for others. We just never know what they’ll be.

| Prep Time | 25 minutes |
| Cook Time | 20 minutes |
| Passive Time | 2 hours |
| Servings |
loaf
|
- 1 1/2 teaspoons active dry yeast (or 1 individual packet)
- 220 ml water warm to the touch
- 30 ml extra virgin olive oil
- 1 teaspoon salt
- 350 grams bread flour
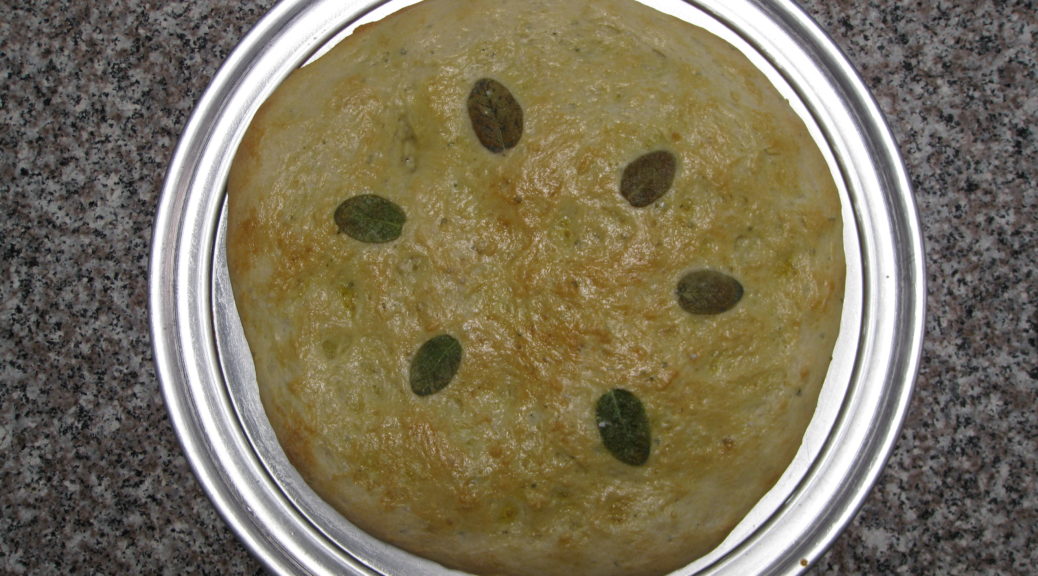
- 2 tablespoons chopped fresh sage
- 6 leaves fresh sage for garnish
- 1 egg
- 2 teaspoons water
Ingredients
|
|
- Fill the bowl of an electric mixer with hot water. Put the dough hook in the water. Allow the bowl and hook to warm up for a few minutes while you prepare the other ingredients. When ready to proceed, drain and dry the bowl and hook.
- Add the 220 ml of warm water, yeast and one tablespoon of the flour to the warmed bowl. Using the dough hook, blend the ingredients briefly. Turn off the machine and allow the mixture to sit until it is bubbling and creamy.
- When creamy, approximately 10 minutes, add half the remaining flour and the chopped sage. Using the dough hook, mix to combine.

- With the mixer running, add the salt then drizzle in the olive oil. After the oil is incorporated add the remaining flour. Mix approximately 8-10 minutes. The dough should be soft and sticky.
- Oil a large bowl with olive oil.
- Remove the dough from the mixing bowl and shape into a ball. It is easier to do this if you rub some oil on your hands. Place the dough in the oiled bowl and roll it around a bit to coat it with oil.
- Put a piece of oiled waxed paper over the bowl and then cover the bowl with a towel. Allow the dough to rise until doubled.
- Punch the dough down and form into a ball once again.
- Oil a 12-14 inch round pizza pan with a little olive oil.
- Put the ball of dough on the pizza pan and begin to press down, using both hands, gently stretching the dough, rotating the pan as you go. The dough will spring back. After six or eight stretches, flip the dough over and repeat. Then, allow the dough to sit for five minutes. Repeat the stretching, flipping, and stretching again. The dough will not spring back quite as much and you’ll be able to get it stretched out a little more. You might have to repeat the stretching-flipping-stretching-waiting routine two or three more times until the dough is shaped into a 12-inch circle. It’s easier use a 14-inch pan because you can overstretch the dough a bit then allow it to spring back to the size you want.

- Using your fingertips, press the dough to create a bumpy surface.

- Cover the dough and allow it to rise until doubled. This will only take about 20-25 minutes. You can cover it with oiled waxed paper but if you have a deep dish pizza pan, you can just flip the pan upside down over the dough and skip the waxed paper altogether.
- While the dough is rising, heat the oven to 425°F.
- Make an egg wash by beating the egg with two teaspoons of water.
- When the dough has doubled, brush the top with egg wash. Arrange the sage leaves on top of the dough and brush each one with more egg wash.

- Bake the focaccia at 425°F until golden brown, 15-20 minutes.
- Slide the focaccia off of the pizza pan and onto a rack to cool.
If you want to try to mix this in a bread machine, consult the directions for your machine. You can use what I do as a guide, however. Combine the flour, salt and chopped sage. Stir to combine. Put the water in the bottom of the bread pan (do not use warm water). Put the flour mixture on top of the water. Make a small well in the top of the flour with the back of a spoon. Add the yeast to the well, being certain the yeast is above the level of the water. Drizzle the olive oil on top of the flour, not touching yeast. Use the dough cycle. When the dough cycle is complete, remove the dough, form into a ball, and proceed with step 9 above.
Copyright © 2017 by VillaSentieri.com. All rights reserved.