Mom’s Slow-Braised Pork Chops

June 16, 2017

Just last week my mother-in-law breaded and quickly pan-fried pork chops for dinner.  They were tender, juicy and truly wonderful.

Now that grilling weather has finally reached Santa Fe, we’ll have pork chops quickly cooked on the grill throughout the summer.  I’ll even grill the occasional pork tenderloin seasoned with olive oil, garlic, lemon juice and rosemary.

I really enjoy juicy, quickly-cooked pork.  However, I also really, really enjoy the style of pork chops that I at while growing up:  thin-cut pork chops cooked slowly in a sauté pan until they are deep brown.

No doubt, this is an entirely different dish from cooking the chops just enough to reach that “magic” temperature of 140°F that the USDA says is “safe.”  It won’t be to everyone’s taste (what is?) but in the interest of presenting an array of very traditional dishes I’m including it.

Just a few nights ago while in Palm Springs, I was served thick-cut braised pork chops cooked by a good friend, John O’Malley, following a recipe from Marcella Hazan.  I use the same recipe from Marcella when I want to cook thick-cut chops for company (ever since John turned me onto it a while back).

Marcella was from Northern Italy, my mother’s family from far Southern Italy, but the two dishes share a style that highlights a common feature of traditional Italian cuisine.  That is, a cut of meat that could be cooked quickly is, instead, cooked slowly coaxing out more flavor and changing the texture in the process.

The realization of the similarity of these two dishes is like the experience I wrote about in April 2017 describing roast chicken I ate in Tuscany that tasted, for all the world, like the falling-apart roast chicken seasoned with garlic and rosemary that my mother made.

Quick cooking is just one style but reading contemporary recipes one would think it’s the only way to cook many cuts of meat.  We all agree that there are cuts that must be cooked long and slow for optimum texture: think Southern Pulled-Pork Barbecue, Hawaiian Roast Pig, Beef Brisket, or Pot Roast, for example.  I challenge you to find a contemporary recipe for roast chicken or sautéed pork chops that doesn’t call for the minimum cooking time and final temperature.  It’s as if we’ve forgotten that these meats can also be cooked low and slow for a qualitatively different dish.

Recording this kind of diversity traditional foodways is one of my main goals for this blog.

As I describe on the About page of this website, I’ve had the very good fortune to cook alongside incredible cooks from many different parts of the world but even that only begins to scratch the surface of traditional foods.  And while I’ve got recipes planned well into next year, I think it’s time to bring in other voices, other stories.

From time to time I am going to feature a blog post, and accompanying recipe, based on interviews with folks who have chosen to share a treasured family recipe and a story to go along with it.  There are several individuals who have volunteered to be in the vanguard of this effort.

If you have a family recipe that you’d like to share, send me an email or add a comment and I’ll follow up.

Click HERE to join our mailing list and you’ll never miss a recipe again!

Print Recipe
Mom's Slow-Braised Pork Chops
If these chops are being served as part of an Italian-style meal, preceded by pasta, rice or soup, and accompanied by several side dishes, one per person should be enough. Without a pasta course, an average eater could easily consume two of these and someone with a hearty appetite could eat three or four! A sauté pan with a very heavy bottom is needed to avoid hot spots. The chops will be cooked on low heat for most of the time and it is important that the pan conduct the heat well to avoid hot and cool spots for optimum browning. I prefer center-cut pork loin chops, these have a bit of loin and a bit of tenderloin, essentially the same cut as a T-bone steak. Loin chops (without the tenderloin), as shown in the pictures, work well too.
Votes: 0
Rating: 0
You:
Rate this recipe!
Course Mains, Meats
Cuisine Italian
Prep Time 5 minutes
Cook Time 2 hours
Servings
people
Ingredients
Course Mains, Meats
Cuisine Italian
Prep Time 5 minutes
Cook Time 2 hours
Servings
people
Ingredients
Votes: 0
Rating: 0
You:
Rate this recipe!
Instructions
  1. Season the chops generously with salt, pepper and garlic powder.
  2. Using a sauté pan that has a very heavy bottom and that is large enough to hold the chops without crowding, heat the oil until it just begins to smoke over high heat.
  3. Add the chops and reduce heat to medium high.
  4. Cook the chops, undisturbed, until nicely browned, approximately 2 minutes.
  5. Turn the chops over. If the oil was very hot when the chops were added and if you didn't disturb them while they browned, they should easily release from the pan without sticking.
  6. Brown other side. Approximately 2 minutes.
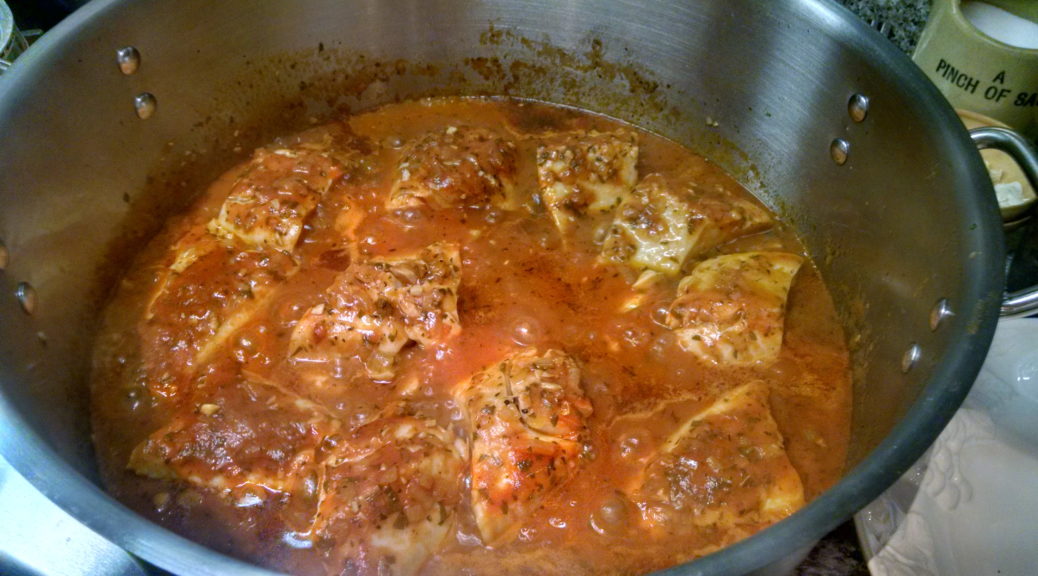
  7. Turn the chops over. Have the cover ready. Add the wine, immediately cover the pan, and turn the heat to low.
  8. Cook, covered, until the wine evaporates, 15 minutes more or less.
  9. After the wine evaporates the pan juices will start to brown. When they do, add 2-3 tablespoons of water and turn the chops over. Cook, covered, until the water evaporates and pan juices get a little bit darker.
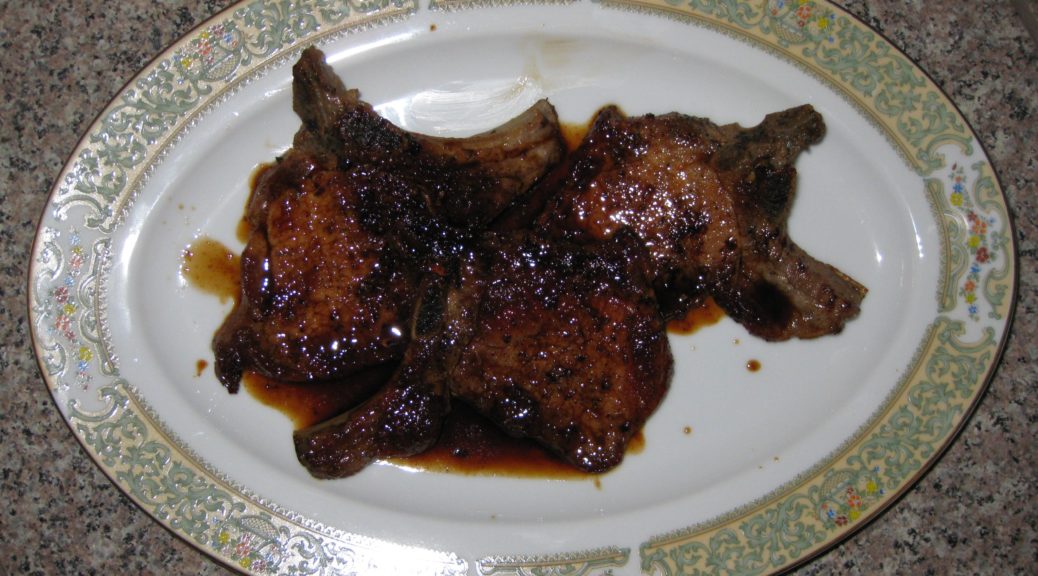
  10. Repeat this process until the chops are falling apart tender and the pan juices are a deep brown. This will take 1 ½ to 2 hours.
  11. At the end there should only be a couple of tablespoons of water plus the oil in the pan. Pour this sauce over the chops when serving. It should have a rich umami porky flavor.
Recipe Notes

I rarely use garlic powder. The dishes for which I consistently use garlic powder instead of fresh garlic are Italian slow-roasted poultry, the pork chops featured in this recipe, and steaks. I find that I just can’t get the flavor that I want from fresh garlic in these instances.

Copyright © 2017 by VillaSentieri.com. All rights reserved.

Share this Recipe

Risotto with Asparagus

May 29, 2017

Risotto is not a Southern Italian dish.  Neither is polenta, for that matter.

I never had either until college when I started cooking from Marcella Hazan’s The Classic Italian Cookbook published in 1973.  I still use the dog-eared copy I bought in college the year it was published.

It was a magnificent introduction to Northern Italian cooking which I knew little about as a kid of 18 from a small town in Western Pennsylvania in my sophomore year of college.

My knowledge of Northern Italian cooking expanded rapidly though.  Marcella was only the beginning.  There was a true restaurant renaissance in Philadelphia in the 1970’s.  Not only magnificent French restaurants like Le Bec Fin and La Panetiere, but wonderful Northern Italian restaurants like the Monte Carlo Living Room and a bevy of others whose names I can’t recall.  I ate at all of them…often.  I still remember one dinner at the Monte Carlo Living Room where, after being served a very simple spaghetti with garlic and oil, the waiter (they weren’t called servers back then) came by with a black truffle and shaved large quantities of it onto my pasta.  Heaven!

I also learned about Northern Italian cooking from the aunts of my college advisor Eugene (Gene) d’Aquili.  Well, it was Roman cooking, actually, which is in central Italy but still pretty far north from where my mother’s family hailed.

Auntie Helen (Zia Elena) and Auntie Louise (Zia Luigia) (they Anglicized their names after coming to America) were born in Rome in the early years of the 20th century.  They came to America as children.  Of the two, Auntie Helen was the cook.  From her I learned to make many classic Roman dishes.  Some of Auntie Helen’s dishes are slated to make it into the blog, including a Roman Chicken Cacciatore flavored with anchovies.

So, by the time I got absorbed into my husband’s Northern Italian family (his father is from Tuscany and his mother from Friuli) I had a good grasp of Northern Italian cooking.

We have risotto often.  Probably at least once every two weeks.  It’s usually made with a vegetable, though occasionally I’ll make Risotto alla Milanese flavored with saffron and not a vegetable in sight.  In the spring risotto usually includes asparagus or peas.  In the summer it is likely to be zucchini.  The fall brings butternut squash risotto and mushroom risotto.  Mushroom risotto pretty much carries us through the winter, too, with the occasional risotto made with meat sauce.

Since it’s spring, I’m doing risotto agli asparagi, risotto with asparagus.

Print Recipe
Risotto with Asparagus
Risotto is a classic Northern Italian dish. The goal is to have rice grains that are still al dente (but not crunchy) in the middle surrounded by a creamy liquid. More often than not I find that risotto served in America is overly rich with butter, cheese, and sometimes cream. An Italian-style risotto should be creamy from the starch in the rice, augmented with a very modest amount of butter and cheese. Risotto rice is a short grain rice that cooks slowly, making it much easier to achieve an al dente texture because it takes a while to actually overcook it. The three types of rice for risotto are Arborio, Carnaroli, and Vialone Nano. Arborio is the easiest one to find though the other two are more forgiving than Arborio when it comes to overcooking. I recommend buying good quality rice imported from Italy. It really isn’t priced that differently from domestic. Do not wash the rice. I don’t buy shallots unless I have a specific recipe in mind. Since risotto is often something that I make with little advance planning based on the fresh vegetables that are in my refrigerator, I usually use onion and garlic in place of shallot. I honestly don’t think one could reliably tell the difference so feel free to use onion and garlic as noted in the recipe if shallots aren’t handy.
Votes: 0
Rating: 0
You:
Rate this recipe!
Prep Time 15 minutes
Cook Time 45 minutes
Servings
people
Ingredients
Prep Time 15 minutes
Cook Time 45 minutes
Servings
people
Ingredients
Votes: 0
Rating: 0
You:
Rate this recipe!
Instructions
  1. Trim off the tough bottom of the asparagus spears. The standard way to do this is to bend the spear and let it crack naturally where the spear is less tough and woody.
  2. Finely dice the shallot.
  3. Cut the tips off each spear, approximately the top 2 inches. Reserve the asparagus tips.
  4. Cut the remaining spears into 1 inch pieces. Reserve the cut spears separately from the tips.
  5. Bring the chicken broth to a boil.
  6. Cook the asparagus tips in chicken broth for 2-4 minutes. They should be “toothy” but not crunchy.
  7. Using a spider or large slotted spoon, remove the tips from the boiling broth and put them into a bowl of ice water to stop further cooking.
  8. Cook the cut asparagus spears in the chicken broth for 4-6 minutes. Like the tips, they should be toothy but not crunchy.
  9. Add the partially cooked cut spears to the ice water with the tips.
  10. Reduce the heat so the broth remains at a simmer.
  11. Heat a two or three quart heavy-bottomed saucepan over medium high heat. Add the olive oil.
  12. When the oil is hot, add the finely chopped shallot (or onion and garlic if you are using that instead).
  13. Sauté, stirring frequently until the shallot softens and turns translucent. Do not brown the shallot. You may need to reduce the heat.
  14. When the shallot is soft, return the heat to medium high and add the rice.
  15. Continue cooking, stirring frequently, until the rice starts to smell toasty. Do not brown the rice.
  16. The outer portion of the rice grains will get translucent while the inside will stay opaque white.
  17. Add the wine. Stir frequently, but not constantly, until the wine has totally evaporated. You will begin to see some starch leaching out of the rice. More and more of the starch will leach out as you cook the rice. This is what will make a creamy sauce.
  18. When the wine has evaporated, add a scant ½ cup of simmering broth. Stir thoroughly paying particular attention to loosening any spots where the starch seems to be sticking to the bottom of the pan. You don’t want to brown (or worse yet, burn) the starch.
  19. Stir frequently, but not constantly, until the broth has evaporated.
  20. If the broth is unsalted, as I recommend, you can add a teaspoon of salt to the rice as you begin to add broth. If the broth contains salt, I recommend not adding salt until the end.
  21. Keep repeating the process with a scant ½ cup of broth, cooking, stirring, and loosening any spots that are sticking until each addition of broth evaporates. The heat should stay as close as possible to medium high. The moderate boiling of the liquid will coax starch out of the rice to create the creaminess that is the hallmark of a good risotto.
  22. While the rice is cooking, drain the partially cooked asparagus.
  23. Begin tasting the rice after about 20 minutes of cooking. It will probably still be quite crunchy at the very core. Until you get the hang of it, I suggest testing a rice grain each time you add more broth so you develop a sense of how quickly the texture changes.
  24. When you think you’re only one or two additions of broth away from having perfectly al dente rice, add the partially cooked asparagus.
  25. Continue cooking, adding simmering broth or water as needed, until the rice is al dente.
  26. Remove the rice from the heat and stir in enough simmering broth or water to create a creamy “sauce.” The starch that you have coaxed out of the rice should absorb at least ½ cup of liquid, possibly more.
  27. Stir in the butter and Parmesan cheese. This will probably thicken the “sauce” so you will need to add a bit more simmering liquid to loosen it.
  28. Taste and add salt and freshly ground black pepper to taste.
  29. Serve immediately.
Recipe Notes

I think the standard method used to decide where to trim asparagus wastes too much.   For a quick tutorial on how I prep asparagus, check out my Preparing Asparagus post.

It will likely take more than 4 cups of broth to cook the rice. If you don’t have more broth, just use plain water. I do that very frequently. Except for the initial addition of wine, all liquid added to the risotto should be simmering.  As I’m getting near the end of the broth, I always put a couple of cups of water on to boil so that I have simmering water to add if needed.

Although the broth used for risotto should be flavorful, it should not be overly concentrated. The flavor of the asparagus should come through and not be muddled because the broth tastes assertively like chicken or herbs. Because you will be cooking down a fair amount of broth, it is best that it not be salted otherwise you run the risk of the risotto being too salty.

Copyright © 2017 by VillaSentieri.com. All rights reserved.

Share this Recipe

Orecchiette with Broccoli and Anchovies

May 10, 2017

A few times in my life I’ve been lucky enough to cook with my husband’s Great Aunt Fidalma.  It’s always been in my kitchen, though I keep hoping to make a trip to Tuscany to cook with her in her kitchen.

Zia Fidalma speaks Italian and German.  I speak English.  Though I studied German in high school and college, and at one point was passably able to translate scientific German, my command of spoken German (and at this point, scientific German) is hopeless.  I studied Italian for a while too, but the best I can do is read a menu, order in a restaurant, and find out where the restroom is.

So, cooking with Zia Fidalma starts with a language barrier but it doesn’t seem to matter.  Somehow we communicate.

Mostly that means Zia Fidalma speaks slowly in Italian emphasizing the words I am likely to understand most.

Like the time we were in my kitchen in Santa Fe preparing dinner for twelve.  The first course was spaghetti al pesto.  A pile of basil stalks from my father-in-law’s (Zia Fidalma’s nephew) garden were on the kitchen counter.  Zia Fidalma was plucking off basil leaves one at a time, inspecting each one.  At one point, she looked up at me holding a leaf and said “è brutta” (it’s ugly), clearly wanting my agreement to discard the less-than-perfect leaf.

One day at our home in Chicago, she was making risotto for lunch.  It had a very similar flavor profile to this pasta in that it contained broccoli, garlic and anchovies.

Zia Fidalma cranked up the 15,000 BTU burner to high.  She sizzled some minced garlic for a moment.  There was a vague hint of smoke coming from the pan.  She added the anchovies and stirred them about.  Smoke started to billow up.  She smiled knowingly.  She added the broccoli, undeterred.  Smoke continued.  She stirred.  I stood there horrified.  Then she lightly charred the broccoli.  I was even more horrified.  At long last some liquid went in and the rest of the risotto-making followed a familiar pattern.

I try to avoid smoking oil at all cost when cooking.  I was more than a little concerned about how the risotto would taste.

However, I have never had anything but fabulous food from Zia Fidalma, so I had to trust that this would be OK, too.

This wasn’t her first rodeo.  She’d been making risotto since before I was born.

In the end, all I can say is that the risotto was wonderful.  It had layers of flavor.  It provided an important lesson about how techniques different from what one would typically use can create incredible flavors.

So, if you see wisps of smoke coming from the pan as you singe the broccoli for this recipe, don’t fret.  Just raise a toast to Zia Fidalma, and enjoy!

Print Recipe
Orecchiette with Broccoli and Anchovies
My husband’s Great Aunt Fidalma, who lives in Tuscany, showed me how to cook the broccoli in this manner. Previously, I parboiled the florets and added them and the beans to the sautéed garlic and anchovies. This method adds layers of flavor that cannot be obtained by just boiling the broccoli. I prefer to use home-cooked kidney beans following my recipe for Cannellini alla Toscana. You can use either red or white (cannellini) beans but the red ones add more color contrast. As an alternative you can use one 15 ounce can of beans. Do not discard the liquid in the can as it will improve the body of the sauce.
Votes: 0
Rating: 0
You:
Rate this recipe!
Prep Time 15 minutes
Cook Time 30 minutes
Passive Time 15 minutes
Servings
people
Ingredients
Prep Time 15 minutes
Cook Time 30 minutes
Passive Time 15 minutes
Servings
people
Ingredients
Votes: 0
Rating: 0
You:
Rate this recipe!
Instructions
  1. Put 3 quarts of water and 1/3 cup salt in a 5 quart stockpot or Dutch oven. Bring to a boil over high heat.
  2. Meanwhile, cut the thick stems off the broccoli just below where the stems start to branch into individual florets.
  3. Cut the individual florets off the broccoli by cutting lengthwise through the stalk from top to bottom.
  4. Cut off any remaining stalk just below the floret. These tender stalks can be cut crosswise into one-half inch pieces and added to the florets.
  5. You can use some of the thicker stalks as well, if you wish. To do so, use a vegetable peeler to remove the tough outer skin. Dice the peeled stems into 1/3 inch cubes. Reserve these diced stalks separately from the florets and diced tender stalks.
  6. When the salted water comes to a boil, add the diced, peeled stalks, if using. Return to a boil and cook for 2-3 minutes until they just begin to get tender. Using a spider or large slotted spoon, remove the stalks from the water and plunge them into a bowl of ice water to stop cooking. When cool, drain in a colander.
  7. Keep the water on low heat so you can return it to a boil quickly when needed to cook the pasta.
  8. In a heavy-bottomed pan large enough to hold the finished dish, sauté the garlic over medium high heat until it turns fragrant, about 30 seconds.
  9. Add the anchovies and their oil and continue to sauté, breaking up the anchovies till they turn to a paste.
  10. Continue to cook until the anchovies darken slightly, about 1-2 minutes.
  11. Add the broccoli florets and diced tender stems. If using, add the partially cooked peeled stems. Season with salt and freshly ground black pepper.
  12. Sauté on high heat, stirring very frequently, until some of the broccoli florets just begin to singe, about 5 minutes.
  13. Add the crushed red pepper. Stir to combine.
  14. Add the wine and cover with a tight fitting lid. Cook over medium high heat till the florets are cooked through but not mushy, shaking the pan occasionally.
  15. If all the wine evaporates before the broccoli is cooked, ladle in a bit of the pasta cooking liquid and continue.
  16. When the broccoli is cooked, add the beans and their cooking liquid along with the oregano. Bring to a simmer over gentle heat.
  17. Meanwhile, return the pasta-cooking water to a rolling boil and add the pasta. Cook until the pasta is slightly shy of al dente. The pasta will finish cooking in the sauce.
  18. Put about ¾ cup of pasta cooking liquid into the beans. Reserve another cup of the liquid.
  19. Quickly drain the pasta and add to the beans. Stir well. Bring to a gentle boil, uncovered. Cook stirring occasionally until the pasta is al dente. Add as much of the reserved pasta-cooking liquid as needed to have enough sauce to coat the pasta and broccoli.
  20. The starch in the pasta-cooking liquid will add body to the sauce. One way to incorporate more of the pasta-cooking liquid is to cook the pasta over higher heat so that you can add, and boil off, more of the liquid, leaving the starch behind.
  21. When the pasta is cooked, remove the pan from the heat and stir in the Parmesan cheese and 1 teaspoon freshly ground black pepper. Taste and adjust salt after adding the cheese.
  22. Stir in the finishing extra-virgin olive oil. This will make the sauce glossy and add additional flavor.
  23. The starch from the pasta water and bean-cooking liquid along with the cheese should create an emulsion with the oil. You may need to add more of the reserved pasta-cooking liquid to loosen the sauce.
  24. Serve immediately. Pass extra Parmesan cheese at the table.
Recipe Notes

Copyright © 2017 by VillaSentieri.com. All rights reserved.

Share this Recipe

Pasta e Fagioli (Pasta and Beans)

January 18, 2017

Talk about comfort food!  Pasta e Fagioli (pasta and beans) hits the spot (for me, at least!).

There are endless variations.  White kidney beans, red kidney beans, chick peas, butter beans, fava beans, for example.  Ditalini, mezzi rigatoni, lumaconi, orecchiette, linguine, and more.  Not to mention the possibilities of tomato sauce, anchovies, broccoli, rapini, and escarole.  I could go on but you get the point.  You could mix and match just those ingredients and come up with hundreds of different combinations.

Growing up, my mother made only one version that I recall.  It featured butter beans, tomato sauce and ditalini.  The amount of liquid was equivalent to pasta with a red sauce.  My Aunt Margie, my mom’s sister, made hers with chick peas and ditalini, no tomato sauce, and it was definitely more of a soup.  My guess is that my grandmother made both versions, and probably others, but my mom and my aunt each settled on one for their cooking repertory.

Then there’s a version that I learned from a work colleague, Louis Evangelista, more than thirty years ago.  He learned it from his Sicilian grandfather.  It features linguine, red kidney beans, escarole, red pepper, and an abundant amount of garlic.

Then there’s orecchiette with kidney beans, broccoli and anchovy.

But we’re not making any of these today.  We’re doing a simple version with kidney beans and lumaconi.  The others will make their appearance in the coming months.

Lumaconi is a wonderful pasta shape for pasta e fagioli.  Lumaconi means snails.  Look at the picture below and you’ll see the resemblance.  What’s so cool about using lumaconi is that the beans naturally slip inside the cooked pasta for the perfect mouthful of beans and pasta!

If you use red kidney beans rather than white, the contrast between the bean and pasta will look startlingly like real snails.  This might not be a good thing depending on your audience!

I strongly encourage you to start with dry beans rather than canned.  Follow the recipe for Cannellini alla Toscana using either white or red kidney beans.  For something as hands-off as putting a pot of beans in the oven you’ll be rewarded with enough beans for two, if not three, meals plus a taste profile that is infinitely superior to canned beans.

This last point was hammered home to me a few months ago.  We were in Alamogordo with Pat and Becky, friends from Santa Fe.  We spent the day at White Sands National Monument sledding down the dunes followed by lunch in Ruidoso before returning to our little house in Alamogordo (the house is another story for another day).

We didn’t feel like going out, not that there are many places to go out to in Alamogordo unless you count Chili’s, which, inexplicably, is my husband’s favorite restaurant in town.  Besides, we made the requisite pilgrimage to Chili’s the night before.

So, a couple of cans of kidney beans later, I was making pasta e fagioli.  It was good, no doubt.  But it had been a very long time since I had used canned beans (even though there is an entire phalanx of canned beans in my pantry).  I was actually startled by the difference in taste and texture, having grown so accustomed to using home-cooked beans.

However, by all means, if using canned beans is the difference between trying this dish, and not.  Go for it!  You might want to throw an extra bit of herbs in the pot at the beginning, like a bay leaf and some sage, but it’s not really essential.

Let me know what you think of the recipe.  And for those of you who have your own favorite version of pasta e fagioli, let me know what it is.

Print Recipe
Pasta e Fagioli (Pasta and Beans)
The difference in taste and texture between home-cooked beans and canned beans is dramatic. I recommend cooking either red or white kidney beans using the Cannellini alla Toscana recipe. While I always keep canned beans on hand for emergencies, my freezer is also always stocked with a variety of cooked beans. Whenever I make Cannellini alla Toscana, I freeze leftover beans in portions of 1 ½ cups of beans covered in whatever cooking liquid is left. I never discard any of the cooking liquid. Ideally, you should have enough cooking liquid to cover the beans for the first part of the cooking, before adding the pasta and some pasta-cooking liquid. If you are using canned beans, two 15 oz. cans of beans is the right amount. Do not discard the liquid in the can. It will help to thicken the sauce.
Votes: 0
Rating: 0
You:
Rate this recipe!
Prep Time 15 minutes
Cook Time 40 minutes
Servings
people
Ingredients
Prep Time 15 minutes
Cook Time 40 minutes
Servings
people
Ingredients
Votes: 0
Rating: 0
You:
Rate this recipe!
Instructions
  1. Combine the beans and their liquid, onion, basil, and red pepper, and freshly ground black pepper to taste in a heavy-bottomed pot large enough to contain the cooked pasta and beans. If the bean cooking liquid and wine does not cover the beans, add water to just cover.
  2. Simmer, partially covered approximately twenty minutes. Taste for salt after about 10 minutes. Remember that the pasta will be well salted and you will be adding Parmigiano so best not to over-salt at this point.
  3. Meanwhile, bruise the garlic with the side of a knife.
  4. Sauté the garlic in the olive oil very slowly until browned. Garlic should be quite brown but not burnt which would make it bitter. Remove and discard garlic. Reserve the garlic-flavored oil.
  5. Cook pasta in 4 quarts of abundantly salted water. The pasta will finish cooking with the beans, so there should still be a small core of hard pasta in the center.
  6. Just before draining the pasta, scoop out and reserve about two cups of the pasta cooking liquid.
  7. If you will not be serving the pasta e fagioli in the cooking pot, pour some of the cooking water into the serving bowl to warm it while you finish cooking the pasta and beans.
  8. Drain the pasta but leave some water clinging. That is, there is no need to shake the colander. Add the pasta to the bean mixture. Stir to combine. Add the garlic oil. Mix well.
  9. Cover tightly and cook over very low heat for approximately 10-15 minutes stirring occasionally until the pasta is cooked through but still ad dente. Add a little of the reserved pasta water from time to time if needed. When the pasta is finished there should be just enough water remaining to create a sauce.
  10. Off the heat, stir in the Parmigiano Reggiano.
  11. The combination of the cheese and the starch from both the bean cooking liquid and the pasta cooking liquid should create a glossy sauce.
  12. You might want to stir in an extra tablespoon or two of extra virgin olive oil both for the flavor and to help emulsify the sauce. Taste and adjust salt and pepper if needed.
  13. If not serving the pasta in the cooking pot, drain and dry the warmed serving bowl and pour in the pasta.
  14. Serve the pasta e fagioli with additional freshly grated Parmigiano Reggiano cheese and crushed red pepper.
Recipe Notes

More than other seasonings, quantities of dried red pepper are mere suggestions. Different types of red peppers vary in their heat and flavor profile. Different people have different tolerances for the heat of peppers. If I were making this dish for only myself, I would add at least a teaspoon of crushed red pepper and I’d probably still add more at the table. The suggested ¼ teaspoon is a modest amount that should not cause difficulty, even for individuals with a low tolerance for spiciness. However, make sure that you use one of the more traditional types of crushed red peppers, or even the whole dried Italian peppers that I used in this recipe. Do not make the mistake of using a dried version of one of the super-hot peppers (like bhut jalokia or naga jalokia or even Habanero or Scotch Bonnet) without understanding the heat level they pack!

Copyright © 2017 by VillaSentieri.com. All rights reserved.

Share this Recipe

Merluzzo in Umido (Cod in Light Tomato Sauce)

January 4, 2017

The first time I had Merluzzo in Umido was November 1992.  My husband and I took my mother, his mother, and his fraternal grandmother to Santa Fe for a week over Thanksgiving.  At the time, we were living in Chicago.  We rented an ancient adobe house off Garcia Street.  The house didn’t have any central heat though it did have a frightening array of heating devices that included a kiva fireplace, a direct-vent gas heater in the living room, a portable electric heater in one of the bedrooms, wall-mounted electric radiant heaters in the bathrooms, and nothing in the kitchen.  If the oven wasn’t on, the kitchen was the coldest room in the house as it had three outside walls and a door that didn’t seal very well.

Of course, it was reported to be the coldest winter that Santa Fe had experienced in 100 years! In addition to cold, there was lots of snow. And there we were, in a drafty old adobe house with no central heat enjoying a week with the likes of The Golden Girls!

We had a blast.

We had been house hunting in Santa Fe since April of that year.  On that November trip we saw several houses we liked.  We spent a few evenings rating each of the houses on an array of factors using a spreadsheet.  (In my professional life, we would have called this a prioritization matrix or selection grid. It’s a technique I’ve taught to hundreds of health care professionals over several decades.)  One afternoon we all piled into the car to look at the two finalists in the property hunt.  We were uncertain which one to buy.  Not so the women.  A little house on Griffin Street was the undisputed, hands-down favorite.  Deal done!

We put in an offer and closed in January.  For most of December my mother kept saying that she wanted to go back to Santa Fe and stay in the house in the spring.  We did a bit of remodeling and moved into the house in March.  Unfortunately, my mother died in January, shortly before we closed on the house.  She never got to experience her dream of returning to Santa Fe.  We had that house for more than nine years before we moved into a much larger Santa Fe property in Ricardo-Legorreta-designed Zocalo.  After Zocalo, we built and moved into Villa Sentieri overlooking the city.

I frequently think of that trip.  It was memorable in so many ways.  We found our first house in Santa Fe.  I got to spend quality time with my mother in the last weeks of her life.  My husband and I had interviews to get our medical licenses in New Mexico.  (It’s the only time either of us has been personally interviewed for a medical license!).   And, I learned how to make Merluzzo in Umido, one of many recipes that my husband’s grandmother brought with her from Italy.

Print Recipe
Merluzzo in Umido (Cod in Light Tomato Sauce)
If possible, by large filets of cod and portion them at home. Three pounds is enough for eight people. The advantage of portioning the fish at home is that you can make some smaller pieces for individuals with smaller appetites. Cod is a perfect fish for this dish because it is forgiving in terms of being overcooked. However, any firm, white, non-oily fish will taste great. I used a 15-inch rondeau to cook the cod. It held the fish in a single layer. If you don’t have a pan large enough to hold the fish in one layer, make the sauce in a single sauté pan then divide it among two different pans to cook the fish.
Votes: 0
Rating: 0
You:
Rate this recipe!
Cuisine Italian
Prep Time 20 minutes
Cook Time 1 hour
Servings
people
Ingredients
Cuisine Italian
Prep Time 20 minutes
Cook Time 1 hour
Servings
people
Ingredients
Votes: 0
Rating: 0
You:
Rate this recipe!
Instructions
  1. Cut the cod into 8 to 10 serving pieces. Though you can cook whole filets, it will be easier to get the fish out of the pan if cut into portions.
  2. In rondeau large enough to hold the fish in one layer, sauté the onion and a sprinkling of salt in the olive oil until transparent and slightly golden but not brown.
  3. Add the garlic and sauté until fragrant, about 1 minute.
  4. Add parsley and some freshly ground black pepper. Sauté for a minute or two. The smell of parsley should become noticeably more potent. Do not brown the ingredients of the pan.
  5. Add the wine and cook briskly until the wine evaporates.
  6. Add the tomato paste. Sauté, stirring frequently, until it gets ever so slightly darker and begins to smell sweet. This will take 2-3 minutes.
  7. Add the water, oregano, basil and additional salt and pepper to taste. Boil gently, with the cover slightly askew for 20-30 minutes. The sauce will thicken. If it becomes too thick, add a little additional water. However, the juices from the fish will thin the sauce so it is better for the sauce to start out too thick rather than two thin. The sauce can be made ahead to this point.
  8. With the sauce at a medium boil, add the fish, skin side down. Season with salt and pepper. Cover the pot tightly and cook for approximately 20 minutes until the fish cooks through an flakes easily. The length of time will depend on the type of fish, thickness of the portions, and elevation. Do not turn the fish but occasionally spoon some of the sauce over the top of the cooking fish.
  9. Taste the sauce and adjust seasoning. If the sauce it too thick thin with a little water. If it is too thin, boil it briskly after removing the fish.
  10. Put the fish on a deep serving platter. Pour the sauce over the fish and serve.
Recipe Notes

Parsley stems can be bitter.  When adding parsley to a recipe, I only use the leaves and very tender stems.  To do this, I hold the end of the parsley stem in one hand and slide the stem between the thumb and finger of the other hand.  When my fingers reach the leaves, I pinch off the stem and discard it.  This makes quick work of the parsley and removes any chance of bitterness from the stems.

Copyright © 2017 by VillaSentieri.com.  All rights reserved.

Share this Recipe