Tiella (Southern Italian Vegetable and Pasta Casserole)

September 18, 2017

When I was growing up, we mostly socialized within the extended family plus a very few close family friends (that’s you, Joe and Betty Slivosky!).

It was a time (the 60’s) and place (small-town Western Pennsylvania) where it was rare to call in advance of a visit. One just showed up. This usually happened in the evening after dinner, though almost never on Monday or Thursday when the stores downtown were open until 9 PM and we dressed and went shopping after dinner.

Everyone would sit around (usually in the kitchen) drinking coffee (with caffeine), chatting…and smoking. Oh, the smoking! Occasionally the men would drink beer but unless it was a holiday or celebration of some sort, hard liquor was a rarity.

On Sundays, visiting frequently occurred (or at least started) in the afternoon and there might be two or three stops before heading home.

I can’t tell you how many times I heard the same stories. It’s one of the ways I developed a connection with family members, like my maternal grandparents, who died when I was very young.

To be sure, sometimes my cousin Donna and I would abandon the adults and pursue some childhood activity but we still hung out in the kitchen much of the time.

Often times the conversation would veer towards food; things my grandmother would make, the huge platters of cannoli one of my great aunts would make, what was eaten on holidays, and on and on.

There was the oft-repeated reminder of how my grandfather could come home late at night with a group of friends and how my grandmother would cook for them near midnight. There were stories of my grandmother cleaning and cooking chicken feet. My mother would talk about the time she killed a chicken in the basement and it got away from her and ran, headless, around the room. My father would remind everyone that the only food he didn’t like was gnocchi.

Food was a central feature of our lives.

So was conversation.

There were also times I would just sit in the kitchen and chat with my mother for hours. Relatives and food were common topics of conversation. There were dishes my grandmother made that I heard about over and over but never tasted because my mother never made them for some inexplicable reason. One of them was a quickly sautéed veal chop with a pan sauce made of the drippings in the pan, crushed canned tomatoes, peas, and seasonings. Back in the days when I cooked veal, I actually made it. Now I do it with pork chops.

The other dish that stands out in my memory from these conversations is Tiella. My mother talked of it frequently but never made it. The instructions were basic, a layer of pasta, a layer of potatoes, a layer of zucchini, and a can of tomatoes crushed by hand and poured on top. The whole thing was then baked. There wasn’t much of a discussion of which seasonings to use or proportions of ingredients. It was just assumed it would have garlic (of course it would have garlic) and the herbs that were commonly used in our family. Proportions…well…it just needed to look “right.”

For the number of times my mother rhapsodized about this dish, I can’t figure out why she never made it.

The first time I tried to make it was in the early 1990’s at our little house on Griffin Street in Santa Fe. That first time around, it didn’t live up to the hype, for sure, but it christened the house in an odd way.

In November 1992 my mother, my husband’s mother, and my husband’s grandmother traveled to Santa Fe with us for Thanksgiving week. We looked at property and fell for a little (1151 square foot) house on Griffin Street. My mother was terminally ill at the time. When we got back home, my mother insisted that we use her money for the down payment, which we did. She kept saying that she wanted to live long enough to return to that house in the spring. It didn’t happen. She died in early January.

All of the kitchen gear, china, and glassware for the house on Griffin came from my mother’s house. So, it was fitting that I should make this dish for the first time using my mother’s kitchenware in a house that we owned thanks to her.

It took me many years of working (off and on) on the seasonings and proportions to get it to taste great. (Well, I think it does.) The only real liberty I took with the dish is to use fresh tomatoes rather than canned when I make this in the summer.


Follow us


Click HERE to join our mailing list and you’ll never miss a recipe again!

Print Recipe
Tiella (Southern Italian Vegetable and Pasta Casserole)
This is a wonderful late summer dish when tomatoes are at their peak. If you make it at other times, use a 28 ounce can of whole tomatoes in place of the tomato puree and fresh tomatoes. Pour the liquid in the can over the potatoes instead of the puree. Crush the tomatoes by hand, add the seasonings described for fresh tomatoes, and arrange the crushed tomatoes on top.
Votes: 0
Rating: 0
You:
Rate this recipe!
Prep Time 1 hour
Cook Time 2 hours
Passive Time 30 minutes
Servings
people
Ingredients
Prep Time 1 hour
Cook Time 2 hours
Passive Time 30 minutes
Servings
people
Ingredients
Votes: 0
Rating: 0
You:
Rate this recipe!
Instructions
  1. Preheat the oven to 350°F.
  2. Combine the olive oil and crushed garlic in a small sauté pan. Sauté garlic until lightly browned. Remove the garlic and reserve the oil.
  3. Put the raw ditalini in the bottom of a deep, circular casserole, approximately 10 inches in diameter. The pasta should form a single layer with a fair amount of extra room for it to expand.
  4. Add 2 tablespoons of Parmesan cheese, ¼ of the minced garlic, and 2 tablespoons of the garlic oil and mix well.
  5. In a bowl, toss the sliced potatoes with half the rosemary, ⅓ of the oregano, ¼ of the basil, 2 tablespoons of Parmesan cheese, ¼ of the minced garlic, 2 tablespoons of the garlic oil, and a generous amount of salt and pepper.
  6. Arrange the potatoes neatly in overlapping layers on top of the ditalini. Do not wash the bowl.
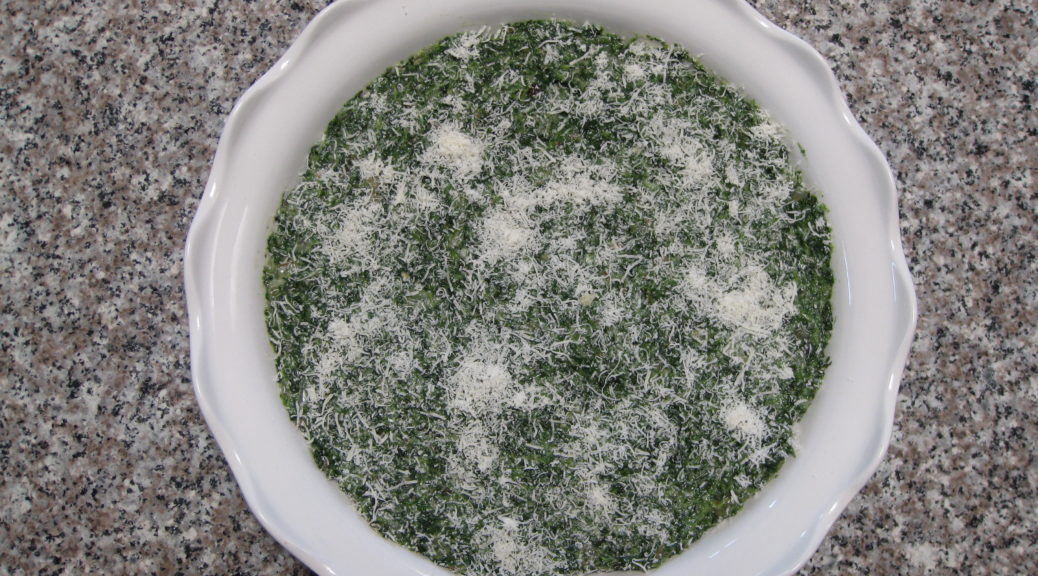
  7. Season the tomato puree with salt and pour over the potatoes.
  8. In the same bowl used for the potatoes, toss the zucchini with the remaining oregano, ¼ of the basil, the remaining rosemary, 2 tablespoons of Parmesan cheese, ¼ of the minced garlic, 2 tablespoons of the garlic oil, and a generous amount of salt and pepper.
  9. Arrange the zucchini on top of the potatoes. Do not wash the bowl.
  10. Neatly arrange half the tomatoes on top of the zucchini. Season with half the remaining minced garlic, half the remaining basil, and salt and pepper.
  11. Arrange the remaining tomatoes on top and season with salt and pepper as well as the remaining garlic, basil, and all the parsley.
  12. Put the tiella in the preheated oven.
  13. Remove the crusts from several slices of day-old Italian or French bread. Whiz the bread in a food processor to make coarse crumbs.
  14. While the tiella bakes, toss the breadcrumbs with the remaining garlic oil in the bowl used for the potatoes and zucchini.
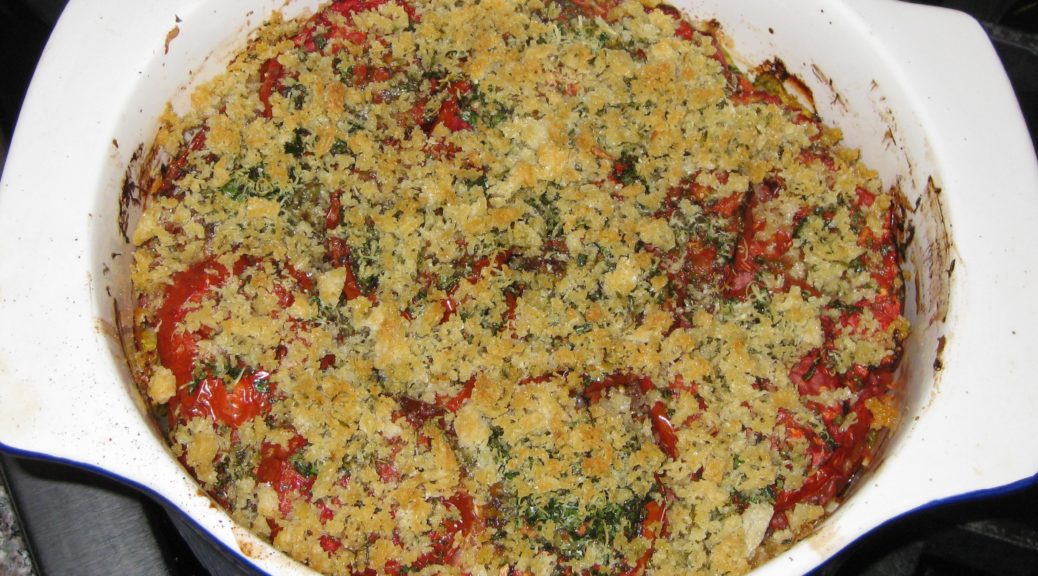
  15. After the tiella has baked for 90 minutes, sprinkle the oiled crumbs on top and bake till golden, approximately 30 minutes more.
  16. Allow to rest at least 30 minutes before serving. The tiella can be served warm or at room temperature. It can also be reheated in the oven briefly before serving, if desired.
Recipe Notes

Here’s the link for my recipe for homemade tomato puree (passata di pomodoro).

Copyright © 2017 by VillaSentieri.com. All rights reserved.

Share this Recipe

Calabacitas: A New Mexican Classic

August 21, 2017

Talk about a dish that simply wouldn’t exist in any recognizable form without new world crops, calabacitas is it! Squash, corn, and chile are all new world plants.

Calabacitas is Spanish for zucchini but is also the name given to a dish of zucchini, corn, and (usually) green chile.

Often served as a side dish, calabacitas makes an awesome burrito, too. Accompany it with some frijoles (and probably a tortilla or three) and you’ve got a great high-protein vegetarian dinner. Leave out the cheese and it’s vegan! Truth be told, I’m plus-minus on the cheese in any case. When serving this for company I usually sprinkle cheese on top as in this recipe, but if it’s just for “us,” cheese isn’t usually even a thought.

This is the time of year to serve the most sublime calabacitas possible as zucchini, corn, green chile, and tomatoes are all in the farmers’ market. But calabacitas is too good to be had only a few weeks a year and, honestly, versions made with frozen corn, canned tomatoes, and roasted green chile that you’ve squirreled away in your freezer along with the ever-present zucchini in the produce aisle are too good to pass up any time of year.

For me, calabacitas shares a serious failing with succotash. They are both great ideas in my estimation but the execution often falls flat.

When I set out to finally perfect a version of calabacitas that I felt comfortable serving, I thought back on all the less-than-perfect renditions I’d had since I first set foot in New Mexico in 1991.

The litany of offenses includes being too watery, being too rich, having huge chunks of zucchini that seem mismatched next to corn kernels, being under-seasoned and being aggressively seasoned.

That set out a plan of action for me. The zucchini should be cut approximately the same size as corn kernels. There needed to be a minimum amount of liquid in the finished dish. Loads of cream or butter or cheese were out of the question. The seasoning should complement the vegetables, not assume control of the dish.

Zucchini (the namesake vegetable) and corn were a given. Pretty much everything else was up for grabs. Tomatoes, which are sometimes included, seemed right for color and a bit of acidic brightness that the zucchini and corn lack. They have the added bonus of being another New World crop. Roasted green chile, also sometimes included, was right for several reasons. It screamed “New Mexico,” it would add a bit of complimentary smokiness to the blend, and, honestly, I’m a chile-head.

My preference was for hot or extra-hot chile. This is wrong for several reasons. First, calabacitas is not traditionally a spicy dish. Second, after one of the dinners where I tested out my evolving recipe, one of the guests said that it was unfortunate that the entire “calabacitas conversation” that evening centered on how hot it was and not on how good it was.

In cooking I prefer to bow to tradition but if there’s ever a place where I butt heads with tradition, it’s in making dishes spicy. But I decided there and then that I should follow tradition and use mild chile in my calabacitas.

Finally I was on to the aromatics and seasoning. Onion and garlic are my go-to combination unless there is some compelling reason for one or the other (usually based on tradition). The herbs eluded me for a while. I really wanted to use Mexican Oregano (which isn’t actually oregano) because of its New World origins but it just seemed to overpower the dish. In the end, I decided that a modest amount of Mediterranean Oregano played best in the sandbox with the other ingredients.

Let me know what you think of my rendition of a New Mexico classic.


Follow us


Click HERE to join our mailing list and you’ll never miss a recipe again!

Print Recipe
Calabacitas: A New Mexican Classic
Traditionally calabacitas is not a spicy dish so it is best to use mild roasted green chile unless you and all your eaters are chile heads. Bacon fat gives a great flavor but olive oil or other vegetable oil is fine, too. Frozen corn works well as there are so many other flavors in the dish but using fresh corn cut off the cob is a definite treat. I prefer to thaw frozen corn before cooking. Ice crystals can sometimes carry a "freezer" taste and rinsing them off can eliminate it. Also, it is easier to time the cooking of the corn in combination with other ingredients if it is not frozen when cooking starts. Rotel packs tomatoes in 10 ounce cans and they’re a bit of a Southwestern classic in and of themselves. In a pinch feta cheese can be used instead of Cotija
Votes: 0
Rating: 0
You:
Rate this recipe!
Prep Time 40 minutes
Cook Time 30 minutes
Servings
people
Ingredients
Prep Time 40 minutes
Cook Time 30 minutes
Servings
people
Ingredients
Votes: 0
Rating: 0
You:
Rate this recipe!
Instructions
  1. Dice the zucchini.
  2. Thaw the corn under running water.
  3. Roasted New Mexico green chile.
  4. Peeled and seeded chile, ready to be chopped.
  5. Sauté the onion until translucent.
  6. Add the garlic and continue to cook until the onion is golden but not brown.
  7. Add the zucchini and sauté until the zucchini is hot.
  8. Add the corn, green chile, tomatoes, oregano, salt, and pepper.
  9. Simmer until the liquid has evaporated and the zucchini and corn are cooked, about 10-15 minutes, depending on your preference.
  10. Adjust oregano, salt and pepper in the last few minutes of cooking.
  11. Serve sprinkled with crumbled Cotija cheese.
Recipe Notes

Copyright © 2017 by VillaSentieri.com. All rights reserved.

Share this Recipe

Fresh Corn Sautéed in Butter

August 16, 2017

I moved full-time from Chicago to Santa Fe in early 2012. I still get asked if I miss anything about Chicago. I think Chicago is a wonderful city but, honestly, the only things I miss are related to food. I miss really good Italian restaurants and I miss the abundance of specialty food shopping.

Go backwards to the late 80’s when I moved from Philadelphia to Chicago (with a one-year stint in Tucson in-between). It was pretty easy for me to find replacements for favorite restaurants and specialty food shopping. It was all but impossible to replace New Jersey farm stands and especially fresh corn, Silver Queen Corn, to be exact.

There I was in the heartland, awash in corn and soybeans, and there was no really good corn-on-the-cob to be had. It was a sad, sad day when I realized something as simple as good corn-on-the cob was basically gone from my table.

To be sure, I bought and cooked corn-on-the-cob but it was never the same.

Not only is Silver Queen an amazing variety of corn but farm stands in New Jersey (at least way back then) were set up on the road alongside the farm. The corn was on the stalk mere hours before it was sold. It was ultra-fresh.

I was actually so enamored of Silver Queen Corn when I lived in Philadelphia that I bought an amateur piece of art simply because of the subject matter. See below.

Then, one day, Jim Nutter prepared corn in a Southern style that compensated for the absence of Silver Queen Corn in my life: Corn Fried in Butter.  I always refer to this as Corn Sautéed in Butter but a Southern cook would most likely refer to it as “fried.”

The method came from his husband’s mother, Mildred Burgess Hamill. Mrs. Burgess, as she was known, ruled her kitchen. One of the very few times Phil Burgess was allowed to help his mother in the kitchen, it was shucking corn for this dish.

The dish is pure simplicity: corn and butter, seasoned with salt and pepper. Sure, you can gussie it up with cream or spice it up with jalapeno peppers but I like it best in its pure state. This two-ingredient recipe (salt and pepper don’t count, really, as ingredients) goes beyond the sum of its parts. I can’t explain why. It just does.

Traditionally, Italians did not eat much fresh corn. Polenta, yes (in the north) but fresh corn, rarely. I made this dish 20-some years ago when my husband’s Great Aunt Fidalma and Great Uncle Faliero were visiting Chicago from Tuscany. Not only did they like it, but Zia Fidalma was fascinated by the tool I used to remove the corn kernels. After seeing me do one ear of corn, she decided to take over and do all the remaining ones!

A nifty tool for cutting kernels off the cob

Follow us


Click HERE to join our mailing list and you’ll never miss a recipe again!

Print Recipe
Fresh Corn Sautéed in Butter
This is an elegant way to serve fresh corn that preserves all of its peak-of-season goodness. You can make it extra-rich by adding a few tablespoons of heavy cream and stirring to incorporate just before removing the corn from the heat, if you would like. You can also change up the flavor profile by adding a finely diced jalapeno pepper at the beginning, as Jim Nutter often does. A pinch of sugar sometimes helps to improve the flavor if the corn is not farm-stand fresh. Some Southern cooks might cook this longer but since really fresh corn tastes good raw, long cooking is not necessary.
Votes: 0
Rating: 0
You:
Rate this recipe!
Course Sides, Vegetables
Cuisine American
Prep Time 15 minutes
Cook Time 10 minutes
Servings
people
Ingredients
Course Sides, Vegetables
Cuisine American
Prep Time 15 minutes
Cook Time 10 minutes
Servings
people
Ingredients
Votes: 0
Rating: 0
You:
Rate this recipe!
Instructions
  1. Cut the corn kernels off the cobs.
  2. Scrape the cobs with a knife to release any juice.
  3. Put the corn and butter in a heavy-bottomed sauté pan.
  4. Season with salt and pepper to taste.
  5. Heat gently to warm the corn and butter.
  6. Cook on medium for approximately 3-5 minutes after the butter melts and the corn “starts dancing” in the butter, stirring frequently. Do not brown the corn or butter.
  7. The finished dish: Corn Fried in Butter.
Recipe Notes

Copyright © 2017 by VillaSentieri.com. All rights reserved.

Share this Recipe

Green Beans with Parmesan Cheese

August 7, 2017

It’s Saturday morning, August 5th and I’m sitting on an airplane writing this post.  I’m bound for Baltimore to visit the younger of my two nephews and his wife and their son.  I have meetings in Washington, DC on Monday and Tuesday so I’m taking this opportunity to visit.

The family members and relatives with whom I am closest are scattered around and I don’t see enough of any of them.

What does all of this have to do with green beans, you might ask?

Everything.

And nothing.

Food is my connector. It connects me to people and places. It evokes memories. It helps to create new ones. It’s a set of shared experiences.

I can’t make my mother’s long-simmered tomato sauce without evoking a slew of memories. My strongest olfactory memory from childhood is being gently awakened by the smell of garlic sizzling in olive oil on Sunday morning as my mother began to make tomato sauce for that day’s dinner. This is the sauce I am making on Sunday at my nephew’s house.

Most recipes that enter my repertory do so because of their connection with people and places. They document my personal history in edible form and cement memories of good times shared with family and friends. Many are family recipes, mine or those of people I know. Some are not, like the Italian Walnut Crostata I created to replicate one I had sitting at a little bar in Venice drinking grappa with my father-in-law in 1996.

That crostata has family connections of a sort. One of the favorite non-Italian desserts in our family is nut roll, brimming with ground sweetened walnuts and encased in just enough lightly sweet yeasted dough to hold it together as it is rolled and baked. While nut roll is more of a Central and Eastern European dessert, it was common in Johnstown, Pennsylvania where I grew up with people from a wide range of ethnic backgrounds.

My Aunt Margie’s nut roll filling is flavored with citrus, hewing toward the Italian, while my mother’s has milk and honey, pointing more towards Eastern Europe. I suspect, though cannot prove, that my Aunt Margie’s filling is more like her mother’s (my Italian grandmother) and my mother’s is more like my father’s mother’s (my Slovak grandmother).

Nut roll is a pastry that I truly miss but it is challenging to make and I have never tackled it despite having my mother’s and my Aunt Margie’s recipes. Except for the one time my cousin, Donna, made it and sent me some and the two times that Michael Alcenius sent me some he made using my Aunt Margie’s recipe, I have been in a nut roll blackout since Aunt Margie died.

The walnut crostata was a revelation. There, in an easy-to-make Italian sweet pastry crust (pasta frolla), was a filling of sweetened, ground walnuts. It wasn’t nut roll but it certainly evoked all the right taste sensations.

I used my husband’s Great Aunt Fidalma’s recipe for pasta frolla and Aunt Margie’s recipe for nut roll filling, to create a dessert that is both reminiscent of that night shooting grappa with my father-in-law in Venice and that preserves recipes from my family and my husband’s family.

Now that I’ve gotten my mouth (and maybe yours) watering for walnut crostata, we’re going to make green beans! I hope, though, that you have a better understanding for the reason this blog exists: to document and preserve traditional recipes along with some sort of a personal story or vignette.

Having just said that, I can’t tell you precisely where this recipe came from but it’s been in my repertory for decades. It is the essence of simplicity, a hallmark of much of Italian home cooking. It also lends itself to being made almost exclusively in advance, making it a perfect dish for a last-minute put-together when entertaining or making a more complicated main course.


Follow us


Click HERE to join our mailing list and you’ll never miss a recipe again!

Print Recipe
Green Beans with Parmesan Cheese
The beans can be cooked in advance and shocked in ice water to stop cooking. The garlic can be sautéed in olive oil in advance, too. Just before serving, heat the oil and toss the beans briefly to warm them. In a serving bowl toss the beans with Parmesan cheese, salt and pepper. This dish can easily be doubled or tripled. Adjust the amount of Parmesan cheese and garlic to your taste. The olive oil is an integral part of the “sauce” so be generous.
Votes: 0
Rating: 0
You:
Rate this recipe!
Course Sides, Vegetables
Cuisine Italian
Servings
Ingredients
Course Sides, Vegetables
Cuisine Italian
Servings
Ingredients
Votes: 0
Rating: 0
You:
Rate this recipe!
Instructions
  1. Wash the beans and cut off the ends. I like to cut the ends at an angle for a better appearance.
  2. Bring a large pot of salted water to a boil.
  3. Meanwhile, bruise the garlic with the side of a chef’s knife.
  4. Add the olive oil and garlic to a skillet, large enough to hold the beans, and heat on medium-low heat until the garlic begins to sizzle.
  5. Sauté, over low to medium-low heat until the garlic is golden.
  6. Remove and discard the garlic.
  7. Remove the oil from the heat.
  8. When the water comes to a boil, add the beans and boil until crisp-tender. This will take just a few minutes depending on the beans and your elevation. The beans should not be crunchy but they should have a distinct “toothiness” and almost squeak as you bite into them.
  9. Drain the beans.
  10. If preparing the beans in advance, shock in ice water.
  11. Add the drained beans to the garlic-flavored olive oil. Heat gently if the beans are cold.
  12. Off the heat, mix in the parmesan cheese, salt to taste, and a generous amount of freshly ground black pepper.
  13. Toss well and serve immediately.
Recipe Notes

Copyright © 2017 by VillaSentieri.com. All rights reserved.

Share this Recipe

Asparagus with Parmesan Cheese

June 12, 2017

I am writing this sitting on a beach in Akumal, Mexico about an hour south of Cancun by car.

On the beach in Akumal
Iguanas enjoying the beach in Akumal

Just a few days ago, I was at home in Santa Fe where the weather was just beginning to turn spring-like.  The week before that I was in Hawaii.

The view from our lanai in Kauai

By the time you’ll be reading this, I’ll be in Palm Springs, where, even today, the temperature is hitting 100°F!

On the patio in Palm Springs before the heat of the day

Needless to say, my sense of seasonality is out of whack at this point.

No matter the temperature or the weather, asparagus says spring!

Just a few days ago, I was eating grilled asparagus in Santa Fe.  Days before that I made an asparagus frittata, before that I cooked the asparagus that is featured in this post.

Asparagus isn’t something I remember much of before college and usually it was the mushy white stuff out of a can.  White asparagus can certainly be a delicacy but when it comes out of a can that’s an impossibility as far as I’m concerned.

College was a time of incredible culinary growth for me.  Growing up I ate wonderful food as my mother was a great cook.  Mostly, though, it was Italian, Slovak, and the American dishes that every kid in the United States grows up eating.

I didn’t learn to cook until freshman year in college.  I was lucky enough to live in a college house at the University of Pennsylvania that was housed on two floors of an otherwise upper class dormitory made up of apartments with kitchens.  The typical freshman dorms either had no kitchens whatsoever or had the most rudimentary cooking facilities shared by large numbers of students.  Since I had a kitchen, I only took out the minimum required meal contract: 10 meals per week.  Usually this meant I ate lunch and dinner in one of the dining halls Monday through Friday.  On weekends I cooked…and baked!

I called home every Sunday from the day I went away to college.  Occasionally there was a lapse, like the time when I was 31 and hadn’t called home in a couple weeks.  The first words out of my mother’s mouth when she heard me on the other end of the line were, “I was just about to put your picture on a milk carton.”  Point made!  [You may or may not know that “back then” the pictures of missing children were put on milk cartons in the hope that someone would recognize them and call the authorities.]

Besides just catching up on our lives, I got advice.  My father gave me advice on how to handle alcohol, what to do if I had too much (don’t lie down and don’t close your eyes, for example), sex, and other topics.

My mother walked me through the steps of how to cook whatever it was I planned on making for dinner that evening.  By the end of freshman year, I was a credible cook.

My gastronomic circle was not very big, however.  Early my freshman year the resident advisors, Dennis and Martha Law from Hong Kong, took a group of us to dinner in Chinatown.  It was exciting, having grown up in a town without a Chinese restaurant.  The tastes, however, were so…well…foreign that I didn’t like much of what was served.  I tasted everything but rarely had more than one bite till something landed on my plate that struck me the right way.  The serving platter made it down the table past two or three other people till Dennis saw me eating.  He commandeered the plate and put it in front of me to be sure I had enough to eat.

By the end of the year I was not only eating, and loving, Chinese food, I had developed a rudimentary understanding of the regional differences and learned the basics of Chinese cooking from Martha.

After my taste buds got over the shock of Chinese food, I started exploring other cuisines.  A favorite became Indian food at Maharaja just a few blocks from my dorm.  It turns out the restaurant was owned by the aunt of someone I now work with!  I believe it was the first Indian restaurant in Philadelphia.

Sophomore year I was not in the college house but had one roommate in a similar upper class dorm with a kitchen.  Meal contracts were only required of freshmen and I saw no point in eating in the dining hall.  The arrangement I struck with my roommate was that I would cook and he would clean up.  It turns out he would eat, and like, most anything so I was free to explore and experiment.

That set the stage for my junior year when I was admitted to another college house, the International Residence Project.  Half of the students were from the USA and half from anywhere else in the world.

My roommate, and best friend for many years, Ray Hugh, hailed from Guyana.  Valrie Tracey from Jamaica became the third member of a triumvirate that was pretty much inseparable for the rest of college.

Two married couples were our resident advisors, Ambrose and Najma Davis, and Reginald and Nanacy Rajapakese.  Ambrose was from Jamaica, Najma from Bangladesh, and Reggie and Nanacy from Sri Lanka.

Nanacy taught me how to make Sri Lankan food and I’m almost as comfortable making that as I am Italian.  I remained close friends with Nanacy and Reggie, even making several trips to Sri Lanka with Nanacy in the last few years, after Reggie’s death.

Ray and I have reconnected on Facebook which is rekindling many memories of the trips I made to Guyana and my experiences in learning to make Guyanese and Chinese food from Ray and his mother.  Ray’s grandparents on both sides emigrated from China to Guyana in the 1800’s.

Ray and I packed an incredible amount of cooking power into a tiny dormitory kitchen.  Without enough cabinet space to store ingredients, we had stacks and stacks of plastic milk delivery crates packed with an unimaginable assortment of ingredients from international food markets.

Our apartment became known as the place for midnight snacks and folks always came knocking on the door around then to see what we’d whipped up to nibble on.

That was the year I discovered that my stovetop Corning percolator made a serviceable stand-in for an asparagus steamer.


Asparagus steamer in a pinch!

Click HERE to join our mailing list and you’ll never miss a recipe again!

Print Recipe
Asparagus with Parmesan Cheese
Asparagus is best cooked in an asparagus steamer. This small-diameter, tall pot allows the bottom of the asparagus spears to boil in the water while the tender tips cook by steaming. When I was a college student and didn’t have an asparagus steamer I used my stovetop Corning Ware percolator. If you don’t have a steamer, or a reasonable substitute, I find it preferable to cook the asparagus in a microwave oven rather than to boil them. After rinsing off the asparagus, put the spears and whatever water clings to them in a microwave-safe dish with a cover. Cook in 1-2 minute increments, moving the spears around after each bout of zapping, until cooked but still a little “toothy” (and certainly not mushy).
Votes: 0
Rating: 0
You:
Rate this recipe!
Course Sides, Vegetables
Cuisine Italian
Prep Time 10 minutes
Cook Time 15 minutes
Servings
people
Ingredients
Course Sides, Vegetables
Cuisine Italian
Prep Time 10 minutes
Cook Time 15 minutes
Servings
people
Ingredients
Votes: 0
Rating: 0
You:
Rate this recipe!
Instructions
  1. Trim the tough ends off the asparagus. The “Notes” section below contains a link to a blog post describing how to do this.
  2. Crush the garlic with the side of a chef’s knife.
  3. Heat the olive oil in a small sauté pan over low heat. Add the garlic and sauté slowly until brown, pressing down on the garlic occasionally.
  4. Discard the garlic. Reserve the oil.
  5. Cook the asparagus until toothy, neither crunchy nor mushy. If you do this in an asparagus steamer, put about two inches of water in the bottom and bring to a boil. Lower in the basket with the asparagus. It will take 5-10 minutes, depending on the asparagus and your elevation, to cook the asparagus properly.
  6. Put the cooked asparagus in a warmed serving bowl.
  7. Add the garlic-infused olive oil and mix.
  8. Add the Parmigiano Reggiano cheese and the salt and freshly ground black pepper to taste. Mix well.
  9. Drizzle with lemon juice and serve.
Recipe Notes

You can find videos of prepping asparagus here.

Copyright © 2017 by VillaSentieri.com. All rights reserved.

Share this Recipe

Green Beans with Tomato Sauce and Bacon

February 27, 2017

Earlier this month I wrote about my “crunchy vegetable” phase of cooking back in the 1970’s.  One of the dishes I was reacting to was my mother’s green beans with tomato sauce and bacon.  Honestly, though, I can’t tell you why.  It was, bar none, my favorite vegetable dish growing up.  Why, when I started cooking in my late teens, I thought I could make it better by cooking the beans until they were just crunchy is beyond me.

Chalk it up to youthful indiscretion.

Americans served a lot of mushy vegetables back then, no doubt, but the reaction shouldn’t be to turn every vegetable crunchy.  But I was just learning to cook and had a lot to learn, not only about technique, but about understanding the essence of a dish.

The essence of this dish is the silky texture (most definitely not mushy) of the beans cooked for a couple of hours in tomato sauce.  The textural change is accompanied by a flavor change that is unobtainable by quickly cooking the ingredients.

It’s actually pretty difficult to turn these beans mushy unless you boil them too long before adding them to the tomato sauce.  The tomato sauce reacts with the beans to somehow inhibit the development of mushiness.  I’m not sure, but it think it might be the acid in the tomatoes.

That first four minute boil is critical, however.  One time, thinking I could eliminate a step, I tried putting the cut up beans in the sauce without parboiling them first.  Mistake!  Four hours later the beans were still not cooked properly!

Green beans cooked in tomato sauce is a classic Italian combination.  The use of bacon clearly signals that this is Italian-American, however.  Italian recipes might use pancetta but not bacon.  Smoked foods are uncommon in traditional Italian cuisine.  The few that appear really stand out.

Pancetta and bacon are made from the same cut, pork belly.  Both are cured but only bacon is smoked.  Although I’ve made other versions of green beans in tomato sauce that are traditional Italian, rather than Italian-American, I keep coming back to this one as my favorite.

Print Recipe
Green Beans with Tomato Sauce and Bacon
These long-simmered green beans in tomato sauce with bacon are an Italian-American favorite. The long, slow cooking is really essential to achieving the right texture and flavor. Although I've specified the amount of water in cups, when cooking with tomato paste my mother always measured water by the can. This dish would have had five tomato paste cans of water. She didn't quite fill them to the top so each can held about 5 1/2 ounces of water, or a little over three cups total. You may need to add more water, or to boil some away, to get a thick sauce.
Votes: 0
Rating: 0
You:
Rate this recipe!
Course Vegetables
Cuisine Italian
Prep Time 25 minutes
Cook Time 3 hours
Servings
people
Ingredients
Course Vegetables
Cuisine Italian
Prep Time 25 minutes
Cook Time 3 hours
Servings
people
Ingredients
Votes: 0
Rating: 0
You:
Rate this recipe!
Instructions
  1. Cut the bacon into matchstick-sized pieces.
  2. Mince the garlic.
  3. In a heavy-bottomed pot, large enough to ultimately hold the beans, gently sauté the bacon until golden brown.
  4. Add the minced garlic to the bacon and bacon drippings and sauté until fragrant and just beginning to turn golden, about one minute.
  5. Add the tomato paste and sauté until it turns a shade darker and smells sweet.
  6. Add the water, stirring to combine. Cover and bring to a boil.
  7. Reduce to a simmer. Add salt, freshly ground black pepper to taste, oregano and sugar. Simmer, partially covered, for 45-60 minutes, stirring occasionally.
  8. Meanwhile, cut the tips off the beans at a diagonal. Cut the beans into pieces about 2 to 2 ½ inches long, also on the diagonal.
  9. Wash the beans in several changes of cold water. Cover with water and allow the beans to soak for 15 to 20 minutes, to fully plump up with water before cooking.
  10. Bring a large pot of heavily salted water (at least 4 quarts of water and ¼ cup of salt) to a boil.
  11. Drain the beans, add to the boiling water, and return to a boil as quickly as possible.
  12. Boil until the beans are just beginning to get tender, approximately 4 minutes. They will cook much longer in the sauce so be careful not to overcook them at this point.
  13. Drain the beans and add to the tomato sauce, which should have been cooking for 45-60 minutes by this point.
  14. Simmer until the beans are silky, but not mushy. This can take 2 hours, plus or minus. Go by texture, not time. The beans should be silky but still have some body.
  15. Taste once or twice while cooking and adjust salt, pepper and, if you wish, oregano.
Recipe Notes

You can make the sauce and partially cook the beans in advance. After the beans have been boiled, quickly chill them in a bowl of ice water. Cool the cooked sauce to room temperature.  Drain and add the partially cooked beans to the sauce.  Refrigerate until ready to complete cooking.

Copyright © 2017 by VillaSentieri.com. All rights reserved.

Share this Recipe

Rapini with Olive Oil, Garlic, and Red Pepper

February 13, 2017

On the whole, Italians like bitter greens.  In fact, Italians like bitter flavors in general.  For example, consider classic Italian digestifs of Fernet Branca and Ferrochina Bissleri.  Less bitter drinks include Cynar.

Rapini is a bitter green.  As with many foods, names vary.  Rapini can also be called Broccoli Raab, Broccoli Rabe, and Cime di Rape.  While some authorities say that Broccolini and Baby Broccoli are also Rapini, I have found that in American markets, these greens are usually less bitter than Rapini.  I suspect that a different variety of green is marketed under these names in the US.

Greens with olive oil, garlic and red pepper is a classic combination.  With the addition of some anchovies, it makes a wonderful sauce for pasta, especially orecchiette.

In 1989 I moved to Chicago to assume the position of Medical Director of  Chicago-Read Mental Health Center.  At the time, it was the second busiest psychiatric facility in the country.  (Only New York City had a busier psychiatric facility.)  The hospital was on the northwest side of Chicago close to both Italian and Polish neighborhoods so lunches with co-workers were always gastronomically rewarding.

I remember one lunch, early on in my tenure as Medical Director, at a nearby Italian restaurant.  The executive leadership team when out.  I ordered Rapini with Garlic and Oil for my antipasto.  What I got was an Italian-American sized portion of greens in a garlicky, surprisingly spicy broth with lots of bread on the side.

It was glorious.

This version is more restrained.  It is what we serve at home.  However, feel free to amp it up with more olive oil, garlic and red pepper if you’d like.  You can also leave a little more liquid in the dish to sop up with bread, if you’d like.

Print Recipe
Rapini with Olive Oil, Garlic, and Red Pepper
This dish can be made with Rapini, Broccoli Rabe, Cime di Rape, Broccolini, or Baby Broccoli. In the United States, Broccolini and Baby Broccoli seem to be less bitter than Rapini. Which to use is personal taste. It doesn’t take long to cook the greens in the boiling water. It is best to undercook them rather than overcook them as they get a second pass at the heat and can be cooked more if needed. Once the rapini are in the serving bowl I like to douse them with a few tablespoons of spicy extra-virgin olive oil for flavor. Heating olive oil tends to dull its flavor so it is almost always a good idea to add an extra bit of uncooked oil at the end.
Votes: 0
Rating: 0
You:
Rate this recipe!
Course Sides, Vegetables
Cuisine Italian
Prep Time 30 minutes
Cook Time 25 minutes
Servings
people
Ingredients
Course Sides, Vegetables
Cuisine Italian
Prep Time 30 minutes
Cook Time 25 minutes
Servings
people
Ingredients
Votes: 0
Rating: 0
You:
Rate this recipe!
Instructions
  1. The starting point: rapini from the market.
  2. Cut the very ends off the rapini stems.
  3. Find the part on the stem where it begins to branch in a major way. Cut crosswise at this point.
  4. If there are any little offshoots below the cut, remove them. Combine the little offshoots with the tops. Keep the bottom stems separate from the tops.
  5. Remove the outer layer of the peel from the bottom stems. To do this, look at the bottom of the stem. You’ll see a dark green layer surrounding a lighter green center. Insert a sharp paring knife into the stem just where the dark green ends.
  6. Grab the peel between your thumb and the knife and pull down to remove.
  7. Cut the peeled bottom stems into pieces approximately 1 ½ inches long.
  8. You do not need to peel or cut the tops.
  9. Bring three quarts of water to the boil. Add three tablespoons of salt.
  10. Put a bunch of ice cubes in a large mixing bowl add cover with water. Set the ice water aside.
  11. Add the stems to the boiling water. Return to a boil. Cook for 3½ to 4 minutes if you are near sea level but up to five minutes if you are at high elevation. They are done when they are toothy but have lost their crunch.
  12. Using a perforated ladle, remove the stems from the boiling water and put into the bowl of ice water to stop cooking.
  13. Add the tops to the boiling water. Return to a boil. Cook for about 2 minutes if you are near sea level but up to three minutes if you are at high elevation.
  14. Using a perforated ladle, remove the tops from the boiling water and add to the bowl of ice water along with the stem ends.
  15. Thinly slice the garlic crosswise and reserve.
  16. In a large sauté pan, heat 1/3 cup of olive oil over medium heat. Add the garlic, turn the heat to low, and sauté gently until the garlic is golden. Add crushed red pepper and continue to sauté until the garlic is light brown.
  17. Add the wine. The dish can be made ahead to this point. If doing so, immediately remove the garlic-wine mixture from the stove. The addition of the wine will stop the garlic from over-cooking. When resuming, or if you’re not taking a break at this point, bubble away the wine over medium heat until only oil is left in the pan.
  18. Drain the rapini.
  19. Add the rapini to the garlic and oil. Season with salt and freshly ground black pepper. Cover and cook briefly until heated through.
  20. If the rapini are not cooked enough to your taste, cook a bit longer. If necessary add a tablespoon or two of water.
  21. Adjust seasoning.
  22. Pour into a serving bowl and drizzle with a few tablespoons of olive oil. Serve immediately.
Recipe Notes

Copyright © 2017 by VillaSentieri.com. All rights reserved.

Share this Recipe

Cavolfiore alla Friulana (Cauliflower Friuli-Style)

February 1, 2017

I started cooking in the early 1970’s when most cooking authorities were trying to convince us that vegetables needed to be crunchy to be good.  No doubt, many vegetables served on American tables were gray, mushy and lifeless but not all vegetables, and certainly not all vegetable dishes, are meant to be toothy, let along crunchy.

I was having a conversation with friends over dinner in Palm Springs just last week about cooking .  They asked me when I started cooking and when I told them, the muscles on their faces froze ever so briefly which made me do a quick calculation.  I started cooking before they were born!  Which means, basically, I’ve seen a lot of food fads and crazes.  I try to avoid them.

I embrace new ingredients or, as is more often the case with “new” ingredients, old ingredients that are finally finding their way to our markets and are, therefore, new to us.  When I think about the ingredients that are available to me now compared to when I started cooking, the difference is staggering.

Honestly, though, the core of my cooking hasn’t changed.  I still focus on traditional foods.  I try to find dishes that have stood the test of time; dishes that have been made for a generation or two, if not a century or two.

Sometimes, though, food crazes get us to think about how we cook and cause us to make changes for the better.  Take crunchy vegetables.  I think American vegetable cookery started getting better when “everyone” was hyping crunchy vegetables.  It got us to think about what was on our plates and whether the essence of a particular vegetable dish was best presented with soft vegetables, crunchy vegetables, or something in between.

Not every vegetable dish is better with crunchy vegetables.  That took me a while to learn as a novice cook in the 1970s when I tried to convert every vegetable recipe to one with toothy vegetables.  They were not all successful.  Not only does texture change with more cooking, flavor does too.  Sometimes those flavor changes “make” the dish as much as the textural change.

This recipe is a good example, though it is not one that I was making in the 70’s.  The essence of the dish is slow-cooked cauliflower and onions that become sweet as the natural sugars caramelize and the cauliflower softens.

I learned to make this from my mother-in-law, who is from Friuli.  Friuli is northeast of Venice, adjacent to Slovenia.  The food definitely shows the influence of Eastern and Central Europe but more on that in upcoming posts.

Print Recipe
Cavolfiore alla Friulana (Cauliflower Friuli-Style)
This dish goes really well with roasted meat. It is a little on the sweet side because the sugars in the onion and cauliflower caramelize during the long, slow cooking. I especially like it with roast chicken or roast pork. Experiment with the cooking time to achieve different textures, but never crunchy. The cauliflower should be soft but not mushy. You can keep the florets more intact during the cooking by being gentle. You can also press down on them every now and then causing them to break up. Both styles are equally traditional. As you will see in the pictures, I opted for longer cooking to create more caramelization and the pressing motion to break the florets into small pieces.
Votes: 0
Rating: 0
You:
Rate this recipe!
Course Sides, Vegetables
Cuisine Italian
Prep Time 20 minutes
Cook Time 2 hours
Servings
people
Ingredients
Course Sides, Vegetables
Cuisine Italian
Prep Time 20 minutes
Cook Time 2 hours
Servings
people
Ingredients
Votes: 0
Rating: 0
You:
Rate this recipe!
Instructions
  1. Bring a large pot of heavily salted water to a boil.
  2. Meanwhile, cut off the base of stem of the cauliflower and remove the green leaves.
  3. Add the cauliflower to the boiling water and cook, uncovered, until it shows just a little resistance when pierced with the point of a knife. This will take between 6 and 10 minutes depending on the cauliflower and how far above sea level you are. When in doubt, opt for less cooking rather than more as you can compensate during the slow-cooking phase.
  4. Using a large slotted spoon, remove the cauliflower. Place it in a colander to drain.
  5. Meanwhile, in a large sauté pan, sauté the diced onion in olive oil (or butter) over medium-high heat. Season with salt. The salt will draw out moisture from the onion. As the moisture evaporates you will need to reduce the heat to medium-low to prevent the onion from browning.
  6. When the liquid has evaporated and the onion is beginning to soften, add the minced garlic, if you are using it. Continue to cook over low heat until the onion turns golden but not brown. This can easily take another 20-30 minutes.
  7. As the onion is cooking, cut the cooked cauliflower into florets.
  8. When the onion is golden, add the cauliflower. Season with salt and freshly ground black pepper. Cover and cook, stirring occasionally.
  9. Add a little wine or water from time to time, as needed, to keep the cauliflower from sticking. There really shouldn’t be any appreciable liquid in the bottom of the pan. Should that happen, uncover the pan slightly till the liquid evaporates.
  10. The florets will break apart as the cauliflower cooks. If you want small pieces, press down on the cauliflower from time to time while cooking. As the cauliflower cooks, taste a few times to adjust salt and pepper.
  11. The cauliflower will slowly darken through caramelization. How far you want to go is up to you. I went fairly far when cooking the cauliflower in these pictures. The cauliflower gets softer the longer it cooks but it also caramelizes more. Figure out the balance of texture and taste you like best.
Recipe Notes

Copyright © 2017 by VillaSentieri.com. All rights reserved.

Share this Recipe

Sformato di Spinaci (Spinach Casserole)

January 13, 2017

The word sformato in Italian means deformed or shapeless.  When applied to food, standard Italian-English dictionaries often translate it as pie or soufflé. It is none of the above.

A sformato is most definitely not deformed or shapeless.  In fact, a food historian described a sformato as “something that was cooked in the mould [sic] and then extracted from it” (Alexandra Grigorieva, Naming Authenticity and Regional Italian Cuisine in Authenticity in the Kitchen: Proceedings of the Oxford Symposium on Food and Cookery 2005, edited by Richard Hosking).  Nor is a sformato really a pie or a soufflé as those terms are usually used.  It has no crust of any sort, as would a pie.  It is not puffy like a souffle.  Sometimes it doesn’t even contain eggs.

A sformato is most often made of vegetables, usually bound with some combination of eggs, cream, cheese, and/or béchamel (balsamella or besciamella in Italian), and cooked in a baking dish.  I think the best English translation of the word is casserole.

Sformato di Spinaci, spinach sformato (or, reluctantly, spinach casserole), is one of those dishes that has iconic status in my husband’s family.  Like Merluzzo in Umido, the recipe came from Italy with his grandmother whom we called Nonni.  Nonni is one of those made up words that sometimes take hold in a family based on the mispronunciations of little kids.  The Italian word for grandmother is Nonna.  However, Nonni is to Nonna as Gramma is to Grandmother.

Just as Pasta Ascuitta has only one meaning in my family, Sformato has only one meaning in my husband’s.  If you simply say “sformato,” everyone knows you mean spinach sformato, and not, for example, cauliflower sformato.

I first had sformato at Christmas Dinner at my in-law’s house in 1989.  Although I had been cooking northern Italian food since 1973 based largely on Marcella Hazan’s wonderful cookbooks, that Christmas was really the beginning of my learning to make some of my husband’s family’s northern Italian favorites.  It’s really a whole different taste profile from the southern Italian dishes I grew up with.

I’ve actually taken a heretical twist with my interpretation of Nonni’s sformato. I’ve added a little balsamella for moisture. This was most definitely not in the original, though it is not an uncommon addition to sformato. If you want to make the original version, just leave out the balsamella.  It will be a little drier.  You might want to not squeeze the spinach quite as tightly if you don’t include the balsamella.

Print Recipe
Sformato di Spinaci (Spinach Sformato or Spinach Casserole)
Nonni always made this with ground beef but Italian sausage, casing removed and crumbled, works really well (a bit of southern Italian heresy creeping in!). It can also be made without meat, but the amount of spinach should be increased by an additional 10 oz. to a total of 30 oz. I have occasionally used fresh spinach but, honestly, frozen chopped spinach works just fine. I doubt you could reliably tell the difference in a side-by-side comparison of fresh vs. frozen spinach in this dish.
Votes: 0
Rating: 0
You:
Rate this recipe!
Course Vegetables
Cuisine Italian
Prep Time 45 minutes
Cook Time 1 hour
Passive Time 15 minutes
Servings
people
Ingredients
For the spinach mixture
For the balsamella
Course Vegetables
Cuisine Italian
Prep Time 45 minutes
Cook Time 1 hour
Passive Time 15 minutes
Servings
people
Ingredients
For the spinach mixture
For the balsamella
Votes: 0
Rating: 0
You:
Rate this recipe!
Instructions
For the spinach mixture
  1. Cook the frozen spinach in a heavy bottomed sauce pan tightly covered until thawed, breaking up the spinach from time to time.
  2. As soon as the spinach is thawed, pour the contents of the pan into a fine mesh sieve and allow the spinach to drain and cool.
  3. When the spinach is cool enough to handle, squeeze small handfuls of the spinach to remove excess water.
  4. Cut through the mass of squeezed spinach about eight or ten times with a knife then rub it through your fingers to loosen it. It will be pretty tightly wadded up from squeezing out the liquid.
  5. Brown the ground beef or sausage in olive oil over medium heat. You want to get some really browned bits of meat for the flavor. Don't make the mistake of just cooking the meat until it is no longer pink.
  6. When the meat is nicely browned, add the onion and cook until golden and soft. Add the garlic and sauté until fragrant, about 1-2 minutes.
  7. Combine the meat mixture and spinach in a large mixing bowl. Season with salt and pepper and allow to cool briefly.
  8. Meanwhile, make the breadcrumbs by removing the crusts from a slice of two-day old home-style white bread. Tear the bread into pieces and whiz in a food processor until processed into evenly sized crumbs. Reserve.
  9. Melt the butter and toss with the breadcrumbs. Reserve.
  10. Make the balsamella (see directions below).
  11. Add the balsamella to the cooled meat and spinach mixture. Stir well, loosening up the spinach. When well combined, stir in the eggs. Be certain that the mixture is not so hot that it cooks the eggs.
  12. Reserve two tablespoons of the Parmesan cheese and mix the remainder into the spinach-meat-balsamella mixture.
  13. Pour the spinach mixture into a buttered 9-inch round or 8-inch square baking dish. Sprinkle top with the buttered crumbs and reserved Parmesan cheese.
  14. Bake at 350°F for approximately 60 minutes or until golden brown.
  15. Cool about 10 minutes before cutting and serving.
For the balsamella
  1. Heat the milk in a small heavy-bottomed saucepan until bubbles begin to form around the edges. Do not bring the milk to a boil.
  2. Meanwhile, melt the butter in a saucepan and add the flour when the foam subsides. Cook for several minutes without browning.
  3. Add the milk, approximately two tablespoonsful at a time, mixing well after each addition. Adding the milk in small amounts should allow you to stir out any lumps before adding the next bit of milk.
  4. After all the milk has been added, bring to a boil and cook for one minute, until thickened.
  5. Remove from the heat and stir in the nutmeg.
Recipe Notes

This recipe doubles well.  If you want to cook a double recipe in a single pan, use a 9-inch by 13-inch baking dish.  Bake at 325°F rather than 350°F as it will brown too much around the outside before the inside is cooked.  If necessary, raise the heat to 375°F at the very end, and put the sformato on the top shelf of the oven, to brown the top.

If you want to use fresh spinach, use 2 pounds instead of the 20 ounces of frozen spinach.  Remove the stems.  Wash the spinach, shaking off most of the water.  Put the spinach in a heavy-bottomed Dutch oven with just the liquid clinging to the leaves.  Cook covered, over medium heat till fully wilted.  Drain and proceed as above with the exception that you will need to do much more chopping of the cooked and squeezed spinach than the eight to ten cuts suggested above.

Copyright © 2017 by VillaSentieri.com. All rights reserved.

Share this Recipe