Chinese Five-Spice Roast Pork

November 22, 2017

My food horizons expanded slowly during freshman and sophomore years in college. I was exposed to Chinese food through Dennis and Martha Law, a graduate student couple from Hong Kong who were the resident advisors in my college house during freshman year. I got exposed to Indian food thanks to the proximity to my dorm of the now long-gone Maharaja Indian Restaurant.

As sophomore year came to a close things were about to get kicked up a notch, to steal a phrase from Emeril Lagasse.


Click HERE to follow us on Facebook


In spring of sophomore year I applied to live in the International Residence Project, another of the University of Pennsylvania’s college houses, during my junior year.

I was accepted into the program and invited to a “meet and greet” with the other students later that semester. The resident advisors were Ambrose and Najma Davis and Reginald (Reggie) and Nanacy Rajapakse. Ambrose was from Jamaica, Najma from Bangladesh and Reggie and Nanacy (whose name was often Anglicized to Nancy) from Sri Lanka.

At the “meet and greet” I was introduced to Ray Hugh, who was to be my roommate. Ray, of Hakka Chinese ancestry, hailed from Guyana. We started hanging out together for the remainder of the semester and then, since we were both staying in Philadelphia for the summer, decided to find a summer sublet together.

Ray and his father, Dr. Hugh, in Georgetown, Guyana, 1974

As I had done the previous summer, we sublet an apartment in Graduate Towers (as discussed in my post on Homemade Applesauce).


Click HERE to join our mailing list and you’ll never miss a recipe again!


Then we started cooking! Guyanese food. Chinese food. Italian food. Indian food. The list went on.

The number of cuisines we cooked exploded beginning in junior year when we moved into the International Residence Project. We got recipes from other residents in the Project who came from all around the world. I (very tentatively) started my cookbook collection which now numbers close to 5000 volumes.

Ray (front center) with from right to left, his mother, sister Fay, sister Shelly, and Shelly’s boyfriend Clive in the suburbs of London, 1975

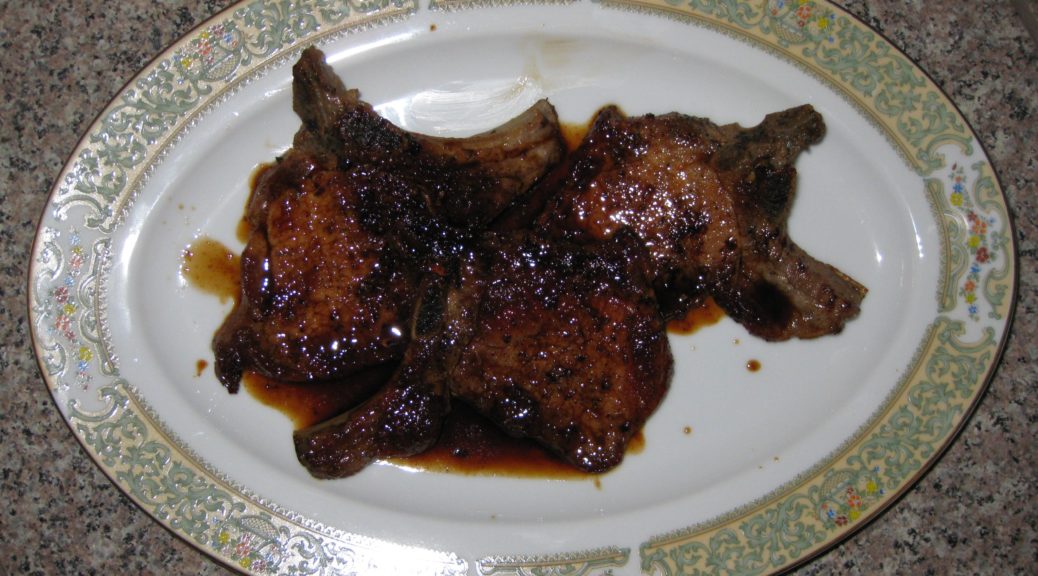
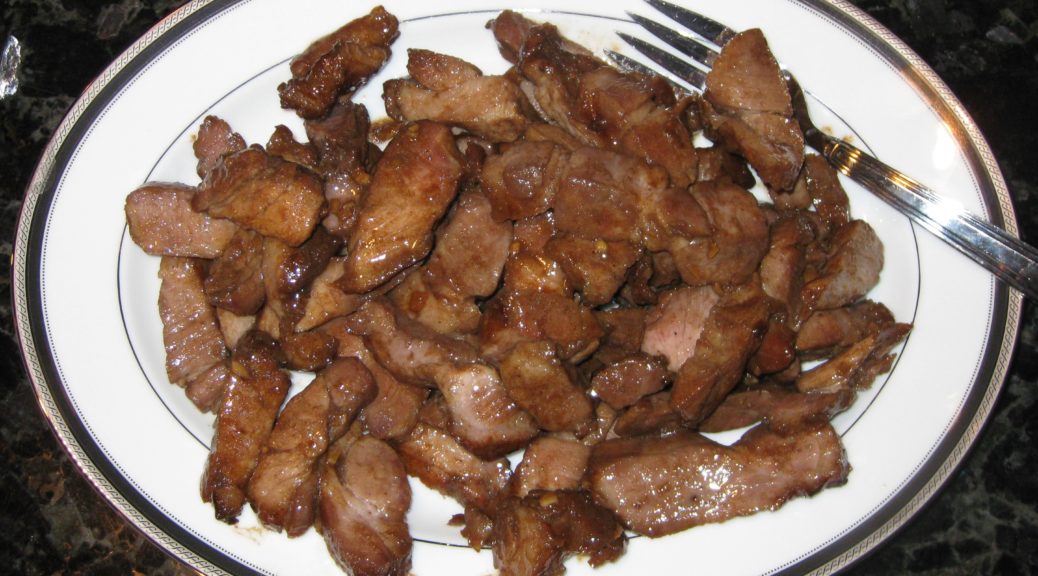
Some dishes we made became regulars (like this roast pork). Others we made once for the sheer challenge.

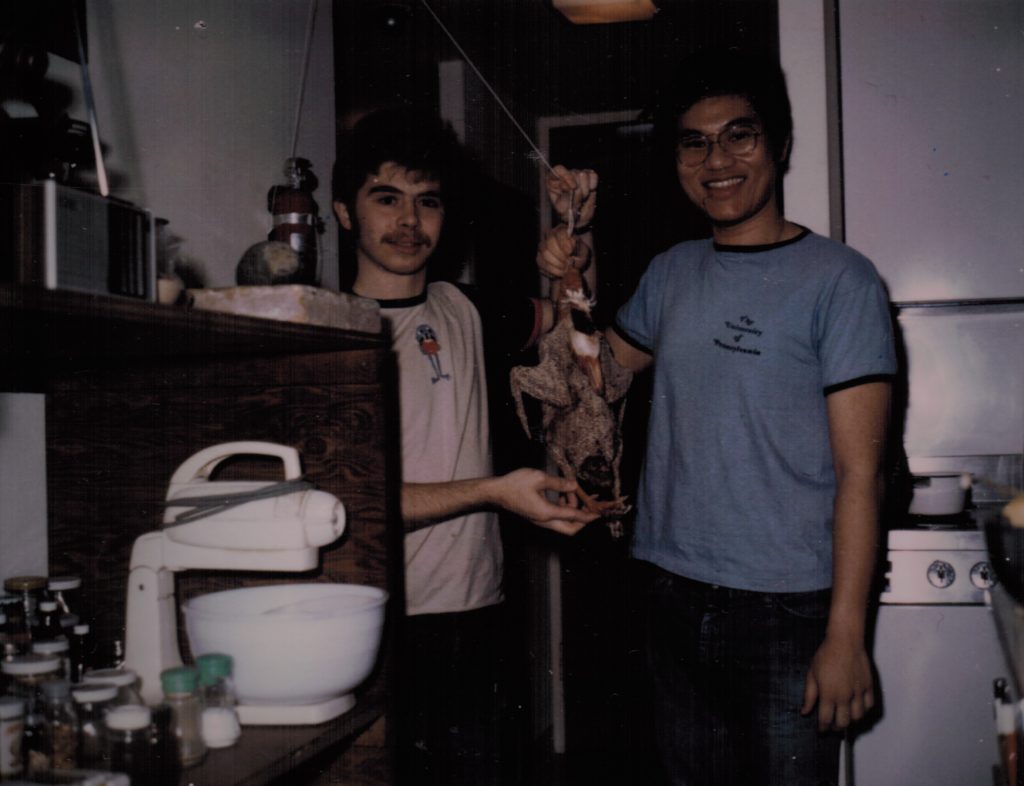
Ray’s mom’s Crispy Duck was in the latter camp. Mrs. Hugh sent us a sheaf of recipes carefully typed out on onion skin paper. Her recipe for plain white rice, included in those pages, was my tutorial on making steamed white rice.  I followed that recipe consistently, with unfailingly perfect results, until we moved to Santa Fe where the elevation, and its effect on cooking, rendered the directions unusable.

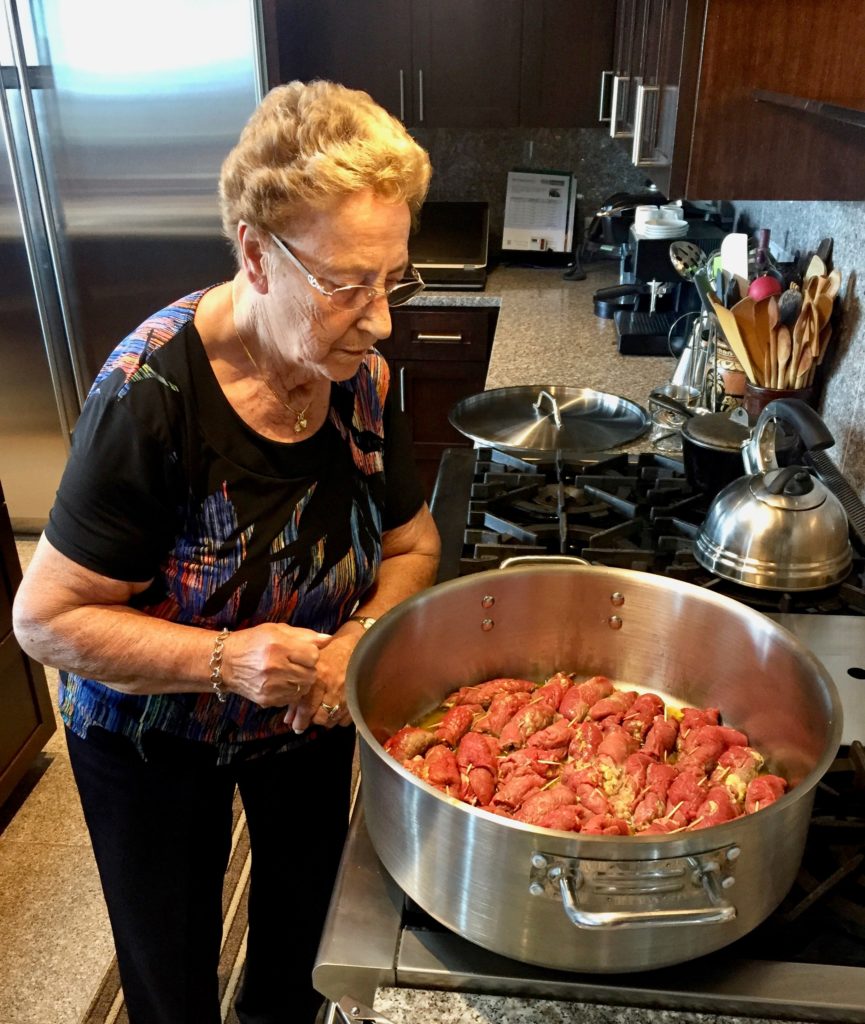
Included in that same sheaf of recipes was Crispy Duck. We started with a whole duck, head and feet included, which we purchased on Ninth Street in Philadelphia. The duck was hung for 24 hours from a hook we screwed into the ceiling while we carefully lacquered it, repeatedly, with a mixture of soy sauce and other ingredients, before roasting.

Me (left) and Ray with Crispy Duck in the early stage, hanging from the ceiling in our dorm apartment, 1975

Compared to the duck, this pork is a breeze. Though Ray, with whom I am still in contact, now recommends marinating it for a day (refrigerated!) if possible, when we were in college the marinating occurred in an hour as the meat was coming to room temperature. I also think that he often used garlic powder rather than fresh garlic. Actually, I think garlic powder works really well to season chicken to be roasted or steaks to be broiled. As I recall, it was pretty tasty on this pork, too.

Everything in this pork is classically Chinese, except, of course, the rum! Likely a rice-based spirit would be used in China but in Guyana the Chinese used rum. Let’s face it, fusion food happens everywhere! Besides, the rum “plays” really nicely with the five spice powder and brown sugar.

Five spice powder is the main flavor and it is important that you use a good quality brand. Not all five-spice powders are created equal. If you don’t have a Chinatown near you, there’s always Amazon. That’s what I did. Despite the existence of a good Asian grocery store in Santa Fe, the five-spice powder that I bought there was not up to my standards.


Follow us


Print Recipe
Chinese Five-Spice Roast Pork
Boneless pork shoulder steaks work well because they contain some fat to keep the meat moist. However, because shoulder steaks contain different muscle groups the texture can change from bite to bite. Well-marbled pork chops with a little fat cap around the edge would work, too. If using bone-in chops, I would use 3 pounds rather than 2 ½ pounds. Be sure to use a good quality five spice powder.
Votes: 0
Rating: 0
You:
Rate this recipe!
Course Mains, Meats
Cuisine Chinese, West Indian
Prep Time 15 minutes
Cook Time 20 minutes
Passive Time 24 hours
Servings
people
Ingredients
Course Mains, Meats
Cuisine Chinese, West Indian
Prep Time 15 minutes
Cook Time 20 minutes
Passive Time 24 hours
Servings
people
Ingredients
Votes: 0
Rating: 0
You:
Rate this recipe!
Instructions
  1. Five spice powder
  2. Combine all ingredients except the pork. Mix well.
  3. Boneless pork shoulder steaks
  4. Add the pork and toss to coat with the marinade.
  5. Marinate the pork in the refrigerator for 24 hours if possible. Turn the pork once or twice while marinating.
  6. One hour before cooking the pork, remove it from the marinade and put it in a single layer in a heavy roasting pan.
  7. Allow the pork to come to room temperature for an hour.
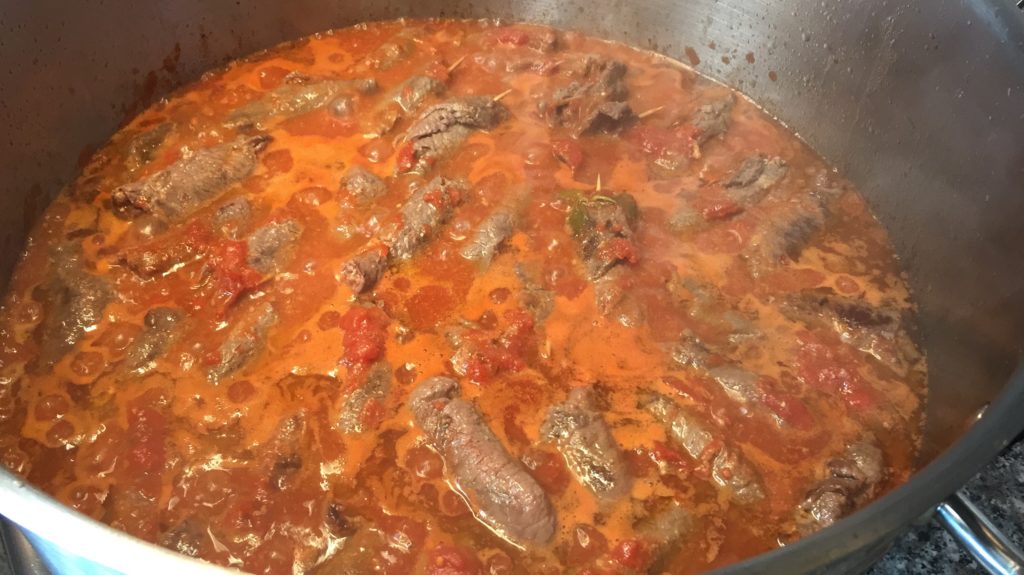
  8. Meanwhile, boil the marinade quickly until it is reduced to approximately 4 tablespoons.
  9. Cool the marinade and pour it over the pork.
  10. Preheat the broiler.
  11. Put the pan with the meat approximately 8 inches below the broiler.
  12. Cook the pork, turning once or twice, until just cooked through, 15-20 minutes.
  13. Allow the pork to rest 10 minutes before carving into bite-size pieces.
Recipe Notes

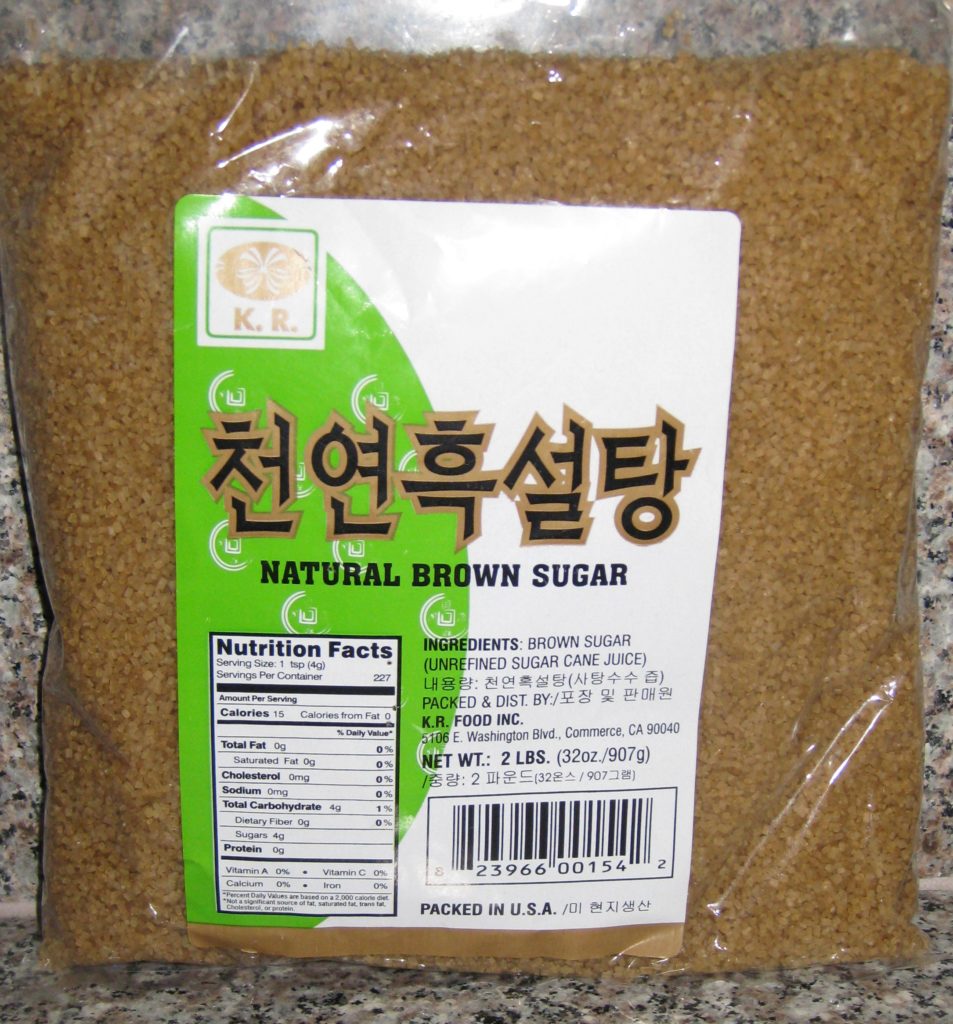
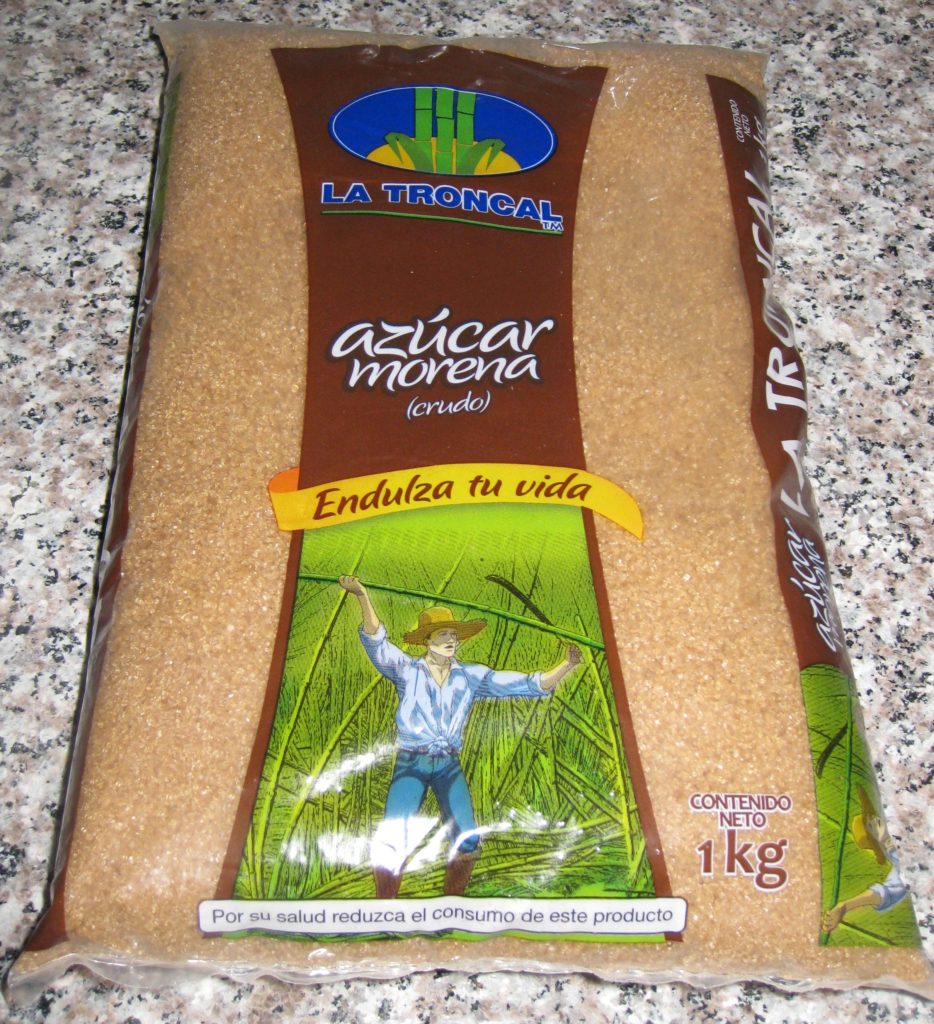
Unlike the brown sugar typically available in the United States, which is a mixture of white sugar and molasses, the brown sugar available in Guyana is actually a less refined sugar, hence the brown color.  There's not enough brown sugar in this recipe to make a difference so feel free to use standard American brown sugar.  Closer to what is available in Guyana is this brown sugar packaged for the Korean market that I bought in an Asian grocery store, and this brown sugar that I purchased in Ecuador.

Brown sugar packaged for the Korean market but bought in the United States

Brown sugar purchased in Ecuador

Copyright © 2017 by VillaSentieri.com. All rights reserved.

Share this Recipe

Carne di Manzo in Umido (Thinly Sliced Beef in Tomato Caper Sauce)

August 30, 2017

As I am writing this, my husband’s Great Aunt Fidalma and cousin Massimo are visiting us from Tuscany. We’ve had quite a week of eating and drinking.  Every night, actually, was something like a party. At the lowest head count we were 6, but more often 9, and once 20!

From left to right: Massimo, me (holding Abby), my father-in-law, Zia Fidalma, Zia Ida, my mother-in-law.

Last night I fried a bunch of zucchini flowers to accompany cocktails. Zia Fidalma made little elongated meatballs (polpette) with ground beef and mortadella seasoned with onions, garlic, and herbs. I made risotto with mushrooms and my mother-in-law made long-simmered green beans in tomato sauce, something like my green beans in tomato sauce with bacon.

Risotto with Mushrooms, Meatballs, Green Beans in Tomato Sauce

While we were sitting at the table after dinner doing what Italians do (talking about growing food, talking about preparing food, talking about food we’ve eaten, and talking about the next meal) Zia Fidalma started to describe a dish of thinly sliced beef cooked in tomato sauce with capers.

“Carne di Manzo in Umido!” I said.  She concurred.

I told her that Carne di Manzo in Umido was, in fact, the long-planned blog post for Wednesday.

It is a dish I had at her home in Tuscany about 20 years ago. I wrote down the recipe in a combination of English and Italian and American and Metric measures sitting at her kitchen table. It took me a while to get it right but I think I’ve nailed it.

Here’s a quick rundown of the food we’ve had over the past week:

August 23rd: Pasta with Zucchini, Chicken Thighs braised in Red Wine and Balsamic Vinegar, Salad, Cherries in Brandy, Homemade Limoncello, and Homemade Bay Leaf Liqueur (being posted in October).

Cherries in Brandy
Homemade Limoncello

August 24th: Tiella (being posted in September), Grilled Hot and Sweet Italian Sausage, Grilled Broccolini drizzled with Olive Oil, and more Cherries in Brandy, Homemade Limoncello, and Homemade Bay Leaf Liqueur.

August 25th: Zia Fidalma’s Rouladen (German, I know, but Zia Fidalma lived in Germany for many years), Mashed Potatoes, Corn on the Cob and, you guessed it, more Cherries in Brandy, Homemade Limoncello, and Homemade Bay Leaf Liqueur.

Zia Fidalma making the filling for her rouladen
A watchful eye on the cooking rouladen
Rouladen bubbling away
Zia Fidalma and a platter of rouladen
Me making mashed potatoes (with a side of bourbon)

August 26th (for 20 people): A Massive Antipasto Platter thanks to cousins Paul and Kim Phillips (and a shopping spree at Cheesemongers of Santa Fe), Baked Penne with Ham, Peas, Mushrooms and Roasted Garlic Besciamella, Porchetta, Corn Sautéed in Butter, Sformato di Spinaci, and Italian Almond Torta with Raspberries and Plum Crostata (thanks to Rich DePippo). Then there were those ever-present Cherries in Brandy, Homemade Limoncello, and Homemade Bay Leaf Liqueur.

Kim and Paul fortify themselves at the Santa Fe Farmers Market before heading off to a marathon shopping session at Cheesemongers of Santa Fe
Antipasto
A bit more antipasto
Baked Penne with Ham, Peas, Mushrooms and Roasted Garlic Besciamella
Porchetta
Sformato di Spinaci
Almond Torta with Raspberries and Plum Crostata

August 27th brought some sanity as we had leftovers from the 26th. (We could still feed a small army with the remains of Paul and Kim’s Antipasto Shopping Spree.)

August 28th: As described above, meatballs, risotto, and green beans.

I neglected to mention that we went through cases of wine and then there was a dark chocolate cake from Chocolate Maven Bakery in Santa Fe that kept making its appearance most nights right before we broke out those cherries.

Dark Chocolate Cake from Chocolate Maven Bakery

Eating will slow down a bit now that the relatives have left. As I finish writing this the house is perfumed from a large pot of chicken broth that will get portioned and frozen ready to be pulled out of the freezer in the coming weeks for wave after wave of risotto made with the freshest vegetables the market has to offer.


Follow us


Click HERE to join our mailing list and you’ll never miss a recipe again!

Print Recipe
Carne di Manzo in Umido
Thinly sliced beef is browned and then simmered in the barest amount of tomato sauce with an array of herbs. A bit of capers round out the flavors.
Votes: 0
Rating: 0
You:
Rate this recipe!
Course Mains, Meats
Cuisine Italian
Prep Time 20 minutes
Cook Time 2 hours
Passive Time 1 hour
Servings
people
Ingredients
Course Mains, Meats
Cuisine Italian
Prep Time 20 minutes
Cook Time 2 hours
Passive Time 1 hour
Servings
people
Ingredients
Votes: 0
Rating: 0
You:
Rate this recipe!
Instructions
  1. Herbs, clockwise from top right: nepita, bay leaf, sage, rosemary, oregano.
  2. Combine the flour and 1 ½ teaspoons of salt. Mix well.
  3. Pound the steak lightly with a mallet.
  4. Season the steak with salt and pepper. Cut the pieces in half if they are too large after pounding.
  5. Dredge the steak in the seasoned flour and reserve. It is best to do this about an hour in advance as the flour will adhere to the meat better.
  6. Bruise the garlic with the side of a large chef’s knife.
  7. Put a thin film of olive oil on the bottom of a very large sauté pan. Heat over medium high heat.
  8. When hot, add as much of the beef as will fit without crowding in a single layer. Add half the garlic.
  9. Sauté the meat and garlic until the meat is browned on both sides.
  10. Remove the browned meat to a platter. Repeat with the remaining meat and garlic, in however many batches are needed.
  11. If the garlic starts to turn dark brown, remove it or it will become bitter.
  12. When all the meat is browned return it to the pan with any accumulated juices. Leave the cooking oil in the pan.
  13. Try to arrange the meat so that the pieces overlap rather than putting one piece of meat directly on top of another.
  14. Add all the other ingredients except the capers.
  15. Cover and simmer gently until meat is tender flipping the meat every 20 minutes or so. It will take at about one and one-half to two hours to get the meat tender depending on the cut and your elevation.
  16. Add water from time to time if the sauce boils away.
  17. Rinse the salt off the capers and add them during last five minutes of cooking. Taste and adjust salt and pepper.
  18. There should be a very small amount of sauce along with oil that is red from the tomato. Do not remove the oil, it adds significantly to the mouthfeel of the sauce.
Recipe Notes

Copyright © 2017 by VillaSentieri.com. All rights reserved.

Share this Recipe

Carne Adovada (Pork Braised in Red Chile Sauce)

July 14, 2017

I am a chile head.

I also like coaxing a tremendous amount of flavor out of a small number of ingredients (though I don’t shy away from recipes with long ingredient lists either!).

I am a big fan of dishes that can be made in advance and warmed up for serving.  Carne Adovada actually tastes better if it is refrigerated for a day or two.

For all of these reasons, Carne Adovada is an ideal dish for me.  It is, bar none, my favorite New Mexican dish.

However, it isn’t necessary to use hot or extra-hot red chile.  If you’re not a fan of spicy foods, use mild or medium-hot chile.  What is critical is that you use actual New Mexico dried red chile.

New Mexican Red Chile Pods

Although I rode in a car along route 66 in the 1960s to visit an uncle in Los Angeles, I never spent any appreciable time in New Mexico until August 1991.   Just days into that week-long visit to Santa Fe, I had Carne Adovada at Maria’s Restaurant.

I was hooked!

I was also enchanted by Santa Fe, as was my husband.  By late 1992 we put in an offer on our first house in Santa Fe.  The offer was accepted and we closed in January 1993.  Thus began our love affair with Santa Fe.

We moved to Santa Fe full time in 2012 but we spent considerable time in Santa Fe every year until then (about ten times per year including all major holidays).

I was never happy with any Carne Adovada recipe that I tried, and I tried plenty, until I stumbled on a recipe from Al Lucero, the former owner of Maria’s Restaurant, in the program book for Santa Fe Wine and Chile Fiesta a number of years ago.

In times past, when a hog was butchered in the fall, some of the meat was preserved in red chile.  This chile-infused meat was later braised to become Carne Adovada.  I don’t know of anyone who cures pork this way any longer but many recipes for Carne Adovada call for marinating the pork overnight in the red chile.  This would seem to be closer to the traditional method, though simply marinating the meat would not produce the additional flavor that would come from actually curing the pork in the chile.  Some recipes, though a minority in my experience, call for the addition of vinegar to the marinade to try to achieve more of a “cured” or “fermented” flavor.

Al Lucero’s approach is different but definitely creates an extra layer of flavor.  The pork cubes are roasted first then braised in red chile.  Refrigerating the completed Carne Adovada for a day or two before serving improves the flavor even more.

What I especially like about Al’s method is that it does not introduce any non-traditional ingredients to the Carne Adovada.  Until I can taste Carne Adovada made from pork that is actually cured in red chile, I’m sticking with my tweaked version of Al’s method.

Click HERE to join our mailing list and you’ll never miss a recipe again!

Print Recipe
Carne Adovada (Braised Pork with Red Chile)
The purity of the chile flavor is key to Carne Adovada so I avoid putting in other seasonings such as onion and oregano that are sometimes called for. This recipe, based on a recipe of Al Lucero, the former owner of Maria’s Restaurant in Santa Fe, roasts the pork first for a depth of flavor not obtainable otherwise. Remove any large pieces of fat from the pork but thin layers of fat between the meat are needed to ensure moist and tender pork, so don’t remove it all. I frequently buy a bone-in pork shoulder (aka pork butt) and use the bone to make broth.
Votes: 0
Rating: 0
You:
Rate this recipe!
Course Mains, Meats
Prep Time 30 minutes
Cook Time 5 hours
Servings
people
Ingredients
Pork
Red Chile Sauce
Course Mains, Meats
Prep Time 30 minutes
Cook Time 5 hours
Servings
people
Ingredients
Pork
Red Chile Sauce
Votes: 0
Rating: 0
You:
Rate this recipe!
Instructions
  1. Cut the pork into one inch cubes.
  2. Toss the pork with the garlic powder, and salt.
  3. Put the meat in a wide shallow baking/roasting pan that has a lid and roast at 450°F, uncovered, until well browned, turning every 20 minutes or so, approximately 90 minutes.
  4. While the pork is roasting, make the red chile sauce using the proportions of ingredients called for above and following the directions in the Red Chile blog post. See the "Notes" section below for the link. There is some rendered fat in the pan. Do not discard the fat, it carries lots of flavor and improves the mouth feel of the sauce.
  5. Beginning to brown.
  6. Tossed after the top has browned.
  7. Almost brown enough.
  8. Browned and ready for the chile. Note that the liquid has all evaporated and created a brown fond in the pan. This gives extra flavor.
  9. When pork is browned, add all the red chile sauce without draining any of the juices out of the pan.
  10. Cook, covered, at 250°F for approximately 3-4 hours or until meat is very tender, stirring occasionally.
  11. Remove the meat from the oven. Allow it to cool to room temperature.
  12. Cover tightly and refrigerate overnight.
  13. Reheat the carne adovada, covered, at 250°F for approximately 2 hours. If the sauce is not thick enough, reheat uncovered at a somewhat higher temperature until the sauce is thickened.
  14. This plate contains carne adovada, red rice, frijoles (beans), and calabacitas) (zucchini, corn, and roasted green chile).
Recipe Notes

Here's where you can find the directions for making Red Chile Sauce.

Copyright © 2017 by VillaSentieri.com. All rights reserved.

Share this Recipe

Mom’s Slow-Braised Pork Chops

June 16, 2017

Just last week my mother-in-law breaded and quickly pan-fried pork chops for dinner.  They were tender, juicy and truly wonderful.

Now that grilling weather has finally reached Santa Fe, we’ll have pork chops quickly cooked on the grill throughout the summer.  I’ll even grill the occasional pork tenderloin seasoned with olive oil, garlic, lemon juice and rosemary.

I really enjoy juicy, quickly-cooked pork.  However, I also really, really enjoy the style of pork chops that I at while growing up:  thin-cut pork chops cooked slowly in a sauté pan until they are deep brown.

No doubt, this is an entirely different dish from cooking the chops just enough to reach that “magic” temperature of 140°F that the USDA says is “safe.”  It won’t be to everyone’s taste (what is?) but in the interest of presenting an array of very traditional dishes I’m including it.

Just a few nights ago while in Palm Springs, I was served thick-cut braised pork chops cooked by a good friend, John O’Malley, following a recipe from Marcella Hazan.  I use the same recipe from Marcella when I want to cook thick-cut chops for company (ever since John turned me onto it a while back).

Marcella was from Northern Italy, my mother’s family from far Southern Italy, but the two dishes share a style that highlights a common feature of traditional Italian cuisine.  That is, a cut of meat that could be cooked quickly is, instead, cooked slowly coaxing out more flavor and changing the texture in the process.

The realization of the similarity of these two dishes is like the experience I wrote about in April 2017 describing roast chicken I ate in Tuscany that tasted, for all the world, like the falling-apart roast chicken seasoned with garlic and rosemary that my mother made.

Quick cooking is just one style but reading contemporary recipes one would think it’s the only way to cook many cuts of meat.  We all agree that there are cuts that must be cooked long and slow for optimum texture: think Southern Pulled-Pork Barbecue, Hawaiian Roast Pig, Beef Brisket, or Pot Roast, for example.  I challenge you to find a contemporary recipe for roast chicken or sautéed pork chops that doesn’t call for the minimum cooking time and final temperature.  It’s as if we’ve forgotten that these meats can also be cooked low and slow for a qualitatively different dish.

Recording this kind of diversity traditional foodways is one of my main goals for this blog.

As I describe on the About page of this website, I’ve had the very good fortune to cook alongside incredible cooks from many different parts of the world but even that only begins to scratch the surface of traditional foods.  And while I’ve got recipes planned well into next year, I think it’s time to bring in other voices, other stories.

From time to time I am going to feature a blog post, and accompanying recipe, based on interviews with folks who have chosen to share a treasured family recipe and a story to go along with it.  There are several individuals who have volunteered to be in the vanguard of this effort.

If you have a family recipe that you’d like to share, send me an email or add a comment and I’ll follow up.

Click HERE to join our mailing list and you’ll never miss a recipe again!

Print Recipe
Mom's Slow-Braised Pork Chops
If these chops are being served as part of an Italian-style meal, preceded by pasta, rice or soup, and accompanied by several side dishes, one per person should be enough. Without a pasta course, an average eater could easily consume two of these and someone with a hearty appetite could eat three or four! A sauté pan with a very heavy bottom is needed to avoid hot spots. The chops will be cooked on low heat for most of the time and it is important that the pan conduct the heat well to avoid hot and cool spots for optimum browning. I prefer center-cut pork loin chops, these have a bit of loin and a bit of tenderloin, essentially the same cut as a T-bone steak. Loin chops (without the tenderloin), as shown in the pictures, work well too.
Votes: 0
Rating: 0
You:
Rate this recipe!
Course Mains, Meats
Cuisine Italian
Prep Time 5 minutes
Cook Time 2 hours
Servings
people
Ingredients
Course Mains, Meats
Cuisine Italian
Prep Time 5 minutes
Cook Time 2 hours
Servings
people
Ingredients
Votes: 0
Rating: 0
You:
Rate this recipe!
Instructions
  1. Season the chops generously with salt, pepper and garlic powder.
  2. Using a sauté pan that has a very heavy bottom and that is large enough to hold the chops without crowding, heat the oil until it just begins to smoke over high heat.
  3. Add the chops and reduce heat to medium high.
  4. Cook the chops, undisturbed, until nicely browned, approximately 2 minutes.
  5. Turn the chops over. If the oil was very hot when the chops were added and if you didn't disturb them while they browned, they should easily release from the pan without sticking.
  6. Brown other side. Approximately 2 minutes.
  7. Turn the chops over. Have the cover ready. Add the wine, immediately cover the pan, and turn the heat to low.
  8. Cook, covered, until the wine evaporates, 15 minutes more or less.
  9. After the wine evaporates the pan juices will start to brown. When they do, add 2-3 tablespoons of water and turn the chops over. Cook, covered, until the water evaporates and pan juices get a little bit darker.
  10. Repeat this process until the chops are falling apart tender and the pan juices are a deep brown. This will take 1 ½ to 2 hours.
  11. At the end there should only be a couple of tablespoons of water plus the oil in the pan. Pour this sauce over the chops when serving. It should have a rich umami porky flavor.
Recipe Notes

I rarely use garlic powder. The dishes for which I consistently use garlic powder instead of fresh garlic are Italian slow-roasted poultry, the pork chops featured in this recipe, and steaks. I find that I just can’t get the flavor that I want from fresh garlic in these instances.

Copyright © 2017 by VillaSentieri.com. All rights reserved.

Share this Recipe

Croquetas de Jamon (Cuban Ham Croquettes)

May 1, 2017

In early 2014, my husband and I were lucky enough to go to Cuba with two close friends.  This was prior to the loosening up of restrictions on travel by Americans to the island nation.

Because of the guidelines governing such travel, we had to spend a significant portion of our time interacting with Cubans, not being tourists.  We visited a schools for the arts and music, toured cultural sites, attended lectures, saw a cigar factory, and met with some Cubans in their homes, among other activities.

All of Cuba is divided up into small units that are under the watchful eye of a trusted local who reports any unusual activities to the authorities.  These units could be a section of a street, for example, or a multi-unit building.  What turned out to be one of the most memorable events was meeting with the residents of one such building one evening in Cienfuegos.

The children put on a small performance, we had refreshments, then spent several hours chatting with the building’s residents.  It seemed to us that everyone was quite open, talking about the challenges, as well as the benefits (such as free education and health care) of life in Cuba.  In fact, while it seems that most Cubans we met were in favor of a more open society they were understandably very protective of their access to education and health care.

One man, seemed particularly open about the difficulties of life in Cuba.  This was surprising to us as his wife was the designated party operative responsible for overseeing this particular building.  Our suspicions seemed to be confirmed when he disappeared into their apartment shortly before the evening ended after his wife gave him “the look.”  As our vehicle was pulling away from the building, he ran out and waved us good-bye.  Clearly he had been banished from the meeting but kept a watchful eye from his apartment, exiting at just the right moment.

In addition to spending the major portion of our trip interacting with Cubans we were prohibited from actually going to the beach!  This was supposed to be an educational and cultural interchange, not fun.

Even more interesting is that, at the time, Americans were prohibited from buying Cuban cigars and rum.  Mind you, I’m not talking about bringing these items back to the United States which was definitely forbidden, but buying and using them while in Cuba.

This would seem to be a singularly difficult rule to enforce and I can’t say that anybody paid particular attention to it.  One of our most pleasant experiences was sitting at a park on the waterfront in Cienfuegos sipping rum (from plastic cups) smoking cigars and watching the sun set.

We ate a lot of croquetas in Cuba and drank a lot of rum punch, mojitos, and cariocas.  After we got back we pulled together a Cuban dinner with a few other friends.  I made the traditional finger-sized croquetas—seven dozen of them, actually!  Here is a picture of me frying them as well as a platter full of cooked ones along with some plantain chips and mojitos.

For this post, since I was cooking them as an entrée rather than as a nibble with cocktails, I made them larger.

Print Recipe
Croquetas de Jamon (Cuban Ham Croquettes)
Instead of ham, croquetas can be made with cooked fish, salted cod, or potatoes among other ingredients. Cracker crumbs are the standard coating used in Cuba but fine dry breadcrumbs will work fine. I really like using plain panko crumbs whizzed in the food processor to finely pulverize them. They give an amazing crunch! If you are making these to serve as nibbles, you should get seven dozen. If you are making larger croquetas to serve as a main course, this recipe will make 16. Two or three of the larger croquetas will serve one person depending on what else is being served.
Votes: 0
Rating: 0
You:
Rate this recipe!
Prep Time 1 hour
Cook Time 20 minutes
Passive Time 9 hours
Servings
people
Ingredients
Prep Time 1 hour
Cook Time 20 minutes
Passive Time 9 hours
Servings
people
Ingredients
Votes: 0
Rating: 0
You:
Rate this recipe!
Instructions
  1. If the ham was cooked with a sweet glaze, rinse the glaze off using warm water.
  2. Cut the ham into one-inch cubes.
  3. Finely grind the ham in a food processor or meat grinder. Reserve the ground ham.
  4. Over medium heat, warm the milk in a small saucepan.
  5. Meanwhile, in a two-quart heavy bottomed pan, sauté the onion in butter on medium heat until soft, approximately 4-5 minutes.
  6. Add the flour to the onion-butter mixture and cook for about two minutes, stirring constantly. Do not brown the flour.
  7. Note, the flour will appear golden from the combination of the butter and the onions.
  8. Add about three tablespoons of the warm milk to the flour mixture. Stir well to fully incorporate. Continue adding about three tablespoons of warm milk at a time, stirring well after each addition, until all the milk has been incorporated. The mixture will form a rather heavy dough.
  9. Continue to cook the dough for 2-3 minutes, stirring constantly, without browning.
  10. Reduce the heat to low and stir in the ham. Keeping the mixture warm makes it much easier to blend the ham into the dough which would otherwise seize up with the addition of cold ham.
  11. Off the heat, stir in the nutmeg and parsley. Taste and adjust salt and pepper.
  12. Spread the mixture into a small oblong pan. Cool to room temperature uncovered.
  13. Cover and refrigerate until very cold, about six hours or overnight.
  14. Form the croquetas. If making small ones, roll portions of the dough into ½ inch diameter cylinders. Cut the cylinders into pieces about 2 inches long. If making larger croquetas, divide the mixture into 16 pieces. Roll each piece into a ball then flatten into a patty about ½ inch thick. Put the croquetas in a single layer on a cookie sheets. Refrigerate the croquetas until very cold.
  15. To bread the croquetas, beat 3 eggs seasoned with ½ teaspoon of salt. Dip the croquettes in the beaten egg then roll in crumbs.
  16. Put the croquetas onto cookie sheets once again. Refrigerate until cold.
  17. Repeat the egg and crumb coating a second time. The second coating is necessary to get the traditional crunch. Refrigerate several hours or overnight.
  18. Cook the croquetas in a deep fryer at 350°F until deep brown. Alternatively, put ½ inch of oil in a heavy bottomed frying pan. Bring the oil to 350°F. Fry the croquetas, turning once, until deeply browned. Drain briefly on absorbent paper. Keep the croquetas warm in a low oven until they are all fried.
  19. The croquetas ready to serve.
Recipe Notes

Copyright © 2017 by VillaSentieri.com. All rights reserved.

Share this Recipe

Salsicce con Cardone (Sausage with Cardoons)

February 17, 2017

We made our move to multi-generational living in 1998 when my husband’s parents moved into the Coach House at our estate in Chicago, The Henry Rohkam House.  (There are a couple pictures of the main house in a prior post.)

Pretty quickly we settled into a routine of having meals together.  When we went to work, the dogs went to Grandma and Grandpa’s (21 feet away in the Coach House) for the day.

My husband started gardening with his father.  A large piece of our one-third-of-an-acre property in Chicago’s Lakeview neighborhood was turned over to cultivation.  We had grapes, strawberries, corn, tomatoes, eggplant, sweet peppers, radicchio, arugula, leaf lettuce, Swiss chard, okra, hot peppers of various types, an array of herbs and other vegetables that varied year by year.  The fruit trees never did very well.  The kiwi thrived but never bore fruit.  One of the four kiwi was accidentally injured and died.  In retrospect, it was probably the male plant (there were three female and one male plant), hence no fruit.

Every fall we canned and preserved foods in various ways.  We made jars of olives marinated in red wine vinegar and herbs from the garden.  We made herb-infused vinegar and olive oil.  We dried herbs for the winter.  We froze vats of tomato sauce.  I’ll admit to even freezing pesto which, while it doesn’t taste like its fresh-made cousin, is pretty awesome in the dead of a Chicago winter!

Some years there were enough strawberries to put up jam.  City squirrels can be quite bold, however.  I was standing alongside the garden one spring day when a squirrel, who had gone grocery shopping in our strawberry patch, literally ran over the top of my foot with a strawberry in his mouth on his way out of the produce isle.

The birds had Houdini-like skills.  Despite wrapping the grape arbor in yards of netting, the birds found their way in, decimated the grapes, and escaped.   The few grapes we were able to harvest were very sweet!

We built a temperature-controlled wine cellar in the basement of the Coach House.  My husband made wine for a few years but stopped when work got too busy.

I started cooking more often with my mother-in-law.  Every month or so, my husband’s grandmother, Noni, would come to visit for a weekend.  Noni was a marvelous cook.  Some dish always appeared during those weekends that I had never had before.  Sausage with Cardone was one of them.

For a vegetable that has been popular since the ancient Romans, I’m surprised I’d never hear of it.  I grew up eating sausage with peppers and onions.  Sometimes the sausage was cooked in a tomato sauce, sometimes not.  Cardone was a whole new thing!

This goes really well with polenta but it’s equally good on its own.  Leftover sauce can be put on pasta or can accompany a frittata.  You may notice from the pictures that we didn’t use as much sausage as called for in the recipe.  We didn’t want leftover sausage but that didn’t mean we didn’t want leftover sauce!  Sadly, the cardone usually all gets eaten on the first go-around but on those rare occasions where it doesn’t, I like to use it as a sandwich filling for lunch.

Print Recipe
Salsicce con Cardone (Sausage with Cardoons)
Cardone looks like oversized celery. It is giant, about 2 feet long as sold trimmed in the grocery store. It is related to the artichoke and was popular among the ancient Romans. Cardone should always be served cooked. Leaves should be removed and not eaten.
Votes: 0
Rating: 0
You:
Rate this recipe!
Course Mains, Meats
Cuisine Italian
Prep Time 15 minutes
Cook Time 2 1/2 hours
Servings
people
Ingredients
Course Mains, Meats
Cuisine Italian
Prep Time 15 minutes
Cook Time 2 1/2 hours
Servings
people
Ingredients
Votes: 0
Rating: 0
You:
Rate this recipe!
Instructions
  1. The starting point: cardone from the market.
  2. Cut off the bottom of the cardone.
  3. Using a vegetable peeler (or knife if you are my mother-in-law), remove the leafy edges of the cardone.
  4. Remove any stringy parts of each rib.
  5. Cut the ribs into pieces approximately 4 inch long. Wash well.
  6. Bring 3 quarts of water to a boil. Add 3 tablespoons of salt and a pinch of baking soda. Add the cardone and boil until you can pierce it relatively easily with the point of a sharp knife. Do not overcook the cardone as it will be cooked further with the sausage.
  7. Remove the cardone from the water. Stop cooking by putting the cardone in a bowl of ice water. When cold, cut into pieces approximately 1 ½ inches long and reserve.
  8. If the sausage is not in links, cut into pieces approximately 4-5 inches in length. Using the tines of a fork, pierce the skin of each piece of sausage in several places.
  9. Heat the olive oil in a large, heavy-bottomed sauté pan or a wide, shallow casserole. Add the sausage and brown well on all sides.
  10. Remove the sausage from the pan.
  11. Add the onions, garlic, parsley, and rosemary to the sausage drippings in the pan. Sauté until the onions are soft and golden.
  12. Add the wine, if using. Allow wine to mostly cook away then add tomato puree and water.
  13. Return the sausage to the pot with the sauce. Season with salt and freshly ground pepper. Simmer, partially covered, for about an hour.
  14. Add the cardone. Taste for seasoning. Simmer, partially covered, until the cardone is tender, approximately 30-45 minutes.
  15. Pour into a serving dish and bring to the table.
Recipe Notes

Copyright © 2017 by VillaSentieri.com. All rights reserved.

Share this Recipe