Pizza di Patate (Potato Pizza)

December 19, 2018

I remember it clearly!  My love affair with Pizza di Patate began May 1992 in Rome.

All of my most favorite foods are carbohydrates:  pasta, bread stuffing, mashed potatoes, pierogi, soft pretzels, and homemade bread, among them.  The favorites among my favorites, though, combine two different carbohydrates in the same dish:  potato gnocchi, bubba (and its relative, potato pancakes), potato pierogi, homemade bread rolls stuffed with mashed potatoes and rubbed with olive oil and garlic, and, of course, potato pizza.

When I first tasted potato pizza in Rome it immediately entered the highest level of my carbohydrate pantheon.  I knew at some point I would need to learn to make it as I had never had anything like it in the States.  I still haven’t unless it’s come out of my pizza oven, though there is a new breed of Roman Pizzerias cropping up around the country dangling the possibility that one, serving pizza di patate, might settle in near where I live.

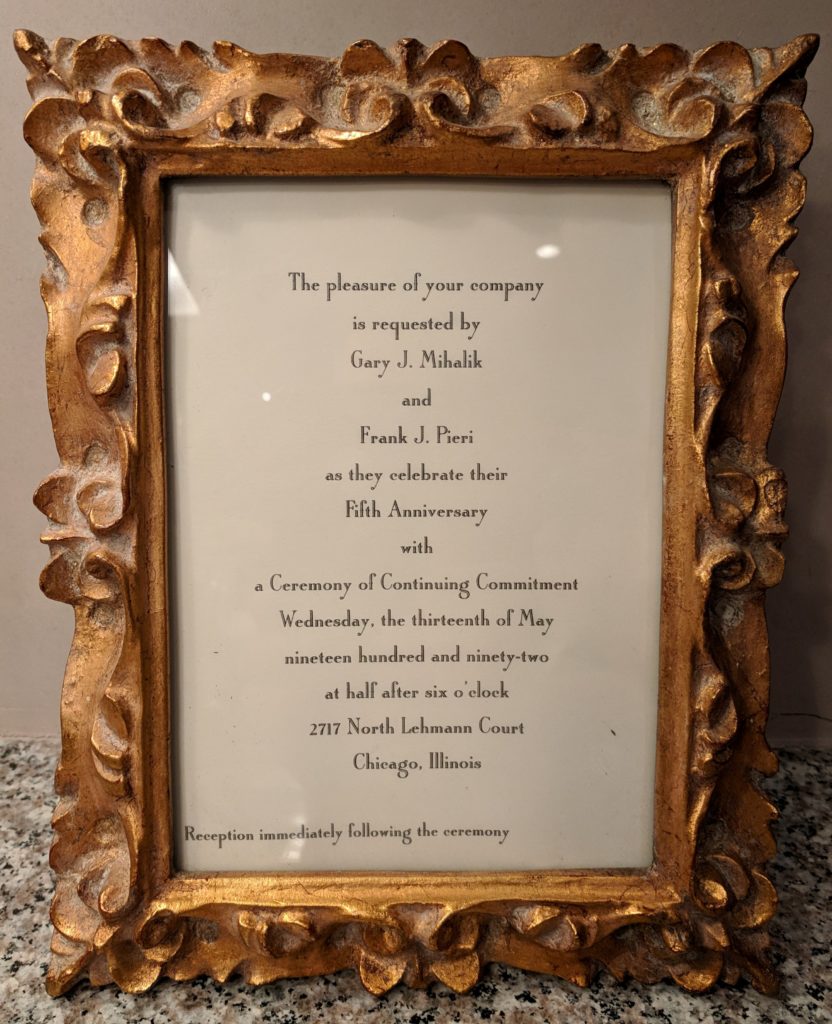
May of 1992 was the month my (now) husband and I were to celebrate our fifth anniversary.  I had been discussing with John Bowker, a friend, Anglican priest and the dean of Trinity College, Cambridge, England, coming to the UK for our anniversary.  John had offered to perform a wedding ceremony (still not legally binding, of course) following the Anglican rite in the Trinity College Chapel with the Trinity College Choir there to sing.

After much thought, we decided against going to Cambridge for the ceremony.  Although a few of our friends might have attended, we felt that most would not and we wanted to be surrounded by friends on that day.

Join our mailing list and you’ll never miss a recipe again!

We opted, instead, to have a ceremony performed at our house by John Fortunato, a friend and Episcopal deacon.  We had a calligrapher record our vows on parchment and signed by everyone present (in a nod to Quaker tradition) as an affirmation of our commitment to each other.

Invitation to our fifth anniversary and commitment ceremony

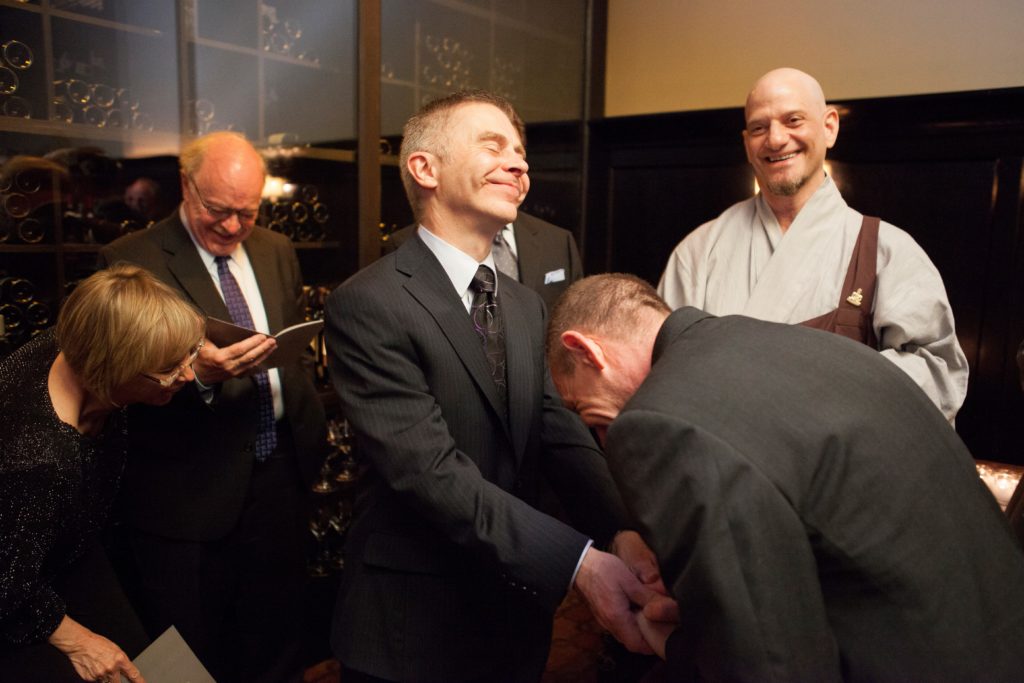
On our 25th anniversary, in 2012, we were actually married with 52 of our friends in attendance.  The wedding and reception were held in a private dining room at Del Posto in New York City.  But I digress…

In the early 1990’s Frank, my husband, and I were working full time but also attending Loyola University of Chicago studying for MBA degrees.  Loyola decided to offer MBA classes for the first time at its Rome campus in May 1992.  We jumped at the chance, leaving for Rome the day after our commitment ceremony.  We treated the trip like the honeymoon we had never had though by then we were very experienced world travelers.

Follow us on your social media platform of choice


A pleasant walk from the Loyola Campus (located in an old convent in Monte Mario) was a small shop that sold prepared Roman food and a dizzying array of pizza by the slice (pizza al taglio).  Most nights we went there for dinner then went back to our dorm room to study.  The shop had a few stools lined up along a narrow counter on one side but every patron, except us, picked up food to go.

A funny moment during our wedding ceremony in 2012

After a few days, our routine became clear to the shop owners.  As soon as we walked through the doorway, without asking a question, one of them reached for a bottle of local red wine and handed it to us.  We then ordered from the food on display and sat at the counter enjoying a wonderful meal.

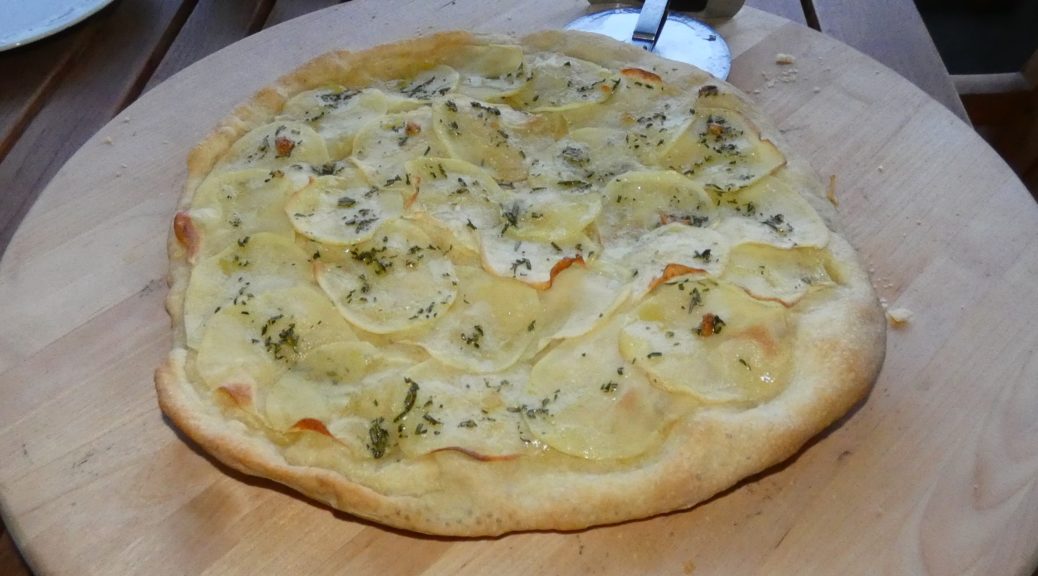
Theirs was the first pizza di patate that I’d ever had.  I ate it all over Rome on that trip.

It took me at least five years to try to make it, and at least another five years to perfect it.  Now that we have a wood-burning oven in Santa Fe I almost always make at least one potato pizza on pizza nights (which don’t happen nearly often enough!).

Print Recipe
Pizza di Patate (Potato Pizza)
I first tasted this in Rome in 1992 and fell in love with it. There are numerous variations, such as using potatoes that have been shredded on the teardrop shaped holes of a grater or topping the pizza with cheese. This simple version is my favorite. Making the pizza in a rectangular pan most resembles Roman pizza al taglio. The dough can be divided to make two round pizzas approximately 12 inches in diameter. See the Notes section for instructions on making the dough in a bread machine as well as directions for making the dough in advance. You can use bread flour if you wish but the dough will be really springy from the gluten making it a bit more difficult to stretch out. If using bread flour it is really a good idea to refrigerate the dough as described below.
Votes: 0
Rating: 0
You:
Rate this recipe!
Prep Time 65 minutes
Cook Time 20 minutes
Passive Time 4 hours
Servings
people
Ingredients
Dough
Topping
Prep Time 65 minutes
Cook Time 20 minutes
Passive Time 4 hours
Servings
people
Ingredients
Dough
Topping
Votes: 0
Rating: 0
You:
Rate this recipe!
Instructions
  1. Warm the bowl and dough hook of an electric mixer with hot water. Drain and dry.
  2. Add the warm water and yeast to warmed bowl. Blend briefly.
  3. Allow the yeast and water to sit until creamy, approximately 10 minutes.
  4. Add about half the flour and mix to combine.
  5. With the motor running, add salt and drizzle in olive oil. Mix to combine.
  6. Add the remaining flour.
  7. Mix approximately 8-10 minutes after all the flour is added. The dough should be soft and slightly sticky.
  8. Place the dough in an oiled bowl or container. Oil the top of the dough. Cover the bowl and allow the dough to rise until doubled.
  9. Meanwhile, make the flavored oil. Sauté the bruised garlic in the oil over medium-low heat until light golden. Do not allow the garlic to turn brown.
  10. Allow the oil to cool for a few minutes. Add the rosemary. The oil should be warm to release the flavor of the rosemary but not so hot that the rosemary begins to sizzle.
  11. Allow the oil and rosemary to sit at room temperature to cool. When cool, remove and discard the garlic.
  12. When dough has doubled, punch it down to remove all air pockets.
  13. Using olive oil, oil an 11x17 inch rimmed baking sheet.
  14. Press the dough into the pan. Allowing the dough to rest for five or ten minutes midway through pressing it into the pan will allow the gluten to relax making it easier to shape the dough.
  15. Brush the dough lightly with some of the flavored olive oil.
  16. Cover the dough with an inverted rimmed baking sheet and allow it to rise until doubled.
  17. Meanwhile, scrub the potatoes and slice into very thin slices. A mandoline is best. If so, set it for 1/16 inch.
  18. Cover the potato slices with cool water to remove excess starch and to keep them from turning brown.
  19. When the dough has doubled, dry the potato slices thoroughly and put them on the top of the dough in a single layer that is slightly overlapping. You may have potato slices left over.
  20. Brush the top of the pizza with the remaining flavored olive oil and sprinkle liberally with coarse sea salt.
  21. Bake at 425°F for approximately 25 minutes, until the potatoes are tender and have golden edges and the dough is golden brown on the edges.
Recipe Notes

The dough can be made, with good results, in a bread machine on the dough cycle.  Though I don’t add sugar when making the dough by hand or with a mixer, the shorter rise cycles used by a bread machine work better with sugar.  Put the ingredients, above, into your bread machine following the manufacturers directions adding 1 tablespoon of sugar as well.  When the dough cycle is finished, press the dough into a pan, as described above, or refrigerate as described below.

If I have time, I prefer to make the dough a day or two in advance. After it has risen as described above, put the dough in an oiled container with a tight-fitting lid. Oil the top of the dough and refrigerate. Remove the dough from the refrigerator at least 5 hours before you plan on making the pizza. Punch down the dough just before making the pizza and proceed as above.

Copyright © 2018 by Villa Sentieri, LLC. All rights reserved.

Share this Recipe

Angie’s Marinated Pasta Salad

December 12, 2018

After driving a circuitous route for two days (I’ll explain why in a minute), I got home to Santa Fe from Palm Springs last Wednesday to a surprise.

My husband and I had plans to attend the holiday party for the Department of Psychiatry at the University of New Mexico, where he is Associate Professor, on Friday.  The surprise was that the party was a potluck and we had to bring a dish.

So, there I was on Wednesday evening, exhausted after two days of driving, with no prior knowledge that I had to produce a dish for a Friday event, coupled with the logistic challenge that I had to leave home around noon on Friday and ultimately make it to the party in Albuquerque by 7:00 PM with a dish in tow that I could neither refrigerate nor heat up!

It didn’t take long before I settled on my cousin Angie Catanese’s Marinated Pasta Salad.  This is a recipe that I’ve been making for about 45 years and it never fails to please.  It has so much stuff in it besides pasta that it’s almost a misnomer to just refer to it as a pasta salad!

Join our mailing list and you’ll never miss a recipe again!

I went grocery shopping on Thursday morning, assembled the salad Thursday afternoon, and the rest is history!

You might also enjoy my cousin Angie’s recipe for Pickled Hot Peppers.


The availability of pasta in many different shapes has ballooned over the decades. Cavatappi makes a great replacement for shells in this pasta salad.

Now, for an explanation as to why you haven’t heard from me in two months and what will be coming up for the blog…

In early October I went to Palm Springs to complete recipe testing for the Trio Restaurant Cookbook.  One can’t really test recipes for a cookbook at 8,000 feet in elevation so I spent five weeks in Palm Springs testing and finalizing over 125 recipes for the cookbook.  I had intended to continue posting to the blog during this time but very quickly found it impossible to fit in anything other than grocery shopping, recipe testing, and note-taking!

I got back to Santa Fe a few days before Thanksgiving then, less than a week after Thanksgiving was back on my way to California to go to the Consulate General of Italy in Los Angeles to apply for a visa.

In early January I am going to Italy to attend a three-month intensive course in Italian cuisine geared toward professional chefs at the Italian Culinary Institute.  Because I’ll be in Italy more than 90 days I need a visa.

Follow us on your social media platform of choice


My visa appointment was Friday and I was planning on spending the weekend in Palm Springs then driving back to Santa Fe on Tuesday.  The consular official said my visa would be ready by Tuesday so, rather than trust my luck (and my passport) to FedEx, I decided to drive back to Los Angeles to retrieve my passport.

It took me 3 hours and 45 minutes to drive the 122 miles from our home in Palm Springs to the consulate!  I got my passport in about 5 minutes then did some shopping at Eataly, conveniently located across the street from the Italian Consulate.  (I’d love to know who was responsible for securing THAT location!)  I then reversed course and started the drive back to Santa Fe, passing within a few miles of our home in Palm Springs where I had started the day.  I spent the night in Payson, Arizona then finished the drive Wednesday (which is when this story began).

The entrance to the Consulate General of Italy in Los Angeles which is conveniently located across the street from Eataly!

While I’m in Italy I will most likely be posting fewer recipes than usual.  I hope to chronicle some of my experiences at the Institute and pass on some tips and pointers on Italian food.  I hope you’ll stick with me during that time.  When I return, I’ll be back to my regular schedule of posting recipes.

Oh, and by the way, judging from how the pasta salad disappeared at the party, I think it was a hit!

Print Recipe
Angie’s Marinated Pasta Salad
There is so much “stuff” in this that it could easily be the basis of a light meal with just some bread and cheese. Angie’s original recipe called for shells but other types of medium-size pasta work just as well. In fact, I think the cavatappi are especially nice given their unusual shape. If you are making this when tomatoes are at their peak, use three medium-sized tomatoes in place of the cherry and grape tomatoes. You can use 2 cups of purchased Italian salad dressing instead of the homemade dressing if you’re so inclined, though the flavor will obviously be somewhat different.
Votes: 0
Rating: 0
You:
Rate this recipe!
Prep Time 1 hour
Cook Time 10 minutes
Passive Time 16 hours
Servings
people
Ingredients
Salad Ingredients
Dressing
Prep Time 1 hour
Cook Time 10 minutes
Passive Time 16 hours
Servings
people
Ingredients
Salad Ingredients
Dressing
Votes: 0
Rating: 0
You:
Rate this recipe!
Instructions
  1. In a large mixing bowl, combine all the dressing ingredients and set aside.
  2. Cook the pasta in abundantly salted water until just cooked but still slightly al dente.
  3. Meanwhile, cut-up all the ingredients.
  4. Onion
  5. Bell pepper
  6. Tomatoes
  7. Celery
  8. Genoa salami
  9. Pepperoni
  10. Provolone
  11. Oil-cured olives
  12. When the pasta is cooked, drain and rinse in cool water to stop cooking.
  13. Stir the pasta and diced onion into the dressing. Allow to cool to room temperature.
  14. When the pasta is cool, stir in all remaining ingredients.
  15. Refrigerate overnight before serving.
Recipe Notes

Copyright © 2018 by Villa Sentieri, LLC. All rights reserved.

Share this Recipe

Cherry Aperitif

October 3, 2018

I apologize for the “radio silence” for the past few weeks.  I was traveling in Europe and did not have a reliable internet connection.  I was planning on keeping up my regular posting schedule, and I had everything with me that I needed (having cooked and photographed all the dishes in advance) but it just wasn’t realistic to upload pictures at a snail’s pace.

Today’s recipe is a bit of a departure from what I usually post.  It’s an adaptation of a recipe from David Lebovitz, the only food blogger that I regularly follow.

How I found out about David, and this particular recipe, is curious.

Join our mailing list and you’ll never miss a recipe again!

In mid-2016 my business partner, Melinda Orlando, and I sold the health care consulting business that I founded in 1994 and that we built together.  We brought our two long-term employees, Joe Kohberger, who celebrated his 20th anniversary with The Mihalik Group this year, and Zorina Granjean, who celebrated her 15th anniversary this year, to Santa Fe for a weekend along with their spouses.

It was a time devoted to enjoying each other’s company, exploring good food and drink in Santa Fe, and a way for Melinda and I to say “thank-you” to Joe and Zorina for all they did to make The Mihalik Group successful.

During one of our conversations, Zorina mentioned a recipe for a cherry aperitif that she got from a food blog that she followed.  The really interesting part is that the aperitif didn’t actually contain cherries but cherry leaves!

Based on Zorina’s recommendation, Rich DePippo and I whipped up a few batches in 2017 using leaves from his cherry trees.  Truth be told, as much as I like infusing alcohol with different botanicals (see my recipe for Limoncello, Melinda’s Drunken Prunes, and Liquore al Lauro for examples), I would never have tried this recipe based on cherry leaves rather than cherries and cherry pits.

That would have been a mistake!

Follow us on your social media platform of choice


It’s a great pre-dinner drink served over (lots of) ice, with or without a twist of citrus peel.  It’s not very alcoholic but it’s very flavorful.  Plus, it’s a cinch to make (assuming you can get a fistful of cherry leaves).

It’s very good made with just cherry leaves but adding one of the other botanicals changes its character.  The cherry flavor is still there but the aperitif becomes more complex.

Don’t use expensive wine or vodka.  Pedestrian alcohol works quite well.  In fact, I usually use red wine from a Trader Joe’s box.

Print Recipe
Cherry Aperitif
If you’re not into the metric measurements, just toggle to the American ones. Select an inexpensive fruity red wine such as Merlot or Shiraz. Boxed wine is perfectly fine. I prefer to add only one additional botanical per batch so that I get the distinct flavor of cherries along with the added ingredient. If you come up with any good combinations, or other botanicals to add, please post a comment.
Votes: 0
Rating: 0
You:
Rate this recipe!
Course Beverages
Cuisine French
Prep Time 20 minutes
Passive Time 7 days
Servings
liters
Ingredients
Basic Ingredients
Optional Botanicals (use only one per batch)
Course Beverages
Cuisine French
Prep Time 20 minutes
Passive Time 7 days
Servings
liters
Ingredients
Basic Ingredients
Optional Botanicals (use only one per batch)
Votes: 0
Rating: 0
You:
Rate this recipe!
Instructions
  1. Combine all ingredients in a large jar with a tight-fitting lid.
  2. Swirl the jar to completely dissolve the sugar.
  3. Keep the jar at room temperature but out of direct sunlight.
  4. Swirl the jar daily for seven days.
  5. Strain and discard the solids.
  6. Pour the aperitif into bottles with tight-fitting lids.
  7. Refrigerate the aperitif several weeks before using.
  8. Serve over ice with a citrus peel, if you would like.
Recipe Notes

Copyright © 2018 by Villa Sentieri, LLC. All rights reserved.

Share this Recipe

Rabbi Goldie’s Jewish Apple Cake

September 5, 2018

In September 1972, at the age of 17, I went from the small town of Johnstown, Pennsylvania to Philadelphia to attend the University of Pennsylvania.

Little did I know how much my life was going to change, nor how sheltered I had been growing up in Johnstown.  There were a few trips to Florida and California by car, and a portion of every summer spent in Atlantic City, but other than that my life mostly revolved around the family and happenings within a few hours’ drive of Johnstown.

A few weeks before I left for college, I got a note from Jon Rikoon who was to be one of my roommates.  Jon lived on Long Island.  I don’t think I’d ever been to New York at that point.

Harnwell House, the dorm (now a college house) I lived in during freshman year

Another of my roommates (we had a three-bedroom, four-bed dorm “apartment”) was Chip Fleischmann, as in Fleischmann’s yeast.  The fourth roommate only lasted the first semester and I simply can’t remember his name.  (He kept to himself mostly.)

Join our mailing list and you’ll never miss a recipe again!

Early in freshman year, Jon started dating Gail Milgram.  Gail spent a lot of time in our apartment and she and I became very good friends.

Gail’s relationship with Jon didn’t last beyond freshman year but our friendship did.  We saw a lot of each other throughout our undergraduate years and for a few years thereafter while I was in medical school.

Our friendship remained strong.  In fact, at one point early in medical school Gail and I had to temporarily stop spending time together as her boyfriend at the time was jealous of our relationship.  Needless to say, he didn’t last!

Gail and I were in infrequent contact after my first couple of years in medical school.  In fact, years could go by without contact but, somehow, we always managed to reconnect.

As the years did, in fact, go by, Gail officially changed her name to Goldie.  She also became a rabbi.

A few months ago, out of the blue, just after I decided to post a recipe for the Jewish Apple Cake that (the then) Gail taught me how to make in college, I received an email from her.

Follow us on your social media platform of choice


She was in Europe for the summer and we set up a time to chat by video conference but her internet connection did not cooperate and we were unsuccessful in our attempts to chat.  We’re planning another attempt at video conferencing when both of us are in the States later this fall.  I’m looking forward to catching up with her.

In the meantime, I hope you enjoy what is now, officially, Rabbi Goldie’s Jewish Apple Cake!

Print Recipe
Rabbi Goldie's Jewish Apple Cake
It is best to bake this cake in a plain, shiny aluminum pan. A dark pan will overcook the outside before the center is done. Don't add the sugar to the apples before you are ready to pour the batter into the pan or it will pull a lot of liquid out of the apples.
Votes: 4
Rating: 4
You:
Rate this recipe!
Cuisine Jewish
Prep Time 30 minutes
Cook Time 90 minutes
Passive Time 1 hour
Servings
people
Ingredients
Cuisine Jewish
Prep Time 30 minutes
Cook Time 90 minutes
Passive Time 1 hour
Servings
people
Ingredients
Votes: 4
Rating: 4
You:
Rate this recipe!
Instructions
  1. Grease and flour a 10" tube pan with a removable bottom.
  2. Sift together the flour and baking powder.
  3. Peel the apples, cut them in quarters and remove the core.
  4. Slice the apples crosswise into 1/8 inch thick slices.
  5. Mix the apples and cinnamon and set aside.
  6. In the bowl of an electric mixer cream oil and 2 cups plus 3 tablespoons sugar.
  7. Add eggs one at a time beating after each addition.
  8. Add 1/3 cup plus 1 tablespoon orange juice and vanilla. Mix well.
  9. Add flour and baking powder mixture and mix well.
  10. Add 5 tablespoons of sugar to the apples and mix well.
  11. Pour half the batter into the prepared pan.
  12. Top the batter with half the apples.
  13. Top the apples with half the walnuts, if using.
  14. Add the remaining batter and top with the remaining apples and walnuts, if using.
  15. Bake at 350°F for approximately 1 hour 40 minutes, until a tester inserted in the center comes out clean.
  16. Cool for 10 minutes on a rack. Remove from pan and cool completely.
Recipe Notes

Copyright © 2018 by Villa Sentieri, LLC. All rights reserved.

Share this Recipe

Sri Lankan Cashew Curry

August 29, 2018

I know I’ve posted a lot of Sri Lankan recipes recently.  I’m trying to post enough to create a Sri Lankan meal if my readers are interested.

Sri Lankan food is not common in the United States.  There are some Sri Lankan restaurants on Staten Island but I’ve never ventured to them when I’ve been in New York.  It’s not that I don’t want to, but it’s a bit of a hike to get there…and there are so many good restaurants in NYC that are easier to get to.

One of these days I’ll try some of the Sri Lankan restaurants in Los Angeles but for now I’ll have to settle on my own cooking.

Sri Lankan Arrack is made from the sap of coconut blossoms (Photo by SilentBobxy2 [CC BY-SA 3.0 (https://creativecommons.org/licenses/by-sa/3.0) or GFDL (http://www.gnu.org/copyleft/fdl.html)], from Wikimedia Commons)
If you like Indian, especially South Indian, and Thai food, chances are excellent that you will like Sri Lankan cooking.  I find the spices in Sri Lankan food to be more delicate than Indian with abundant use of super-aromatic spices like cardamom, cinnamon and cloves.

Join our mailing list and you’ll never miss a recipe again!

Curry leaves are an absolute delight, lending a taste and aroma that I can’t really describe.

Although native to Brazil, the cashew was transported to India by the Portuguese in the sixteenth century.  From there it spread throughout South Asia.  It is also commonly grown in Africa.

Cashews are an integral part of Sri Lankan cuisine.  Devilled cashews are a common nibble with cocktails.  Arrack is the classic distilled spirit of Sri Lanka, made from the sap of coconut blossoms.

In Sri Lanka, cashew curry is made from fresh cashews.  I’ve never seen fresh cashews in the United States.  Whole raw cashews work well if soaked in water for several hours, just like dried beans.

In my experience there are two basic styles of cashew curry in Sri Lanka, a dry one and one with gravy.  The one I have always made is with gravy.  The “gravy” is really seasoned coconut milk.

Follow us on your social media platform of choice


In years past, I would always make my own coconut milk from shredded coconut but now, with rare exception, I use coconut milk that I’ve purchased.  With a good quality coconut milk, such as Aroy-D it is really impossible to tell the difference when making a curry or other well-seasoned dish.

Aroy-D is an excellent brand of coconut milk

This is an especially easy dish to prepare as all the ingredients are simmered.  There’s no sautéing involved.  That makes it a great introduction to Sri Lankan cooking.  Serve it with rice to sop up all the wonderful gravy.

Print Recipe
Sri Lankan Cashew Curry
If using homemade coconut milk, use 3 cups of thin milk instead of 1 ½ cups purchased coconut milk and 1 ½ cups water. Long thin chilies, such as Cayenne or Thai Bird peppers would be appropriate for this dish.
Votes: 0
Rating: 0
You:
Rate this recipe!
Course Mains, Vegetarian
Cuisine Sri Lankan
Prep Time 15 minutes
Cook Time 1 hour
Passive Time 3 hours
Servings
people
Ingredients
Course Mains, Vegetarian
Cuisine Sri Lankan
Prep Time 15 minutes
Cook Time 1 hour
Passive Time 3 hours
Servings
people
Ingredients
Votes: 0
Rating: 0
You:
Rate this recipe!
Instructions
  1. Cover the cashews with water and allow to soak for 2-3 hours, or overnight in the refrigerator.
  2. Split and seed the chilies.
  3. Lightly crush the lemongrass. Peel off the tough outer layers and cut off the dark tough tops, leaving about 4 inches of softer inner pith.
  4. Put everything except cashews, thick coconut milk, and salt into a saucepan.
  5. Boil gently, uncovered, for about 10 minutes.
  6. Add drained, soaked cashews and simmer approximately 15-20 minutes.
  7. Add two teaspoons salt.
  8. Simmer until cashews are cooked but not mushy, approximately 10-20 minutes more.
  9. Add thick coconut milk.
  10. Taste and adjust salt.
  11. Simmer 5 minutes more.
Recipe Notes

Rampe (pandan, bai tuey, or bai toey) can be purchased frozen in Asian grocery stores.

Copyright © 2018 by Villa Sentieri, LLC. All rights reserved.

Share this Recipe

Louis Evangelista’s Pasta e Fagioli (“Beans and Macaroni”)

August 22, 2018

I completed my residency in psychiatry in June 1981.  Although I was part of the 1980 graduating class in medical school, I didn’t finish until 1981.  The added year allowed me to get a master’s degree in anthropology as well as to complete all my coursework, field work, and dissertation defense for a PhD.  I didn’t finish writing my PhD dissertation and, unfortunately, didn’t get a PhD.  (The reason I didn’t finish writing my dissertation is a long story better suited for another day.)

I started a private practice in Philadelphia as soon as I finished my residency, forming a partnership with Gene d’Aquili.  Our office was at 2400 Chestnut Street.  It was an apartment building but was conveniently located to the University of Pennsylvania and the management was happy to allow us to rent one of the apartments for use as an office.

In quick succession, Wolf Rieger, another psychiatrist from Penn and one of my previous instructors, did the same thing right down the hall from us.

Mark Vuolo, another resident in my group opened his practice a few floors up from us.

Join our mailing list and you’ll never miss a recipe again!

It was a congenial group.

Starting a private practice takes a while so I, like most newly-minted psychiatrists, took on a part-time job.  I was a hired by the Lenape Valley Foundation (LVF) in Bucks County, north of Philadelphia.  LVF provided the bulk of the psychiatric services in Bucks County.  The Foundation provided the community mental health center for the county, ran the psychiatric inpatient unit at the hospital in Doylestown, provided psychiatric services to the Bucks County Correctional Facility, consulted at area nursing homes, and ran a psychiatric partial hospital, among other things.

Part of my responsibility was to be the psychiatrist at the partial hospital.  A partial hospital is a program that operates during the day, with patients going home for the night.  It can serve as a bridge from the hospital to less intensive treatment or it can provide supportive services in an ongoing manner for individuals who need more care than can be provided in an office-based psychiatric practice.

Follow us on your social media platform of choice


Each day, a group of patients and a staff member made lunch for everyone.  In psychiatric parlance, this would be an “activity of daily living” (ADL) and would be considered a therapeutic activity.  The older adults usually made comforting, grandmotherly food.  Louis Evangelista, the Music and Movement Therapist, often had his group make Italian food.

By regulation, I, as the psychiatrist, was required to be onsite a specified number of hours per week based on the number of patients.  After a few months, once I knew all the long-term patients and had a good system in place to evaluate the new ones, I had time on my hands so I took on one of the ADL groups.  It was probably the only time a partial hospital had a psychiatrist teaching patients how to cook!

Louis made a killer pasta e fagioli.  He learned it from his Sicilian grandfather.  When I left the Lenape Valley Foundation and the partial hospital, it was the meal I requested for my last day.

I hope you enjoy it as much as I do.

Print Recipe
Louis Evangelista's Pasta e Fagioli
Canned red kidney beans work well in this recipe but if you want even more flavor, start by cooking dry beans. If you do, I suggest using my recipe for Cannellini alla Toscana, substituting red kidney beans. A link to the recipe is in the Notes section, below. A little olive oil added at the end will improve both the flavor and the mouth-feel of the sauce.
Votes: 0
Rating: 0
You:
Rate this recipe!
Prep Time 15 minutes
Cook Time 45 minutes
Servings
people
Ingredients
Prep Time 15 minutes
Cook Time 45 minutes
Servings
people
Ingredients
Votes: 0
Rating: 0
You:
Rate this recipe!
Instructions
  1. Bring four quarts of water seasoned with 1/3 cup of salt to a boil.
  2. Meanwhile, gently heat the beans and their liquid in a small pot.
  3. Separate the leaves of the escarole.
  4. In a sauté pan large enough to hold everything, heat the olive oil.
  5. Add the garlic to the oil and sauté over medium-low heat until brown. Be careful not to burn the garlic or it will impart a bitter taste.
  6. When the garlic is brown, discard it and remove the oil from the heat.
  7. When the water comes to a boil, add the escarole leaves, return to a boil, and cook until wilted, approximately 1 minute.
  8. Lift the escarole out of the water and toss with the oil in the skillet.
  9. Cook the spaghetti in the same water used to cook the escarole until it is almost al dente. It should still be just a bit crunchy on the inside.
  10. Add the warmed beans to the sauté pan with the escarole and keep warm on low heat.
  11. When the pasta is ready, reserve one cup of the pasta-cooking water.
  12. Drain the pasta and add to the beans and escarole.
  13. Season with black pepper to taste.
  14. Cook over medium to medium-low heat until the spaghetti is just al dente, adding the reserved pasta cooking water as needed.
  15. There should be enough liquid left to create a glossy sauce.
  16. Off the heat, add the grated cheese and a few glugs of olive oil if you wish (I do!)
  17. Taste and adjust salt.
  18. Serve immediately with grated Parmigiano Reggiano or Pecorino Romano cheese on the side.
Recipe Notes

If you want to start with dried beans, use my recipe for Cannellini alla Toscana.

Copyright © 2018 by Villa Sentieri, LLC. All rights reserved.

Share this Recipe

Risotto with Zucchini

August 15, 2018

One of the glories of summer produce is zucchini.

We eat our fill of fried zucchini blossoms but also zucchini itself in many ways, among them sautéed in olive oil with aromatics and herbs, made into a frittata, boiled and dressed with olive oil, stuffed with ricotta and mint, cooked in a light tomato sauce, made into calabacitas, and most definitely, used in risotto.

Join our mailing list and you’ll never miss a recipe again!

Although there are exceptions, such as Risotto Friulano and Risotto alla Milanese, most risotti that I make contain vegetables.  As far as actually cooking the rice goes, the technique doesn’t vary.

Fried zucchini blossoms are a much-loved summertime treat in our house

Aromatics (shallot, onion and/or garlic, depending on the risotto) are sautéed in olive oil.  The rice is added and cooked slightly.  A bit of wine is added and cooked away then the liquid (almost always broth but I make a killer champagne risotto and I also have a risotto recipe that uses carrot juice) is added in small amounts and cooked off before more is added.  Cheese and a bit of butter are stirred in at the end.

What varies for me is how the vegetables are prepared and when they are added.

Some vegetables are cooked in advance then added to the rice when it is nearly done.  I do this, for example with the mushrooms for Risotto ai Funghi (Mushroom Risotto).  Other vegetables are put in at the very end and cooked briefly.  This method works best for vegetables that don’t really require cooking to be edible.  Believe it or not, really good summer corn fits into this category as do frozen peas.  The third method is to sauté the vegetable in the olive oil before the rice is added.  This is the method I use for Butternut Squash Risotto.

Follow us on your social media platform of choice


It is also possible to add the vegetables part-way through cooking the rice though I rarely use this method because it is not possible to guarantee the vegetables will be cooked properly when the rice is done.

Despite the difference in texture, zucchini can be added at the beginning as with butternut squash.  The final texture is different, with the butternut squash being cooked but still holding its shape completely while the zucchini will soften much more but will still be recognizable.

Once you get the hang of cooking the rice for risotto, you can turn any vegetable into a risotto by just considering which of the cooking techniques to use.

Print Recipe
Risotto with Zucchini
Broth for risotto should be light in flavor, not a heavy stock. The broth should add the barest amount of background flavor but allow the other ingredients in the risotto to shine. Risotto uses a lot of broth. It is important that the broth have minimal salt so as not become overly salty. I never salt my homemade broth for this reason. If it seems that you will run out of broth before the risotto has finished cooking, put some water on to heat. It is important that all liquid added to the risotto, other than the initial addition of wine, be at a simmer.
Votes: 0
Rating: 0
You:
Rate this recipe!
Prep Time 15 minutes
Cook Time 45 minutes
Servings
people
Ingredients
Prep Time 15 minutes
Cook Time 45 minutes
Servings
people
Ingredients
Votes: 0
Rating: 0
You:
Rate this recipe!
Instructions
  1. Bring the broth to a bare simmer.
  2. Meanwhile, peel the zucchini then slice into ½-inch thick rounds.
  3. In a heavy-bottomed three-to-four-quart saucepan, heat the oil over medium to medium-high heat.
  4. Sauté the onion and garlic in the oil, stirring frequently, until the onion becomes translucent.
  5. Increase the heat to medium-high. Add the zucchini and ½ teaspoon of salt.
  6. Sauté the zucchini until the greenish color changes to a slightly less vibrant shade and the edges of the zucchini rounds become just a little less sharp, approximately 5-7 minutes.
  7. Add a few grindings of black pepper.
  8. Add the rice and stir until coated with oil.
  9. Sauté several minutes until the outer edges of the rice grains become translucent while the center remains white, approximately 5 minutes.
  10. Add the wine. Stir frequently, but not constantly, until the wine has totally evaporated. You will begin to see some starch leaching out of the rice. More and more of the starch will leach out as you cook the rice. This is what will make a creamy sauce, not a large quantity of butter, cheese or cream.
  11. When the wine has evaporated, add 1/2 cup of the simmering broth. Stir thoroughly, paying particular attention to loosening any spots where the starch seems to be sticking to the bottom of the pan. You don’t want to brown (or worse yet, burn) the starch.
  12. Stir frequently, but not constantly, until the broth has evaporated.
  13. If the broth is unsalted, as I recommend, add 1 ½ teaspoons of salt to the rice as you begin to add the broth. If the broth contains salt, do not add salt until the end.
  14. Keep repeating the process with ½ cup of simmering broth each time: cooking, stirring, and loosening any spots that are sticking until each addition of broth evaporates. The heat should stay as close as possible to medium high. The moderate boiling of the liquid will coax starch out of the rice to create the creaminess that is the hallmark of a good risotto.
  15. Begin tasting for doneness after approximately 3 cups of simmering broth have been added. When the rice is al dente, firm but not crunchy in the center, add another ½ cup of simmering broth, stir, and remove the rice from the heat.
  16. Off the heat, stir in the Parmesan cheese, butter, parsley, if using, and freshly ground black pepper to taste. Taste and adjust salt.
  17. In two or three small additions, add as much of the broth as the risotto will absorb without becoming watery. Stir thoroughly.
  18. Serve immediately.
Recipe Notes

With risotto, the goal is to have rice grains that are still al dente (but not crunchy) in the middle surrounded by a creamy liquid. An Italian risotto should be creamy from the starch in the rice, augmented with a very modest amount of butter and cheese. Risotto served in America is often overly rich from butter, cheese, and sometimes cream.

Risotto rice is a short grain rice that cooks slowly, making it much easier to achieve an al dente texture because it takes a while to actually overcook it. The three types of rice for risotto are Arborio, Carnaroli, and Vialone Nano. Arborio is the easiest one to find though the other two are more forgiving than Arborio when it comes to overcooking.

I recommend buying good quality rice imported from Italy. It really isn’t priced that differently from domestic. Do not wash the rice.

Copyright © 2018 by Villa Sentieri, LLC. All rights reserved.

Share this Recipe

Sri Lankan Roasted Curry Powder

August 8, 2018

Most historians of cooking claim that curry powders are legacies of the European colonization of South and Southeast Asia.   I don’t doubt that this is partially true but I think the reality is much more nuanced.

The word “curry” is believed to come from the Tamil word “kari,” meaning sauce.  Now, however, the term is applied to a range of dishes from a wide swath of South and Southeast Asian countries, not just to dishes from India.

What constitutes a “curry powder?”  Does it take multiple spices and herbs or just more than one?

In Sri Lankan cooking, for example, the combination of coriander and cumin in a two-to-one mixture is commonly used in many dishes.  This is so much the case, that Nanacy Rajapakse, who taught me Sri Lankan cooking, suggested that I make the mix and have it available for use as needed.

Join our mailing list and you’ll never miss a recipe again!

I think we can generally acknowledge that “curry” as we use the term in the Western world, is really a Western construct.  It usually refers to a generously spiced dish cooked in liquid, though the liquid may be (mostly) boiled away in some cases to make a “dry” curry.  The word “curry” (or translational equivalent) may not figure into the name of a given dish in the local language but when rendered in English, I suspect, the word “curry” is often used in the name of a dish to signify the general concept.

An array of Sri Lankan dishes. The darker beef and pork dishes make use of roasted curry powder.

Whether commonly prepared spice blends used in these countries actually constitute “curry powders” is a matter of definition and whether or not these spice blends pre-date, or are a result of, European influence is up for debate.  Even when curry powders or pastes are used, my experience is that other herbs and spices are almost always added to fine tune the taste of a dish.  In South and Southeast Asian cooking, it would be rare to rely on curry powder alone to flavor a dish.

Clearly, however, the way spice blends are used in South and Southeast Asia differs from the way “curry powder” is used the Western cooking, whether the curry powder is used to impart an interesting flavor to an otherwise Western dish (like deviled eggs, for example) or to create a Western version of an Asian dish (like a generic “curry” found in so many cookbooks that predate the last 20 years, or so).

Follow us on your social media platform of choice


In addition to the coriander-cumin blend noted above, Sri Lankan cuisine makes use of roasted curry powder for meat dishes and unroasted curry powder for vegetable dishes.

Though the spices for many “curries” are cooked in oil at the start, the roasted curry powder of Sri Lanka is different.  It produces a depth of flavor that is completely different from that which can be obtained by simply frying the raw spices and herbs at the beginning of cooking.  While it’s easy to pull together different spices individually for each non-meat dish that might otherwise use an unroasted curry powder, one cannot replicate the taste of roasted curry powder without actually roasting it.  There really is no substitute for roasted curry powder if one wants to make traditional Sri Lankan food.

A curry leaf plant.  The leaves are very fragrant.

There are several dishes planned for the coming months that make use of roasted curry powder.  Today’s recipe is the starting point for those recipes.  If  you have any interest in Sri Lankan, or South Asian, cooking you won’t be disappointed in whipping up a batch of this curry powder.

Print Recipe
Sri Lankan Roasted Curry Powder
Roasted curry powder is used in Sri Lanka for meat dishes. It brings a depth of flavor that cannot be achieved by any other means.
Votes: 0
Rating: 0
You:
Rate this recipe!
Prep Time 10 minutes
Cook Time 25 minutes
Servings
cup
Ingredients
Prep Time 10 minutes
Cook Time 25 minutes
Servings
cup
Ingredients
Votes: 0
Rating: 0
You:
Rate this recipe!
Instructions
  1. Combine the coriander seeds, cumin seeds, peppercorns, mustard seeds, fennel seeds, cloves, and cinnamon on a rimmed baking sheet.
  2. Roast in the oven 325º F, stirring occasionally, until golden brown, approximately 20-25 minutes.
  3. Lightly crush the cardamom pods but don't remove the husk.
  4. Combine the cardamom pods and curry leaves on a different baking sheet.
  5. Roast the cardamon pods and curry leaves in the same oven as the seeds until the leaves are crispy. Remove the leaves
  6. Continue roasting the cardamom pods until lightly browned.
  7. Roast the cayenne pepper in a dry frying pan over moderate heat till slightly darkened in color.
  8. After removing the roasted spices from the heat, immediately pour them into a cool rimmed baking sheet as the heat of the baking or frying pan can overcook them.
  9. Finely grind the coriander seeds, cumin seeds, peppercorns, mustard seeds, fennel seeds, cloves, and cinnamon in a coffee mill.
  10. Stir in the roasted cardamom pods, curry leaves and cayenne pepper. The curry leaves and crushed should not be ground.
Recipe Notes

Copyright © 2018 by Villa Sentieri, LLC. All rights reserved.

Share this Recipe

Cherry Jam

August 1, 2018

Every year during late summer when I was in grade school we would pick elderberries.  The “we” was myself, my cousin Donna Medile and our mutual friend Ricky Slivosky. Ricky’s dad, Joe, would take us on this adventure.

We’d go to various places in Stackhouse Park, aka the “woods” near our neighborhood.  If you look at the map on the website link, you’ll see Fayette Street.  It’s the street I lived on.  It basically goes right into one of the walking paths into the “woods.”  We never called it Stackhouse Park though everyone knew the name.

Join our mailing list and you’ll never miss a recipe again!

Joe Slivosky would take the elderberries to one of his relatives who would turn them into pies and jam.  I can’t say that I actually cared much for either but I loved picking the berries.  I also liked the idea that something we picked from the wild could be turned into something we ate.

Ever since then, the idea of preserving fruit, preferably fruit that I picked, by turning it into jams, jellies, preserves or by soaking it in alcohol, has fascinated me.

Pitted sour cherries ready to be turned into jam

Santa Fe had a bumper crop of stone fruit in 2012.  Peaches and apricots were everywhere.  I made peach nectar, peach preserves, apricot preserves, apricot and lavender preserves, and apricot preserves with bourbon and brown sugar all from fruit I picked from friends’ trees.  We are just finishing up the bounty of what I canned that year.

Two years ago, I made orange jam and lemon jam from citrus trees outside our house in Palm Springs.

Although guava jelly is my absolute favorite in the jam-jelly-preserve category I find it impossible to get really good guava jelly.  Years ago, I would bring guava jelly back from Guyana where it was made by a friend of my college roommate’s father.  It contained only guava juice, sugar, and lime juice and it tasted just like guava.  Nothing I’ve had since compares to it.

Follow us on your social media platform of choice


Cherry jam is actually my second favorite, though, honestly, there isn’t anything in the jam-jelly-preserve category that I don’t like except traditional British orange marmalade, which I find too bitter.

I was really excited when Rich DePippo’s cherry trees produced enough cherries for the birds, the squirrels, and us this year.

If you’re intimidated by the idea of canning, then don’t can the jam.  Make a batch of it, which will be about six cups total.  It’s really a breeze to make.  When the jam is done, put it in nice jars and refrigerate.  It’ll keep for a few months with no problem.  You can also gift some of it to your friends, who will be amazed that you made it yourself.

Print Recipe
Cherry Jam
This recipe uses one box of traditional fruit pectin. If you make a lot of jam, you may want to buy pectin in a multi-use container. Follow the instructions on the container for the amount that equals one box of pectin. Pie cherries or sour cherries make the best jam.
Votes: 0
Rating: 0
You:
Rate this recipe!
Prep Time 45 minutes
Cook Time 20 minutes
Passive Time 6 hours
Servings
cups
Ingredients
Prep Time 45 minutes
Cook Time 20 minutes
Passive Time 6 hours
Servings
cups
Ingredients
Votes: 0
Rating: 0
You:
Rate this recipe!
Instructions
  1. Put six clean, 1 cup jam jars into a large pot of water. Bring to a boil and reduce to low to keep the jars and the water hot.
  2. Put six new lids in a small saucepan of water. Bring to a simmer, reduce heat to low and keep warm.
  3. Pit the cherries.
  4. Put the cherries in a food processor and pulse until finely chopped. There should still be bits of fruit visible.
  5. Measure four cups of chopped cherries.
  6. Combine the chopped cherries and pectin in an 8 quart saucepan.
  7. Over high heat, bring the cherry mixture to a full, rolling boil; one that cannot be stirred down.
  8. Add the sugar all at once.
  9. Stir and bring the mixture to a full rolling boil as quickly as possible. Boil for one minute.
  10. Remove the jam from the heat.
  11. Skim off any foam.
  12. Remove the jars from the hot water. Turn the heat to high and bring the water to a boil.
  13. Ladle the jam into the hot jars filling to ¼ inch from the top.
  14. Put a lid and a band on each jar. Tighten until you just meet resistance. The lid must be loose enough to allow air to escape (but not allow water to enter) otherwise the jar will explode when being processed.
  15. When all the jars are full, lower them into the boiling water.
  16. Return the water to a boil and boil 10 minutes at sea level. If you are above 1000 feet in elevation, increase the processing time by the amount noted below.
  17. Remove the jars from the boiling water and tighten the lids. Do not overtighten or you may break the seal.
  18. Allow the jars to cool completely.
  19. When cool, the lids should all be concave or, if pressed, should stay concave. If the lids pop up in the center, refrigerate that jar as the seal is not adequate to protect the contents.
  20. Add the following time to the original 10-minute processing time based on altitude: 1000-3000 feet above sea level: 5 minutes; 3001-6000 feet above sea level: 10 minutes; 6001-8000 feet above sea level: 15 minutes; 8001-10,000 feet above sea level: 20 minutes
Recipe Notes

Copyright © 2018 by Villa Sentieri, LLC. All rights reserved.

Share this Recipe

Barbecued Chicken Thighs

July 25, 2018

For someone who tries to eat lower on the food chain, I sure love using my smoker.

Granted, I could smoke things like cheese and even some vegetables but meat is where the smoker really shines!

I’ve smoked pork shoulders, ribs, and turkey breasts, and I continue to expand my repertory, but I really enjoy smoking chicken thighs.

Smoking is often an all-day affair.  Sometimes it’s an all-night affair if one is smoking large enough pieces of meat.  So far, I’ve limited myself to smoking things that can go into the smoker at a reasonable time of the day.  I’m not one of those guys who wants to sit beside his smoker through the night with a cooler of beer at his side!

Join our mailing list and you’ll never miss a recipe again!

Chicken thighs cook in a relatively short period of time so they’re great when you want to limit attending to the smoker to just a few hours before dinnertime.

My smoker has an adjustment for the heat output but not temperature, per se. If the wind or external temperature change, the internal smoker temperature changes, too. Some day I’ll get a smoker with an actual thermostat but so far this one has served me well.

If you get a smoker with an automatic thermostat there would be almost no need to attend to the chicken thighs.  While I have a nice smoker, it doesn’t have a thermostat.  It has a control that puts out an adjustable but then constant amount of heat based on the setting similar to the way car heaters used to work before cars had real thermostats.  If the outdoor temperature or wind changes, the temperature inside the smoker will change due to the constant heat output.

Before I had a smoker, I used my gas grill to smoke.  It has a separate burner just for creating smoke from wood chips.  It has three other burners to actually cook the food plus a rotisserie burner.  Under many circumstances, the burner for the wood chips puts out enough heat to keep the grill at the proper smoking temperature.  When the weather turns cold, like the time I smoked a turkey on Thanksgiving, a little heat from one of the other burners is needed…just not a burner that’s actually under the food.

I sometimes use my gas grill to smoke things, including a whole turkey once.

This recipe makes use of two of my previously published recipes, my barbecue rub and my barbecue sauce.

Follow us on your social media platform of choice


If you don’t have a smoker (and I realize that most people don’t) you really can do these on a grill with indirect heat, either gas or charcoal.

Put on oven thermometer on the grate where you intend to put the chicken.  There should not be any heat coming from under that grate.  Heat up the opposite side of the grill using either gas or charcoal.  With a little experimentation, you’ll be able to keep the side of the grill, where the chicken will go, at the proper smoking temperature.  If your grill doesn’t have a separate place for wood chips, add some wood chips, soaked in water for 30 minutes, to the hot part of the grill from time to time.

Happy smoking!!! (Oh, and don’t forget the beer!)

Print Recipe
Barbecued Chicken Thighs
These chicken thighs are moist and fall-apart tender. See the Notes section for links to my recipes for barbecue rub and barbecue sauce. Professional kitchens often weigh liquids, hence the 4000 grams of water. 4000 grams would essentially be the same as 4 liters. The advantage of weighing the water, though, is that you can add ice to cool the brine down while still being exact about the quantity of water. This recipe scales easily.
Votes: 0
Rating: 0
You:
Rate this recipe!
Course Mains, Poultry
Cuisine American
Prep Time 40 minutes
Cook Time 4 hours
Passive Time 2 hours
Servings
people
Ingredients
Course Mains, Poultry
Cuisine American
Prep Time 40 minutes
Cook Time 4 hours
Passive Time 2 hours
Servings
people
Ingredients
Votes: 0
Rating: 0
You:
Rate this recipe!
Instructions
  1. Dissolve the salt in the water.
  2. Refrigerate the brine until cold. If you are weighing the water, you can add ice cubes to cool the brine quickly.
  3. Add the chicken thighs and weigh them down with a plate or a zipper lock bag full of water. Brine for two hours in the refrigerator.
  4. Remove the chicken thighs and pat them dry.
  5. Lay the chicken thighs skin-side down.
  6. Sprinkle liberally with garlic powder.
  7. Sprinkle with oregano.
  8. Sprinkle with barbecue rub.
  9. Wrap the skin around thigh, trying to enclose the meat as much as possible. Tie with twine.
  10. Rub the thighs generously with barbecue rub.
  11. Smoke at 225°F for 4 hours.
  12. Fifteen minutes before thighs are done, brush with barbecue sauce. Continue cooking for 15 more minutes.
Recipe Notes

Here is where you will find my recipe for barbecue rub and my recipe for barbecue sauce.

Copyright © 2018 by Villa Sentieri, LLC. All rights reserved.

Share this Recipe

A Passion for Traditional Recipes