Risotto Friulano (Friuli-Style Risotto)

June 25, 2018

If you do an internet search on Risotto Friulano you will turn up more entries for risotto con lo sclopit than any other.

Sclopit (bladder campion in English) is native to large parts of Europe and beyond.  It is not native to the United States but grows abundantly from coast to coast. Its botanical name is Silene vulgaris.

The leaves of Silene vulgaris (sclopit in Friulan; bladder campion in English) are used in risotto (photo by D. Gordon E. Robertson [CC BY-SA 3.0 (https://creativecommons.org/licenses/by-sa/3.0) or GFDL (http://www.gnu.org/copyleft/fdl.html)], from Wikimedia Commons)
In my husband’s family, however, Risotto Friulano refers to risotto that is made with Salsa Friulano, a traditional tomato sauce made with ground meat, herbs and spices.  I’ve published two recipes for Salsa Friulano.  One is my mother-in-law’s and the other is Ivana’s, the wife of my mother-in-law’s cousin Olvino.  (By the way, I asked my mother-in-law about sclopit.  She’s never heard of it!)


Follow us on your social media platform of choice


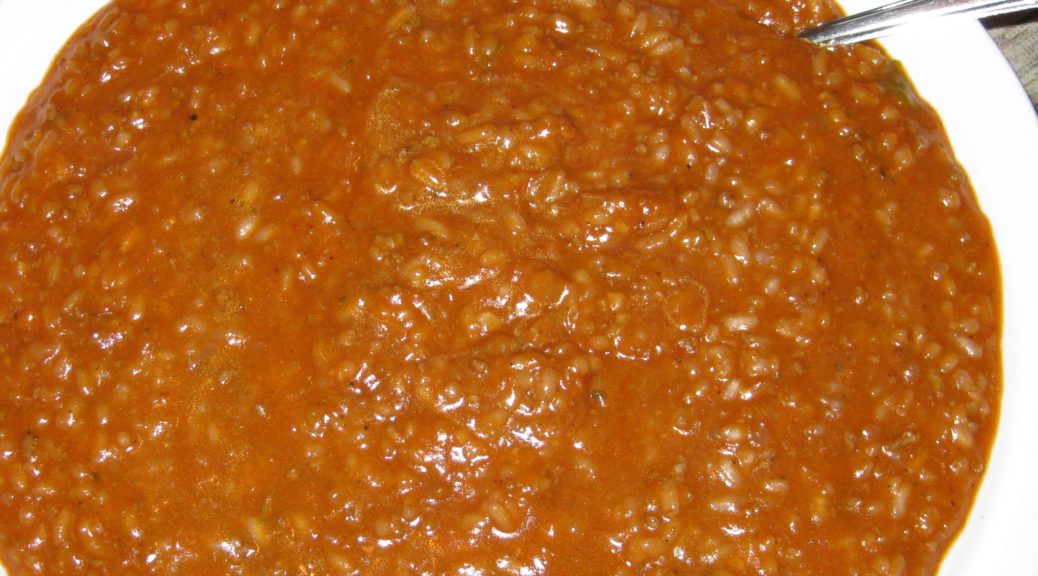
My mother-in-law uses homemade chicken broth, and her Friulan tomato sauce for her Risotto Friulano.  Uncle Ray, her brother, uses canned beef broth instead of chicken broth.  Neither uses risotto rice, opting for long-grain rice, and neither really follows the common risotto technique of adding liquid slowly and allowing it to evaporate before the next addition.

We have long discussions about these differences.  While I don’t have a good explanation for the differences in technique other than cooking differences within their family, it’s my belief that the use of long-grain rice rather than short-grain “risotto” rice is a consequence of what was readily available when the family immigrated to the United States.

Sclopit leaves

I have a number of cookbooks from Friuli and all the recipes for risotto use what the Italians would call “riso per risotto,” rice for risotto.  It’s possible that this is a recent change in cooking habits in Friuli but I am more inclined to believe that the switch from risotto rice to long-grain rice happened in the United States, at least for my mother-in-law’s family.

Both my mother-in-law and Uncle Ray add enough liquid to their respective recipes for Risotto Friulano to make the final product pourable, like a traditional risotto.  Without the more starchy riso per risotto and the risotto technique, however, the result is not as creamy but still very good…and very traditional within the family.  Just ask my father-in-law, who is from Tuscany and not Friuli, whose Risotto Friulano he prefers!  (Hint, he’ll tell you mine tastes good, but…)


Join our mailing list and you’ll never miss a recipe again!


The most common types of rice for risotto are Arborio, Carnaroli, and Vialone Nano.  Arborio is the easiest to find and it is what I use most of the time.  Carnaroli and Vialone Nano are even more forgiving than Arborio as they are harder to overcook.  They are more difficult to source in American markets, however.

Arborio Rice is generally the easiest “riso per risotto” (risotto rice) to find in the United States

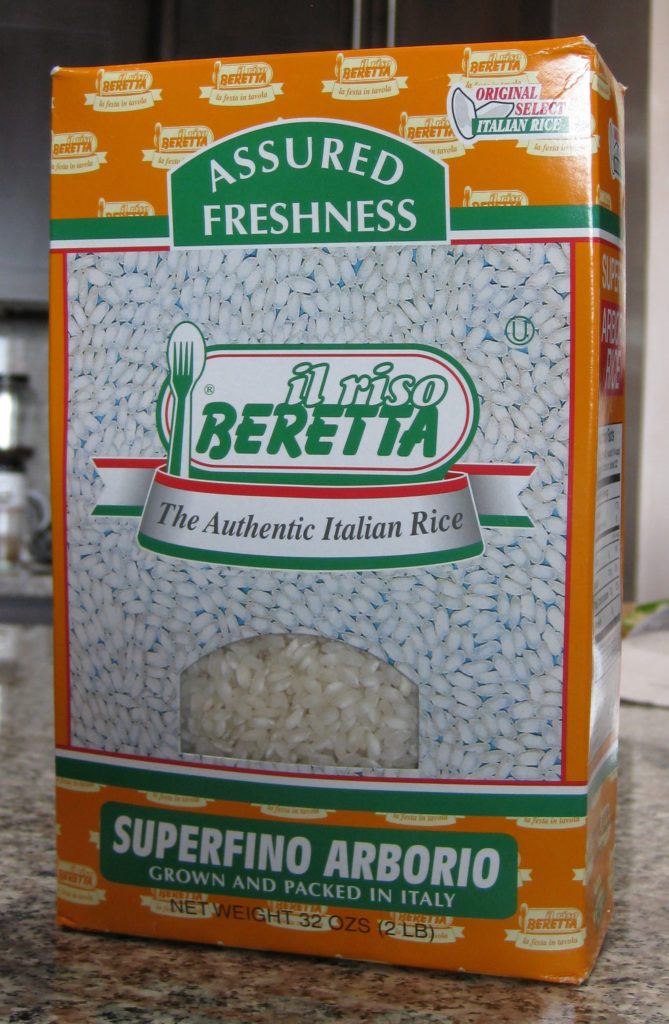
When I make Risotto Friulano, I follow standard risotto technique and use short-grain Italian rice.  I hope you enjoy it!

Print Recipe
Risotto Friulano (Friuli-Style Risotto)
My mother-in-law’s version of this is much simpler. She sautés long-grain rice in olive oil without any aromatics. She adds the sauce and then the broth. Broth is not added in small amounts but most of it is put in at once. Additional broth is added near the end If the rice can absorb it. Uncle Ray’s version is similar but with canned beef broth. Parmigiano is added at the end. If you’re going to make Marisa’s Mystical Meatballs, this is a wonderful use of the beef broth that will be created. See the Notes below for a link to the meatball recipe. If you are not using unsalted homemade broth, do not add salt as directed. Wait until the end and add salt to taste.
Votes: 0
Rating: 0
You:
Rate this recipe!
Prep Time 10 minutes
Cook Time 45 minutes
Servings
people
Ingredients
Prep Time 10 minutes
Cook Time 45 minutes
Servings
people
Ingredients
Votes: 0
Rating: 0
You:
Rate this recipe!
Instructions
  1. Bring the broth and the Salsa Friulana to a bare simmer in separate pots.
  2. Heat a two or three quart heavy-bottomed saucepan over medium-high heat. Add the olive oil.
  3. Briefly sauté the onion in the oil. As the liquid from the onion evaporates and the onion just begins to turn translucent, reduce the heat to medium add the garlic.
  4. x
  5. Sauté on medium until the onion is translucent. Do not brown the onion or garlic. You may need to reduce the heat.
  6. When the onion is translucent, return the heat to medium high and add the rice.
  7. Sauté for 3-5 minutes, until the rice grains are partially translucent. Do not brown the rice.
  8. The outer portion of the rice grains will get translucent while the inside will stay opaque white.
  9. Add the wine.
  10. Stir frequently, but not constantly, until the wine has totally evaporated. You will begin to see some starch leaching out of the rice. More and more of the starch will leach out as you cook the rice. This is what will make a creamy sauce.
  11. When the wine has evaporated, add one ladle of simmering broth, approximately 1/3 cup, and the salt. Stir thoroughly paying particular attention to loosening any spots where the starch seems to be sticking to the bottom of the pan. You don’t want to brown (or worse yet, burn) the starch.
  12. Cook, stirring frequently but not constantly, until the broth has evaporated.
  13. Keep repeating the process with 1/3 cup of broth, cooking, stirring, loosening any spots that are sticking, and allowing the liquid to evaporate, until you have used approximately 5 cups of the broth. The heat should stay as close as possible to medium high. The moderate boiling of the liquid will coax starch out of the rice to create the creaminess that is the hallmark of a good risotto.
  14. Add 1 ½ cups of Salsa Friulana and cook until some of the liquid has evaporated. It will not be possible to cook the rice until dry once the sauce is added.
  15. Season with black pepper to taste.
  16. Continue adding broth, one ladle at a time, until the rice is cooked and creamy but still al dente at the very center.
  17. Remove the rice from the heat. Stir in the Parmesan cheese then the remaining ½ cup of Salsa Friulana.
  18. Still off the heat, add hot broth, a little at a time, to create a creamy, pourable risotto, adding only as much as the starchy liquid in the risotto will absorb.
  19. Taste and adjust seasoning.
  20. Serve immediately. Pass additional Parmesan cheese at the table.
Recipe Notes

This is where you’ll find the recipe for Marisa’s Mystical Meatballs.

You can find my mother-in-law’s recipe for Salsa Friulana here and Ivana’s recipe here.

Copyright © 2018 by Villa Sentieri, LLC. All rights reserved.

Share this Recipe

Chicken Braised with Lemon, Sage and Olives

June 20, 2018

When we’re in Palm Springs in the winter, surrounded by an abundance of citrus trees, I feel like citrus ought to be featured in every meal.

Being able to walk out the door and pick lemons, limes, oranges, grapefruit and tangerines, and NOT doing it, seems like such a grand missed opportunity.  Even if the ingredients for the rest of the meal don’t come from within a few feet of my door, the citrus fruits and herbs can.

With that in mind, and the prospect of cooking a multi-course dinner for 15 people in a kitchen that’s about 8’ x 10’ got me to thinking.  Individually lemons, sage, and olives pair well with chicken so why not all of them together in the same dish?

Looking up into a lemon tree in Palm Springs

Next came the method.  With fifteen people I needed at least 15 pieces of chicken.  I was pretty sure that with all the other courses, one piece of chicken per person would be enough.  I added a few more for good measure.


Follow us on your social media platform of choice


Braising 18 pieces of chicken on the stove top would have consumed a good deal of space so I opted for the oven and a “hotel pan,” sometimes called a steam table tray.  You know, those cafeteria-style rectangular pans.  I have a mess of them in an array of sizes.  Made of stainless steel, they’re non-reactive.  You can cook and store food in them, simplifying the preparation process.  Shallow roasting pans are a good substitute.  Don’t use aluminum pans or other reactive materials due to the lemon juice in this dish.

To keep it simple, I decided not to brown the chicken first, but rather to do it at the end by turning up the oven.  I made a marinade by buzzing the ingredients in a blender, so even that is super-easy.

A hotel pan is a great way to prepare large quantities of food

Which part of the chicken to use was never in question.  I like what happens to chicken thighs with long, slow braising.  Keeping the bone in adds flavor and structure so I suggest avoiding boneless thighs.

If you keep the skin on you’ll have to remove it before browning and serving the chicken because it will be rubbery from the moist heat.  I usually prefer to keep the skin on as it helps keep the meat moist but the combination of low and slow cooking and a tight cover meant the effect of the skin would be marginal.  Removing the skin in the beginning makes the dish even simpler to prepare.  Besides, the skin is a great addition to the stock pot when making chicken stock or broth.


Join our mailing list and you’ll never miss a recipe again!


I keep a zipper lock bag in my freezer into which I put chicken skin and other bits that I trim off chicken then add the contents to the stock pot with backs and wings.  Skin contains a lot of fat but since it will be skimmed off at the end it’s not really a concern.  The collagen in the skin, however, will greatly improve the mouthfeel of the broth.  In the “old days” adding chicken feet to the stock pot served the same purpose but finding chicken feet is challenging.

A Palm Springs orange tree, in the distance, full of ripe oranges

While this dish was created in the Palm Springs winter, it works well year-round thanks to the non-stop availability of lemons.  The next time you’re cooking for a crowd, give it a try and let me know what you think.

Print Recipe
Chicken Braised with Lemon, Sage and Olives
I created this recipe for my father-in-law’s birthday, January 2018. The lemons came from the trees outside of our house in Palm Springs. Though not essential, I prefer to put a sheet of baking parchment over the chicken before covering with aluminum foil to keep the reactive aluminum completely out of contact with the acid in the lemon juice.
Votes: 0
Rating: 0
You:
Rate this recipe!
Course Mains, Poultry
Cuisine Italian
Prep Time 30 minutes
Cook Time 2 hours
Servings
people
Ingredients
Course Mains, Poultry
Cuisine Italian
Prep Time 30 minutes
Cook Time 2 hours
Servings
people
Ingredients
Votes: 0
Rating: 0
You:
Rate this recipe!
Instructions
  1. Make marinade by pureeing the olive oil, lemon juice, 6 cloves garlic, rosemary, salt, and pepper in a blender.
  2. Pour the marinade over the chicken thighs and mix well.
  3. Marinate chicken thighs overnight in the refrigerator.
  4. Lightly oil a non-reactive hotel pan or shallow roasting pan.
  5. Arrange lemon slices on the bottom of the pan.
  6. Put a sage leaf on each lemon slice.
  7. Put a chicken thigh on each sage-topped lemon slice, reserving the marinade.
  8. Scatter olives around the chicken.
  9. Smash the remaining 8 garlic cloves and scatter around the chicken.
  10. Pour the marinade over the chicken. Cover the pan tightly with foil. (If possible, cover the pan with a sheet of parchment before the aluminum foil.)
  11. Put the chicken into a preheated 350°F oven. Cook until the chicken is nearly fall-apart tender, 90-120 minutes.
  12. Using a turkey baster, remove most of the liquid from the pan. Put the liquid into a fat separator.
  13. Turn the heat as high as the oven goes. Put the pan of chicken on the top rack until it takes on some color, approximately 10-15 minutes. You can also use the broiler for this, though many broilers do not have enough heated surface area to brown the contents of a large pan.
  14. While the chicken is browning, skim the fat from the pan juices.
  15. Carefully move the chicken thighs, with lemon slices intact, to a serving platter or individual plates.
  16. Scatter the olives over the chicken.
  17. Pour some of the defatted pan juices over the chicken.
  18. Pass the remaining defatted pan juices at the table.
Recipe Notes

Copyright © 2018 by Villa Sentieri, LLC. All rights reserved.

Share this Recipe

Salsa Friulana di Marisa (Marisa’s Friulan Tomato Sauce)

June 11, 2018

Ma’s spaghetti sauce.  That’s what my husband calls it.

That’s pretty similar to what most of us of Italian heritage who grew up in the United States called the sauce that our mothers (yes, it was almost always the mothers) made most frequently.

It isn’t as if there aren’t more pasta sauces than one can count.  It’s just that for everyone I know of Italian heritage, there’s one that stands out above the rest.

For my husband’s family, this is the one.


Join our mailing list and you’ll never miss a recipe again!


It’s actually quite similar to Ivana’s sauce.  Ivana is married to my mother-in-law’s cousin Olvino.  Ivana grew up in Friuli but in a different town.  There are subtle differences in her sauce and my mother-in-law’s sauce, but if you read both recipes you’ll certainly see the similarities.

My mother-in-law doesn’t remember when she learned to make this sauce, or even if she learned from her mother or her aunt.  She does remember, however, that her father asked her how she could get married (she was engaged to my father-in-law) without knowing how to cook.

My mother- and father-in-law on their wedding day (apparently before she knew how to cook)

She got married, ultimately learned to cook, and then headed up the kitchen in Castleview, the restaurant that she and my father-in-law owned in Fox River Grove, Illinois.  The restaurant was named Castleview because it had a view of an adjacent…you guessed it…castle…well, sort of a castle.   For more information on the castle, you can look here.

The Bettendorf Castle in Fox River Grove, Illinois

By the time I came on the scene, it was difficult to catch more than a glimpse of the castle from the restaurant due to the growth of trees and other vegetation.

Another view of the Bettendorf Castle

My mother-in-law thought my version of her sauce was “pretty good.”  She did note that it was thicker than hers; probably because I cook it longer but also potentially due to a different brand of tomatoes.  If you want it thinner, cook it less or (my preference) just add more water or put a splash of pasta-cooking water in the bowl with the pasta and the sauce.  (Just between you and me, when I’m putting dinner on the table using my mother-in-law’s sauce, I usually boil it down a bit because it seems a little thin to me!)


Follow us on your social media platform of choice


In a few weeks I’ll be posting a recipe for Friulan Risotto that incorporates this sauce.  Stay tuned.

Print Recipe
Salsa Friulana di Marisa (Marisa's Friulan Tomato Sauce)
The amount of water needed will vary based on how thick the tomato puree is, how much liquid evaporates during cooking, and how thick or thin you like your sauce. Feel free to add more water during cooking if the mixture is becoming too thick. If the sauce is too thin uncover near the end of cooking and increase the heat to cook off more water.
Votes: 0
Rating: 0
You:
Rate this recipe!
Prep Time 20 minutes
Cook Time 3 hours
Servings
quarts
Ingredients
Prep Time 20 minutes
Cook Time 3 hours
Servings
quarts
Ingredients
Votes: 0
Rating: 0
You:
Rate this recipe!
Instructions
  1. Finely chop the parsley, carrots, celery, onion, and garlic in food processor.
  2. There should be a bit of texture to the mixture, not a puree. Reserve.
  3. Puree the crushed tomatoes in the food processor.
  4. Rinse the cans out with some of the water. Add the water to the pureed tomatoes. Reserve.
  5. Sauté the beef in the olive oil on high heat until no pink remains.
  6. Add the chopped vegetables.
  7. Sauté on high heat until all the liquid evaporates and then continue to sauté until the mixture darkens slightly and smells cooked.
  8. Add the wine and continue to cook until the wine has evaporated.
  9. Add the allspice, nutmeg, and cinnamon. Stir well.
  10. Add the tomato paste and sauté until it begins to smell sweet, approximately 5 minutes at medium-high heat.
  11. Meanwhile, rinse tomato paste can out with some of the water and add it to the pureed tomatoes.
  12. Add pureed tomatoes, bay leaf, oregano, basil and remaining water.
  13. Bring to a boil, reduce heat and simmer, partially covered for about 2 ½ hours, stirring every 20 minutes.
  14. After about an hour of cooking, begin to taste and adjust seasoning.
  15. Serve with the pasta of your choice.
Recipe Notes

Copyright © 2018 by Villa Sentieri, LLC. All rights reserved.

Share this Recipe

Italian Roasted Peppers

May 28, 2018

I wish I had a pithy story to tell about roasted peppers.

I don’t really, except to say that after reviewing a dozen, or so, recipes to see how they compare with my method, I’ve discovered that NONE of them does it right.  (I know.  That sounds pretty narcissistic, doesn’t it?)

In a nutshell, you want to turn the skin jet black and you want to do it as quickly as possible.  Then you want to put them in a covered non-reactive container for about 10 minutes before peeling them.

The recipes that I found included the following (erroneous) steps:

1.      Roasting them in the oven.

2.      Cutting them before cooking.

3.      Cooking them too long.

4.      Not sufficiently blackening and blistering the skin.

5.      Putting them in a paper bag after roasting.

And don’t even get me started about putting oil on them before roasting!

Here’s the skinny…


Join our mailing list and you’ll never miss a recipe again!


The longer you cook them, the softer the flesh of the pepper becomes.  If you really want any structure at all, you want to get the blackening of the skin done quickly.

You really want the skin to be completely black.  First, this will cause the skin to peel off easily.  Second, it will add the smokiness that you want in a good roasted pepper.  No, they won’t taste burnt.  You will notice, if you give this recipe a try, that the places where the skin isn’t burnt won’t peel off very easily.

The main goals of cooking them fast and completely blackening the skin mean you really can’t roast them in the oven.  You need direct heat.

You don’t want to cut them because you won’t be able to rotate them sufficiently to blacken the skin all over.  They’re harder to handle if cut.  Besides, they’ll dry out.

Sometimes juice will leak out while the peppers are cooling.  If you put them in a paper bag, the bag will absorb the flavorful juice, and that would be a shame!

If I’m roasting one or two peppers, I’ll do it directly over the burner on a gas stove.  Oh, and for that one writer who suggested lining the burners with aluminum foil, get a life!  Not that much juice comes out of the peppers and what does is likely to get vaporized on the cast iron grate.  If a drop or two lands anywhere else on the stove, it’s just as likely to land in a spot that you can’t cover with aluminum foil as it is to land on the foil itself.


Follow us on your social media platform of choice


If I’m roasting more than a couple of peppers, I’ll do it on my gas grill.

You can use a broiler if you don’t have a gas stove or a gas grill, though I find the broiler a little less friendly to use.

As for heat, crank it up:  medium high on a burner, high on a gas grill.  The goal is to blacken the skin as quickly and as evenly as possible.  The longer it takes to do this (that is, the lower the heat) the more the flesh of the pepper will soften.  The pepper should hold its shape after roasting, not collapse.

I use roasted peppers in lots of dishes.  Auntie Helen’s Lentil Salad is a good example.

The simplest way to use roasted peppers is to cut them in strips after peeling off the skin and toss them with a little extra virgin olive oil and salt.  They make an excellent side dish.  Since they’re served at room temperature they can be made in advance.  Using different colored peppers makes it festive.

If you like peppers, and you’ve never roasted your own, please give this recipe a try.  I think you’ll be surprised at how easy it is and how much better the peppers taste that the ones in the jar!

Print Recipe
Italian Roasted Peppers
Roast the peppers using direct heat, set as high as possible. For one or two peppers, I use the burners on my gas stove. For more, I use my gas grill. A broiler (gas or electric) works too. The directions below are for a gas burner but the same technique works for a gas grill and a gas or electric broiler. The pepper won’t obviously touch the heat source if using a grill or a broiler.
Votes: 0
Rating: 0
You:
Rate this recipe!
Course Sides, Vegetables
Cuisine Italian
Prep Time 10 minutes
Cook Time 10 minutes
Passive Time 10 minutes
Servings
or more
Ingredients
Course Sides, Vegetables
Cuisine Italian
Prep Time 10 minutes
Cook Time 10 minutes
Passive Time 10 minutes
Servings
or more
Ingredients
Votes: 0
Rating: 0
You:
Rate this recipe!
Instructions
  1. If using a gas burner, set the burner to medium high.
  2. Using long-handled tongs, put the pepper directly on the grate above the flame (where you would ordinarily set the pot).
  3. As the skin begins to blacken, move and rotate the pepper to get the skin evenly black.
  4. When the skin is evenly blackened, put the pepper in a non-reactive heat-proof bowl with a lid, such as one made from glass or enamel.
  5. Cover and allow to cool for 10 minutes.
  6. Rub off the skin. It helps to keep a bowl of water nearby to dip your fingers into to remove the skin that will inevitably stick to your fingers.
  7. Catch any juice that runs out of the peppers to add back once the peppers are peeled, cleaned, and cut.
  8. Cut the peppers in half from top to bottom. Remove the stem, ribs, and seeds.
  9. Use as directed in the recipe.
Recipe Notes

Copyright © 2018 by Villa Sentieri, LLC. All rights reserved.

Share this Recipe

Auntie Helen’s Lentil Salad

May 18, 2018

Auntie Helen had a way with lentils.

In addition to making lentil salad for summer cook-outs, she taught me that cooked lentils, topped with homemade tomato sauce, make a great main (or side) dish for a cold winter’s day.

Auntie Helen liked her scotch.  On the rocks.  And she was not shy about quantity.

Auntie Louise liked gin.  Also on the rocks.  Also not shy about quantity.

It was mostly under their tutelage that I went from drinking Bourbon Manhattans (Old Grand Dad at the time) to Bourbon, also on the rocks.  This was somewhere around the age of 19.

Auntie Helen in 1976

I soon made the jump from Old Grand Dad to Jack Daniels, which remained my tipple of choice for decades.  Now I’ve branched out to a wide array of bourbons but always on the rocks and in respectable quantities.


Follow us on your social media platform of choice


Auntie Helen and Auntie Louise were born, shortly after the turn of the 20th century, in a palazzo in Rome, now part of the American Embassy.  After their parents lost everything for the second time (there was talk that the first time it happened, they were bailed out by one of the Stroganoffs) the family emigrated from Italy to America.  Their father, a Count in Italy, worked delivering bread in Trenton, NJ.

Auntie Helen and Auntie Louise both became schoolteachers.  Neither married.  They lived together their entire lives.

They had a sweet little house on Yardley Road, just steps from the Yardley town line, in Morrisville, New Jersey.  I spent many weekends at their house, a little over an hour from where I lived in Philadelphia.

Auntie Helen did the cooking.  Auntie Louise made drinks and helped to clean up.

Auntie Louise in 1976

Though they came from a background that was more privileged than most immigrants of the time, they had little by the time the family got to the United States.  They did what many immigrants did, they assimilated and became almost “hyper” American.  I never heard either of them speak a word of Italian.  And, while Auntie Helen cooked an array of Roman specialties, she also cooked a lot of American food, including Impossible Pies, more the savory ones than the sweet ones; homemade Pumpkin Chiffon Pie (the only thing she cooked that I didn’t like); and cheese and egg strata for brunch (with lots of bacon on the side!).


Join our mailing list and you’ll never miss a recipe again!


I recently found a series of Impossible Pie recipes that Auntie Helen wrote out for me.  I can’t promise that I’ll make each of them, but I will post the recipes, in her own handwriting.  If nothing else, they’ll be a bit of a time capsule.

Meanwhile, please enjoy my take on Auntie Helen’s lentil salad.

Print Recipe
Auntie Helen's Lentil Salad
Auntie Helen’s lentil salad was more of a general concept that a definitive recipe. Feel free to add other ingredients to this, like a handful of chopped black oil-cured olives, some sliced scallions, or a sprinkling of dry oregano. You can replace some of the olive oil with the oil from a can of anchovies or add a teaspoon of anchovy paste if you’d like. It will add an umami touch without tasting fishy.
Votes: 0
Rating: 0
You:
Rate this recipe!
Prep Time 30 minutes
Cook Time 30 minutes
Passive Time 8 hours
Servings
people
Ingredients
Prep Time 30 minutes
Cook Time 30 minutes
Passive Time 8 hours
Servings
people
Ingredients
Votes: 0
Rating: 0
You:
Rate this recipe!
Instructions
  1. Wash and pick over the lentils but do not soak them.
  2. Drain the lentils.
  3. Combine the lentils and water.
  4. Bring the lentils to a boil and gently boil until just tender, 10-15 minutes, or maybe a little more based on your elevation.
  5. Drain the lentils.
  6. Mix the hot lentils with the diced onion, oil, and rosemary. Stir well.
  7. Bury the bruised garlic clove in lentils.
  8. Loosely cover the lentils and cool at room temperature.
  9. When the lentils are cool, they can be refrigerated for up to three days before proceeding.
  10. To finish the lentil salad, remove the garlic clove and discard.
  11. Dice the roasted red pepper.
  12. Add the diced roasted red pepper, vinegar, salt and pepper. Mix well and chill thoroughly.
  13. Remove the lentil salad from the refrigerator approximately one hour before serving.
  14. Adjust salt and pepper before serving. Add more olive oil if the lentils seem dry.
Recipe Notes

Copyright © 2018 by VillaSentieri.com. All rights reserved.

Share this Recipe

Penne with Roasted Garlic Cream Sauce

May 14, 2018

I apologize!

In my inaugural messages, I clearly stated that I would publish traditional recipes, many (though not all) of them Italian, but with the emphasis on traditional.

I get really stoked by the idea of preserving traditional recipes in written form (even if it’s a bunch of zeroes and ones on a cloud server somewhere)!

I also truly appreciate new and innovative dishes…especially cakes, for some reason.  But my very strong preference if I’m going to work on perfecting and publishing a recipe is to focus on traditional recipes.  (I’m happy to eat good food of any type, traditional or not, that someone wants to serve me, however.)


Follow us on your social media platform of choice


My editorial calendar for this blog, including what I’ve published and what I currently have planned to publish, numbers 212 recipes.  The number keeps growing.  Most of these recipes are ones I listed (off the top of my head, so to speak) when I was planning the launch of the blog in late 2016.  The list came from simply thinking about my favorite recipes.  As I trawl through my recipe archive periodically, looking for recipes for particular events, or even just dinner, I usually come upon at least a few more recipes that get added to the list.

Two hotel pans hold a double batch, 4 pounds of penne, for a summer dinner party for the family from Tuscany

Windows says I have 4133 recipes saved in my recipe directory.  That does not count the hundreds of hand-written ones that I’ve not scanned in yet.

But I have to admit, not EVERYTHING I make is traditional.  I have this killer salmon recipe that I got from the New York Times that is now a regular on our table.  Almost any vegetable recipe by David Tanis is a winner in my book, well really ANY recipe by David Tanis, but he has a way with vegetables.  He has many make-ahead-and-heat-up-in-the-oven options that remove a lot of last minute work when putting dinner on the table, whether it be for 2 or 20!

In my defense, these are recipes that I think will become classics in a few decades just as many of the recipes that I started cooking 45 years ago in college have become classics for me.  I think if a recipe still tastes good after half a century it can be considered a classic…which is getting pretty close to traditional.

This is just a portion of the antipasto for the dinner for our Tuscan relatives

Think about all the things you ate 50 years ago that you don’t make any more, like fried bologna simmered in ketchup!  That actually is something that my very traditional mother put on the table in the 1960s!  Granted, it was a main course (and I use the term lightly) that could be whipped up in under half an hour after a day’s work.  The truth is, I actually liked it at the time.

I differentiate the fried bologna category of foods that I don’t make any more from the fried salami category of foods that I still love but that just have fallen off my rotation.  Have you ever had a sandwich of pan-fried salami?  If not, give it a try.  (Thinly slice the salami.  Make a cut from the middle to one edge, like the first cut of a pie, to reduce puckering.  Cook in a skillet over medium heat till lightly browned on each side.  No oil needed.  Pile on bread.  Enjoy…dripping fat and all!)


Join our mailing list and you’ll never miss a recipe again!


So why the apologia?

Today’s recipe isn’t traditional.  I developed it about four years ago for dinner for a large group of people.  It was such a hit, that I kept making it.  I even made it last summer for a dinner party for the family from Tuscany!  So, while it’s not really traditional (which I take to mean something with a cultural history, something that individuals from a particular culture and location make or made on a regular basis), it has a very traditional FLAVOR.

I made this penne for my father-in-law’s birthday party this past January. Everyone had clean plates!

In my mind it’s not a REAL (i.e. traditional) dish because I made it up.  On the other hand, the flavor profile makes it fit into an established canon of northern Italian food.  Italians would recognize it as Italian food, just not traditional Italian food.

Because it isn’t traditional, I hadn’t planned on publishing it.  I got a number of requests for the recipe after I mentioned it in one of my emails and decided that I should reconsider my initial decision.  There aren’t many photographs but the steps are not really complicated.  I know you can do it without all the usual photos.

Who knows, maybe in another 45 years it’ll become a classic!

Print Recipe
Penne with Roasted Garlic Cream Sauce
This takes some time to put together but once it’s assembled you can spend time with your guests while it cooks. The sauce has a luxurious amount of butter, about twice what would typically be used based on the amount of flour. This improves the flavor and mouth-feel of the sauce. Because I originally created this dish for an event in Alamogordo, New Mexico, I topped it with pistachios which are grown there. Chopped walnuts or whole pine nuts could be substituted. If you want to prepare the dish in advance, be sure to cool the pasta in a bowl of ice water. Mix the cooled pasta with cold white sauce and the other ingredients. Pour into a baking dish, cover tightly, and refrigerate. Allow the covered dish to sit at room temperature 60-90 minutes before baking.
Votes: 0
Rating: 0
You:
Rate this recipe!
Prep Time 2 hours
Cook Time 2 hours
Passive Time 2 hours
Servings
people
Ingredients
Balsamella (White Sauce)
Final Assembly
Prep Time 2 hours
Cook Time 2 hours
Passive Time 2 hours
Servings
people
Ingredients
Balsamella (White Sauce)
Final Assembly
Votes: 0
Rating: 0
You:
Rate this recipe!
Instructions
Balsamella (White Sauce)
  1. Put the garlic in a single layer in a small oven-proof dish with a tight-fitting lid. Alternatively, put the garlic on a sheet of heavy-duty aluminum foil.
  2. Sprinkle the garlic with olive oil.
  3. Put the lid on the dish, or fold up and seal the aluminum foil.
  4. Roast the garlic at 300°F until soft and golden brown, approximately 45 minutes, stirring occasionally.
  5. Put the garlic and any olive oil you can scrape out of the dish into a blender jar.
  6. Add 1 cup of the milk.
  7. Puree the garlic and milk. Reserve.
  8. Warm the remaining milk in a heavy-bottomed saucepan.
  9. Melt the butter in another heavy-bottomed saucepan over medium heat. Stir the flour into the butter.
  10. Cook for a few minutes on medium heat but do not allow flour to color.
  11. Stir in the warm milk, one ladleful at a time, incorporating well after each addition to avoid lumps.
  12. After about half the warm milk has been incorporated, add the pureed garlic mixture.
  13. Use some of the warm milk to rinse out the blender jar and add it to the pot. Stir well.
  14. Add the remaining milk to the pot along with the bay leaves, rosemary sprigs, and lemon zest.
  15. Bring to a boil over medium high heat stirring (nearly) constantly and cook until the sauce reaches the thickness of heavy cream, approximately 5 minutes.
  16. Strain the white sauce through a fine-mesh sieve.
  17. If not using the sauce immediately, cover it with plastic wrap, putting the plastic directly on the surface to prevent the formation of a skin, and refrigerate. [If you are going to prepare the casserole in advance, make sure the balsamella is cold before combining with the other ingredients.]
Final Assembly
  1. Put the frozen peas in a large sieve. Rinse with cool water to thaw the peas. Allow the peas to drain and completely thaw while proceeding with the recipe.
  2. Heat the olive oil in a large sauté pan over high heat.
  3. When the oil is hot, but not smoking, add the diced mushroom caps. Toss well.
  4. When the mushrooms have absorbed the oil, add 1 teaspoon of fine salt. Mix well.
  5. Turn the heat to medium low until the mushrooms begin to sweat.
  6. Turn the heat to high and continue sautéing until the liquid evaporates.
  7. Continue to cook until the mushroom pieces are browned in places.
  8. Season with black pepper. Add ham and cook 2-3 minutes.
  9. Remove from the heat and reserve.
  10. Bring a large pot of heavily salted water to a rolling boil. Add the pasta.
  11. Boil until the pasta is partially cooked. It should still be a little crunchy on the inside.
  12. If you are going to cook the casserole immediately, drain the pasta but do not rinse. If you are going to assemble the casserole in advance, drain the pasta and chill it in a bowl of ice water. When cold, drain well.
  13. Combine pasta, peas, mushroom and ham mixture, and balsamella. Mix well.
  14. Pour into a large buttered casserole. For this quantity, I use a full-size steam-table tray, also called a “hotel pan.”
  15. Put a sheet of parchment on top then cover the pan tightly with heavy-duty aluminum foil. You can skip the parchment if you are going to cook the casserole immediately. Food should not stay in extended contact with aluminum, hence the parchment paper if the dish is being assembled in advance.
  16. Either refrigerate or bake at 350°F until bubbly. Baking time will depend on whether the ingredients are hot or previously refrigerated and brought to room temperature, 1 ½ to 2 hours.
  17. Remove the foil and parchment. Sprinkle the top with Parmesan cheese and nuts.
  18. Place under the broiler, or on the top rack of an oven heated to 500°F, until the top is golden brown.
  19. Allow the casserole to rest at least 15 minutes before serving.
Recipe Notes

Copyright © 2018 by VillaSentieri.com. All rights reserved.

Share this Recipe

Aunt Margie’s Pasta è Ceci (Pasta and Chickpeas)

May 4, 2018

Beans and Macaroni. Pasta è Fagioli.  Even Pasta Fazool to quote Dean Martin.

It’s a classic combination and there are as many variations as there are cooks!  (Google returned 6,300,000 entries for “beans and macaroni,” 588,000 for “pasta è fagioli,” and 57,900 for “pasta fazool!”)

This is my interpretation of Aunt Margie’s, which she made with chickpeas.

At Aunt Margie’s 90th birthday party in September 2010.  From left to right, Aunt Margie’s grandson, Jim, me, Aunt Margie, my cousin Donna (Aunt Margie’s daughter)

It couldn’t be more different from my mother’s which was made with baby lima beans.

Aunt Margie’s was made with water and oil.  My mother’s had tomato sauce.


Follow us on your social media platform of choice


Aunt Margie’s was quite soupy.  My mother’s was just slightly “saucy.”

They grew up in the same house and learned to cook from the same mother.  I wish I had thought to ask either of them where their respective recipes came from and why they were so different.

My cousin Donna and I in the lobby of the Hilton Plaza in Miami Beach, 1970

One thing that both versions had in common, though, is that they were frequently served on Fridays, which our families observed as meatless back then.  (When Fridays were no longer meatless, my father joked that it was because the Vatican sold its fisheries.)

But Friday or no, pasta è fagioli, or, in this case, more specifically pasta è ceci (ceci means chickpeas), is consummate comfort food.  Admittedly, pasta è fagioli does not need to be meatless but it very often is.  (Actually, I made a non-meatless version earlier this week with guanciale, cured pork jowl.)


Click HERE to join our mailing list and you’ll never miss a recipe again!


Aunt Margie and Uncle Joe were like second parents to me.  I spent many (most?) summer days at Aunt Margie’s, getting there in the morning and staying until dinnertime or later.  My cousin, Donna, is nine months younger than I am.  Her neighbor Ricky Slivosky is nine months younger than she is.  The three of us hung out pretty much all summer.  That made Aunt Margie’s house the logical choice.

Aunt Margie got a little too much sun while we were staying at the Beau Rivage Resort in Miami Beach, 1971

Our families often vacationed together.  Florida was a favorite destination.  Once every 5 years Uncle Joe had 13 weeks of vacation (ahh, the glory days of American steel manufacturing…and collective bargaining).  Those years were likely to include a trip to California.

Aunt Margie really didn’t like vacations.  Several times I witnessed what I believe was an annual ritual.  Uncle Joe would be loading the suitcases in the trunk of the car and Aunt Margie would be standing beside him still trying to convince him to cancel the vacation.  Aunt Margie never won.

Beau Rivage Resort, Bal Harbour, Florida

Those vacations were always by car; two days to Florida and four days to California.  Aunt Margie ate the same lunch every day of every trip: bacon, lettuce, and tomato sandwiches on white toast, hold the mayo.  Only after we reached our destination did she resume a “regular” diet!

We always had fun and even Aunt Margie seemed to enjoy herself (a minor episode of seasickness, notwithstanding).

Aunt Margie getting seasick on the boat trip from Miami to the Bahamas, 1970

My father didn’t always go on vacation with us due to his work schedule.  He made it on the 1970 trip to Florida, which included several days in the Bahamas which we reached by boat from Miami.  The only food memory I have of that trip is going to an Italian restaurant in Freeport where the garlic bread was so garlicky that it was bitter.  The food itself must have been pretty good as we went back again.  Unfortunately, the garlic bread was just as bad the second time around.

Print Recipe
Aunt Margie's Pasta è Ceci (Pasta and Chickpeas)
Aunt Margie’s Pasta è Ceci was more soupy than my mother’s Pasta è Fagioli. It had no tomato sauce. This is my interpretation. I have made the liquid a little thicker by emulsifying the cheese and oil at the end. Aunt Margie never used wine. That is my addition. To prepare dry chickpeas, combine 1 pound of dry chickpeas, 7 cups of water, 1 tablespoon salt, 2 bruised garlic cloves, one bay leaf, ½ teaspoon whole black pepper, and a piece of Parmesan cheese rind. Cook in the Instant Pot for 15 minutes or simmer, partially covered, adding more water if needed, till tender but not mushy. If not using the Instant Pot, add the salt after about 15 minutes of simmering. Measure out 3 ½ cups of cooked chickpeas. Reserve the remainder for another use. Use the cooking liquid as described below. Aunt Margie's pasta è ceci was usually so soupy that it was served in bowls. Feel free to make yours as loose as you would like.
Votes: 1
Rating: 5
You:
Rate this recipe!
Prep Time 10 minutes
Cook Time 45 minutes
Servings
people
Ingredients
Prep Time 10 minutes
Cook Time 45 minutes
Servings
people
Ingredients
Votes: 1
Rating: 5
You:
Rate this recipe!
Instructions
  1. Measure out three cups of chickpea-cooking liquid or use the liquid from canned chickpeas adding water to make three cups.
  2. Combine chickpea liquid, white wine, diced onion, oregano and black pepper in a Dutch oven large enough to hold the cooked pasta comfortably. Bring to a boil and simmer approximately 20 minutes, until the onion is tender.
  3. Meanwhile, brown the garlic in 1/3 cup of olive oil over gentle heat.
  4. When the garlic is brown, remove it and reserve the oil.
  5. Cook the pasta in two quarts of heavily salted, boiling water until the pasta retains just a little crunch at the very center.
  6. Reserve at least two cups of the pasta-cooking water.
  7. Pour some of the remaining pasta-cooking water into the serving bowl to warm it while proceeding with the recipe.
  8. Drain the pasta and immediately add it to the seasoned chickpea-cooking liquid along with the chickpeas.
  9. Add the garlic-infused oil and salt and black pepper to taste.
  10. Simmer gently, covered, until the pasta is just al dente. Add some of the reserved pasta-cooking water as needed.
  11. When the pasta is al dente, add more of the reserved pasta-cooking water, if necessary, to make a slightly soupy mixture.
  12. Remove from the heat.
  13. Stir in the Romano cheese and 1/4 cup of olive oil to create a glossy sauce.
  14. Add a bit more of the pasta-cooking water if needed to thin the sauce as the combination of cheese and olive oil will create an emulsion that will thicken the sauce.
  15. Taste and adjust salt and pepper.
  16. Serve immediately with additional freshly grated Pecorino Romano cheese.
Recipe Notes

Copyright © 2018 by VillaSentieri.com. All rights reserved.

Share this Recipe

Mom’s Biscotti (aka Anise Toasts or Slice Cookies)

April 20, 2018

Growing up biscotti were not ubiquitous the way they are now.

Remember, this was before the coffee shop craze swept the country and when Italian food was viewed as “foreign.”

Sure, one could get biscotti in Italian specialty stores.  There was even a marginally passable supermarket version from Stella d’Oro.  (It still exists though the company has been sold many times.)

Stella d’Oro Biscotti (I just can’t bring myself to spell it incorrectly with an uppercase “D” and a lowercase “o”)

But mostly, biscotti were homemade.


Follow us on your social media platform of choice


My mother’s biscotti are a little softer on the inside than the standard biscotti today, which seem to have a crunch the whole way through.  She also made them much smaller than is now common, maybe three inches or so in length as opposed to six or eight.

The interesting ingredient in these biscotti is maraschino cherries.  The maraschino cherry as we Americans know it was a product of food science from the 1920’s and 30’s.  “Real” maraschino cherries, Marasca cherries from the Dalmatian coast of Croatia, pickled in salt water and preserved in Maraschino liqueur, are actually quite rare.  There are many versions of cherries preserved in liquor from throughout Europe, some clearly developed as substitutes for authentic maraschino cherries.

I remember eating these biscotti in the 1960’s so the recipe is at least that old, probably older.  It is unlikely, however, that these biscotti ever saw real maraschino cherries due to their rarity.

If this recipe dates to pre-prohibition, in which case it would have been from my grandmother or someone in her generation, it’s possible that some sort of cherry preserved in alcohol (on the order of a real maraschino cherry) was originally used.  I have no idea if the recipe is that old.

Since liquor-soaked cherries were outlawed during prohibition they would have been eliminated from this recipe even if it is that old.  Which brings us to a dichotomy in thinking about recipes that I often consider:  the difference between authentic and traditional.


Click HERE to join our mailing list and you’ll never miss a recipe again!


Is food authentically Italian if it’s prepared in Italy by an Italian but does not follow any traditional recipe?

If cioppino is made following a longstanding traditional Italian regional recipe but the cook substitutes seafood available in the United States for that available in Italy, is it authentic?

There is no doubt that these biscotti are traditional in my family, having been made for more than 50 years.  But what would make them authentic?  And for that matter, would it be authentically Italian or authentically Italian-American?

I suggest you mull that over while dunking biscotti in your morning caffe latte.

Print Recipe
Biscotti
In my family, these biscotti are traditionally made much shorter (after being cut crosswise) that is commonly the case now. For longer biscotti, form 6 logs approximately 9 ½ to 10 inches long before baking. For shorter biscotti, form 10-12 logs of the same length. The recipe is easily cut in half (which is what I did when making this batch).
Votes: 0
Rating: 0
You:
Rate this recipe!
Prep Time 45 minutes
Cook Time 2 hours
Passive Time 30 minutes
Servings
dozen large biscotti
Ingredients
Prep Time 45 minutes
Cook Time 2 hours
Passive Time 30 minutes
Servings
dozen large biscotti
Ingredients
Votes: 0
Rating: 0
You:
Rate this recipe!
Instructions
  1. Drain the cherries.
  2. Cut the cherries in quarters.
  3. Squeeze out excess liquid by gently pressing a small handful of cut cherries between your flat palms. Do not make a fist and do not smash the cherries. Reserve the cherries.
  4. In a very large bowl, mix flour, sugar, and baking powder using your hands.
  5. Make a well in the center.
  6. Add the eggs.
  7. Begin to incorporate some of the flour into the eggs working in a circular motion using your hands.
  8. Add the oil and butter and continue mixing.
  9. Add the milk and anise extract. Mix thoroughly.
  10. Add the cherries and nuts, if using.
  11. Fully incorporate the cherries and nuts.
  12. Form into six or twelve cylinders approximately 9 ½ inches long. Six cylinders will make biscotti that are quite long once cut crosswise. Twelve cylinders will make shorter biscotti.
  13. Bake the cylinders for 30 minutes at 350°F. You can line the sheet pan with parchment if you prefer.
  14. Brush the tops with beaten egg.
  15. Bake 5 to 10 minutes longer, until golden brown and the cylinders are cooked through. Larger cylinders will take longer to bake.
  16. Cool the baked cylinders on the baking pan on a cooling rack for approximately 10 minutes.
  17. Cut the baked cylinders crosswise on the diagonal into slices approximately 1 inch thick.
  18. Cool the slices completely.
  19. Lay the slices cut side down on a baking pan.
  20. Toast in the top rack of the oven at 450°F.
  21. Turn and toast the other side.
  22. Remove biscotti to a rack to cool.
Recipe Notes

Copyright © 2018 by VillaSentieri.com. All rights reserved.

Share this Recipe

Piselli in Umido (Peas in Tomato Sauce)

April 11, 2018

Italians have knack for combining a modest array of vegetables into an almost endless cannon of dishes, each of which is distinctive, even if the interrelationships of the various parts are obvious.

This dish of peas cooked in tomato sauce is from my husband’s paternal grandmother, Amerina Pieri.

I learned to make this from my mother-in-law, Marisa, Amerina’s daughter-in-law.


Follow us on your social media platform of choice


Everyone who makes it adds his or her own signature.  Mine is not exactly like my mother-in-law’s and I’m sure hers is not just like Zia (Aunt) Ida’s, Amerina’s daughter.

Interestingly, Nonni (as we all called her) used canned peas.  In talking with my father-in-law (who grew up eating this) and my mother-in-law, they were pretty sure Nonni would not have used canned peas in Italy unless she possibly canned them herself.  Somehow canned peas became the norm in America.

Amerina Pieri (aka Nonni or Nonni’merina) Christmas 2005

And, while canned peas produce a pretty good dish, I prefer something a little fresher.  Because really good fresh peas are available for only a few weeks a year at the Farmers Market in Santa Fe, I usually use frozen peas.

If the frozen peas haven’t been in your freezer so long that they start to dry out and freeze into a block they are superior to “fresh” peas except during the few weeks a year when they are really locally-grown and truly fresh.


Click HERE to join our mailing list and you’ll never miss a recipe again!


My mother-in-law usually uses canned tomato sauce when making this, as did Nonni (at least when she made it on this side of the Atlantic Ocean!).

I use tomato paste and water.  If you read the ingredient lists on cans of tomato sauce that you can buy in the United States, you will find that most are made from tomato paste and water, so why not just do it yourself?  Those few brands of tomato sauce that are not made from diluted tomato paste are a little too sour for my taste.  I would opt for a good-quality tomato puree instead.

My favorite brand of domestically produced tomato paste

Tomato paste has a richer flavor than tomato sauce or tomato puree.  I attribute this to the extra cooking that is needed to concentrate the tomatoes.  Those little cans provide the foundation of a taste that could otherwise only be achieved with hours of simmering.

Homemade tomato puree would be another good option if you want a fresher, more summery taste.  Here’s where you can find my recipe.


If you have a favorite family recipe and a bit of a story to tell, please email me at santafecook@villasentieri.com and we can discuss including it in the blog. I am expanding the scope of my blog to include traditional recipes from around the country and around the world. If you haven’t seen Bertha’s Flan or Melinda’s Drunken Prunes, take a look.  They will give you an idea of what I’m looking for.


Print Recipe
Piselli in Umido (Peas in Tomato Sauce)
Fresh or canned peas can be used in place of frozen. Fresh peas will take longer to cook. The canned peas should be cooked briefly to avoid overcooking. I like to rinse off frozen vegetables to remove any ice crystals on the exterior. I find the ice crystals can carry a “freezer” taste.
Votes: 0
Rating: 0
You:
Rate this recipe!
Course Sides, Vegetables
Cuisine Italian
Prep Time 10 minutes
Cook Time 75 minutes
Servings
people
Ingredients
Course Sides, Vegetables
Cuisine Italian
Prep Time 10 minutes
Cook Time 75 minutes
Servings
people
Ingredients
Votes: 0
Rating: 0
You:
Rate this recipe!
Instructions
  1. Sauté the onion, garlic, sage, parsley and ½ teaspoon of salt in the olive oil in a heavy-bottomed saucepan till the onion is translucent.
  2. Add the wine and cook, stirring frequently, until it evaporates.
  3. Add the tomato paste and sauté until it becomes slightly darker, 3-4 minutes.
  4. Add the water, sugar, bay leaf, rosemary, oregano, and salt and pepper to taste.
  5. Simmer, partially covered, until thickened, approximately 45 minutes.
  6. Adjust seasoning.
  7. Rinse the frozen peas under cool water to remove any ice crystals.
  8. Add the frozen peas to the sauce.
  9. Simmer approximately 15 minutes, adjusting seasoning once again, if needed.
Recipe Notes

Copyright © 2018 by VillaSentieri.com. All rights reserved.

Share this Recipe

Gnocchi di Patate (Potato Gnocchi)

April 4, 2018

My father didn’t like gnocchi.

As far as I know, it is the only food he refused to eat.

It was all about the texture.  Mind you, this is from a man who’s comfort food was a BIG bowl of cold mashed potatoes with buttermilk poured over top.

I understand the texture thing but for me the offending texture is slimy…like Jello (or cold mashed potatoes with buttermilk).

The next worst texture is hot cereal.  It’s not as bad as Jello but it’s not a favorite.  It took a long time for me to enjoy polenta because it has a texture just like hot cereal.  I think my dislike for hot cereal has diminished as I’ve gotten older and I can probably now keep Jello down, which as a kid wasn’t always the case.


Click HERE to join our mailing list and you’ll never miss a recipe again!


But gnocchi?  In the pantheon of foods, gnocchi reign supreme.  They are my favorite food.  Not to be morose, but they would be my death row meal (assuming a prison chef could make them like my mother with her pepperoni sauce!).

The pepperoni sauce is an interesting twist.

Since my father didn’t like gnocchi, we didn’t have them when he was home for dinner.  My father worked out of town from time to time, so there were weeknight meals where he wasn’t around.

The back of a fork is commonly used to imprint ridges on gnocchi but a gnocchi board does a much better job

My mother would freeze her Sunday sauce, which was made with large pieces of pork.  Sometimes a container of sauce wouldn’t have any meat.  A common Italian approach to adding a bit of protein to a meal of pasta with red sauce is to simmer some shelled hard-boiled eggs in the sauce for a little while and serve them with the pasta.

My mother did that, but she also would take pieces of pepperoni, pierce them with a fork in a few places, boil them for about 20 minutes to render some of the fat and to soften the meat, and then add them to sauce to simmer for half-an-hour or so.

That sauce, which only appeared on weeknights from leftover Sunday sauce is my favorite sauce for my favorite food!


Follow us on your social media platform of choice


Let’s face it, pepperoni is an American creation.  To be sure, it’s a riff on any number of Italian regional salame piccante (hot salami).  In fact, you can’t get a pepperoni pizza in Italy but you can get a pizza with slices of salame piccante.

It took a while for our Italian relatives to wrap their heads around pepperoni.  In Italian, pepperoni are peppers not a cured meat product.  The word is also plural, not singular.  Americans often adopt the plural form of an Italian word (whether changing the meaning or not) and then treat it like it’s singular.

Consider panini.  One sandwich is panino.  More than one are panini.  The same is true with gnoccho and gnocchi or raviolo and ravioli.  Americans tend to say paninis and raviolis (fingers on blackboard screeching sound) if they mean more than one.  We don’t really have a rule about this as far as I know.  It’s just random.  Or so it appears to me.

Italian, on the other hand, has a very clear rule when adopting foreign words.  The singular form of the word becomes the Italian word.  That word is use for both the singular and the plural, with the adjective changing to indicate more than one.

Take bar, for example.  The “Italian” word for bar is bar.  (This is a critical bit of information that one learns early when taking Italian lessons.)  If you’re going to the bar, in Italian you would say “il bar” (the bar).  If you’re going out for a night of pub-crawling to many bars you would say “i bar” (the bars).

Now, you might ask yourself, when you would ever eat just one gnoccho.  Gnocchi translates as dumplings.  So if you had a large American or Eastern European dumpling, it would be a gnoccho, and you might have just one.  Today, however, we are making small gnocchi, and one is never enough.


If you have a favorite family recipe and a bit of a story to tell, please email me at santafecook@villasentieri.com and we can discuss including it in the blog. I am expanding the scope of my blog to include traditional recipes from around the country and around the world. If you haven’t seen Bertha’s Flan or Melinda’s Drunken Prunes, take a look.  They will give you an idea of what I’m looking for.


Print Recipe
Gnocchi di Patate (Potato Gnocchi)
There are some very strong opinions about making gnocchi. The first is whether they should be very soft or somewhat firm. That preference tends to drive other decisions but sometimes in different directions. My husband’s Great Aunt Juliana liked soft gnocchi so she did not use eggs. She insisted that the gnocchi should be mixed while the potatoes were still hot, though other folks who like soft gnocchi use the potatoes after they’ve cooled and lost some of their moisture so less flour is needed. I like firmer gnocchi, so I use eggs. I also let the potatoes cool (as my mother did) because 1) it’s easier on the fingertips and 2) the trivial amount of moisture lost or not by cooling or not is no competition for the addition of eggs.
Votes: 0
Rating: 0
You:
Rate this recipe!
Prep Time 5 minutes
Cook Time 1 hour
Servings
people
Ingredients
Prep Time 5 minutes
Cook Time 1 hour
Servings
people
Ingredients
Votes: 0
Rating: 0
You:
Rate this recipe!
Instructions
  1. Scrub the potatoes.
  2. Put the potatoes in a large stockpot and cover with a generous amount of cold water. Bring to a rolling boil and cook until a knife can be easily inserted, approximately 20 minutes. This will depend on the potatoes and the altitude so begin testing after about 15-17 minutes.
  3. Remove the potatoes from the water and allow them to cool enough to peel, about 15 minutes.
  4. Meanwhile, put three cups of flour on the counter or a pasta board.
  5. Pass the peeled, but still warm, potatoes, through a ricer on top of the flour. Note: it is very difficult to rice cold potatoes so this step should be completed as quickly as possible after the potatoes have been removed from the water.
  6. Allow the potatoes to cool completely.
  7. Sprinkle the salt on the potatoes.
  8. Using your fingers, begin to mix in the flour.
  9. Add two eggs. Work in the eggs, incorporating more flour.
  10. Add the remaining two eggs and work in enough flour to make a dough that is just very slightly tacky. It will firm up a bit as the flour completely hydrates.
  11. Cut off a small piece of dough and roll it into a cylinder approximately 1/2 inch in diameter.
  12. After all the gnocchi have been rolled and cut bring a large pot of abundantly salted water to a rolling boil.
  13. Add some of the gnocchi, maybe 18-24 depending on the amount of water.
  14. As soon as the water returns to a full boil. Remove the gnocchi with a spider or slotted spoon.
  15. Put them in a serving bowl with a small amount of whatever sauce you are using on the bottom.
  16. Add more gnocchi to the boiling water.
  17. Meanwhile drizzle a bit more sauce on the gnocchi in the bowl and sprinkle with a bit of Parmigiano Reggiano cheese, if desired.
  18. Add each batch of gnocchi to the serving bowl, keeping it warm in a low oven and sprinkling each later with some sauce (and cheese, if desired).
  19. Once all the gnocchi have been added, gently stir the gnocchi to distribute the sauce and cheese.
  20. Serve immediately.
Recipe Notes

Copyright © 2018 by VillaSentieri.com. All rights reserved.

Share this Recipe