Bertha was born and raised in Duran, New Mexico. She was one of 15 children.
If her family lived in Duran now they would constitute 50% of the population of 33 people (35 according to some reports).
With a few dozen residents, Duran doesn’t qualify as an actual ghost town but many of its buildings are abandoned.
One of many abandoned buildings in Duran. This was a general store and hotel adjacent to the railroad tracks.
Duran popped up in the very early 1900’s thanks to the railroad, a common occurrence in New Mexico. Twenty years later the railroad moved it operations (repair shops, etc.) south to Carrizozo, dealing Duran, population 300 at its peak, a blow.
Click HERE to join our mailing list and you’ll never miss a recipe again!
In the 1930’s US 54 came right through Duran. The highway traffic revived the town a bit. In the early 1960’s however, I-25 opened about 60 miles away. Traffic on US 54 dropped precipitously and Duran entered a downward spiral.
A sign without a purpose
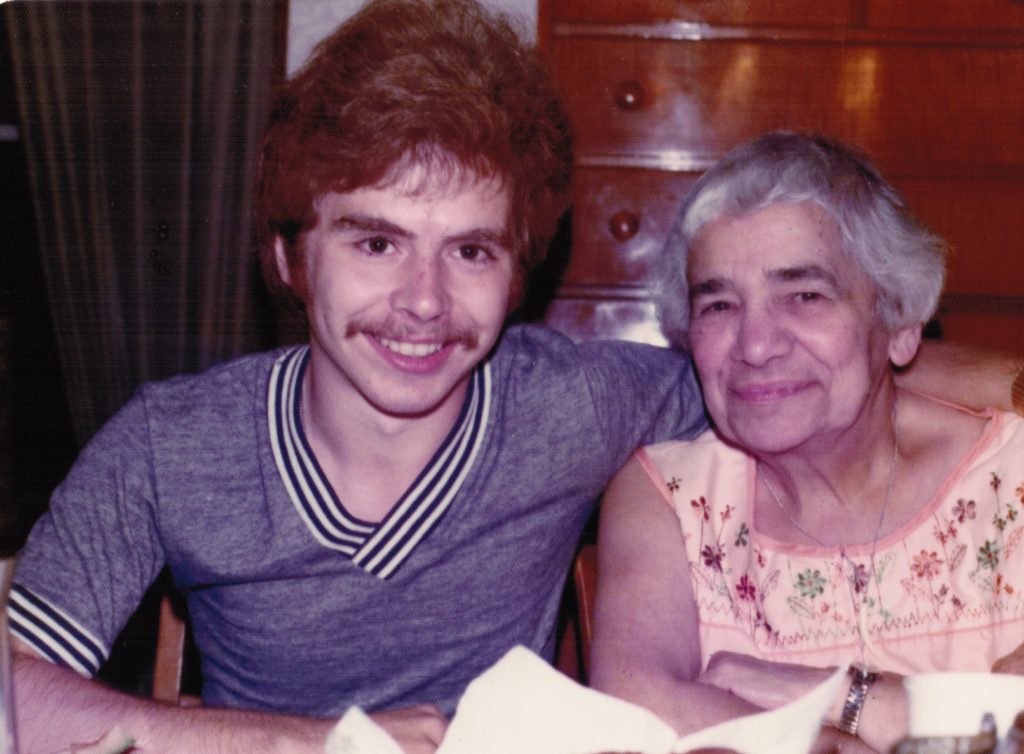
Bertha has been our housekeeper in Alamogordo for the last five years. As you may know, my husband is the Medical Director for Behavioral Health at the Gerald Champion Regional Medical Center in Alamogordo.
He’s in Alamogordo during the week and back home in Santa Fe on the weekends.
The fastest way from Santa Fe to Alamogordo involves US 54, so Frank and I know Duran well. It’s almost the halfway point of the trip.
Another abandoned building
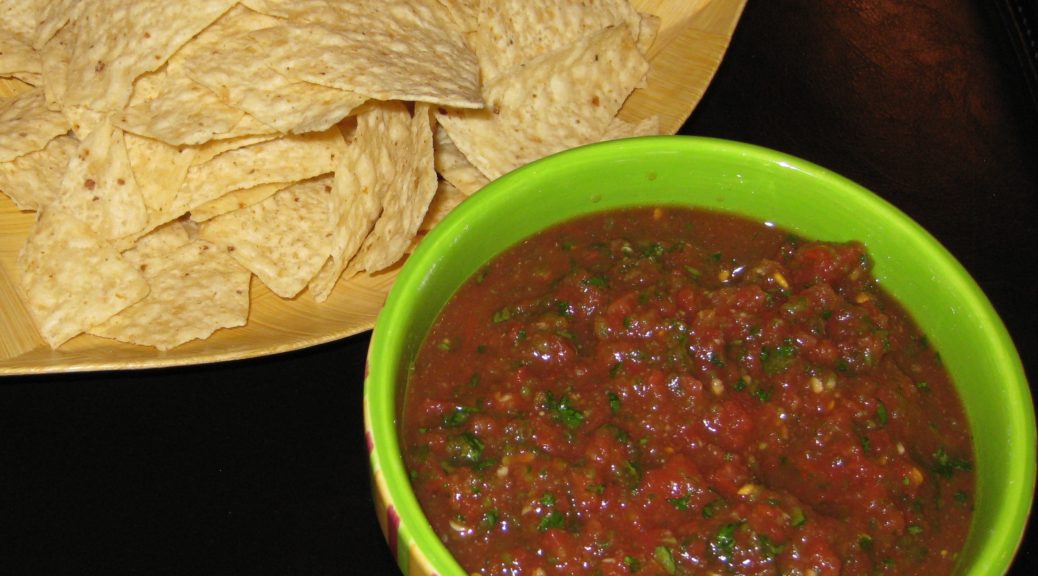
Bertha loves to cook. She periodically leaves goodies in the fridge in Alamogordo. This salsa appears frequently. It’s an interesting recipe using canned tomatoes and garlic powder. The canned tomatoes mean that it’s a year-round treat which does not require the red-ripe tomatoes of late summer.
Follow us on your social media platform of choice
I’m not sure why the garlic powder instead of fresh garlic but there are several dishes that I make that turn out better with garlic powder than with fresh garlic (like my mother’s roast turkey and chicken). So, I didn’t play with Bertha’s recipe.
And yet another
Just whizz everything in the food processor and refrigerate for several hours for the flavors to blend and you’ve got an amazing salsa with almost no work.
The fire department is still in operation
Frank is leaving Alamogordo at the end of June. We’re going to miss Bertha, her husband Miguel, and the surprise treats that occasionally appear in our refrigerator!
Print Recipe
Bertha's Salsa
Since this salsa doesn’t use fresh tomatoes it can be made year-round. Despite the use of canned tomatoes and garlic powder it tastes bright and fresh.
Italians have knack for combining a modest array of vegetables into an almost endless cannon of dishes, each of which is distinctive, even if the interrelationships of the various parts are obvious.
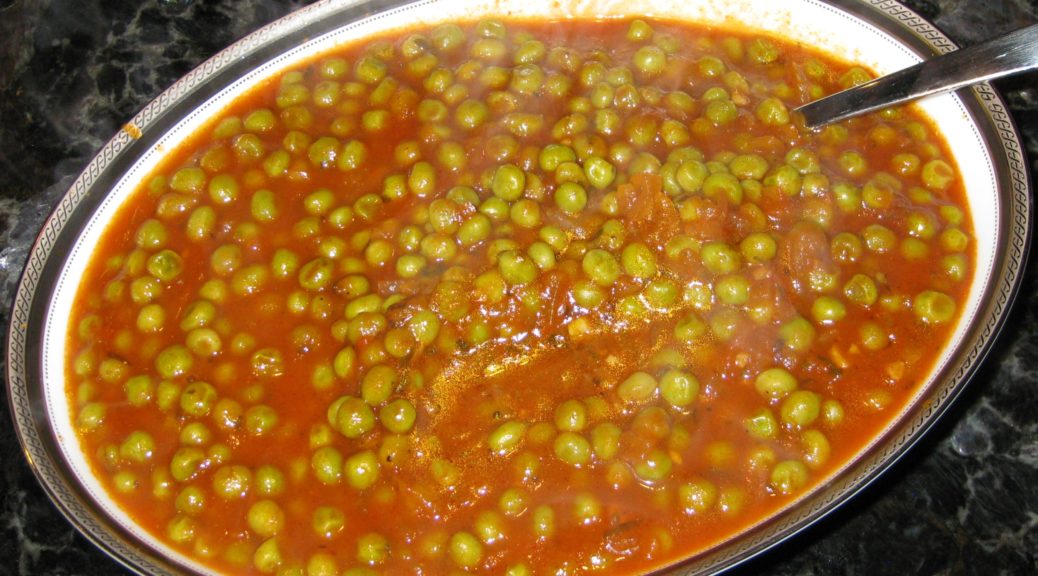
This dish of peas cooked in tomato sauce is from my husband’s paternal grandmother, Amerina Pieri.
I learned to make this from my mother-in-law, Marisa, Amerina’s daughter-in-law.
Follow us on your social media platform of choice
Everyone who makes it adds his or her own signature. Mine is not exactly like my mother-in-law’s and I’m sure hers is not just like Zia (Aunt) Ida’s, Amerina’s daughter.
Interestingly, Nonni (as we all called her) used canned peas. In talking with my father-in-law (who grew up eating this) and my mother-in-law, they were pretty sure Nonni would not have used canned peas in Italy unless she possibly canned them herself. Somehow canned peas became the norm in America.
Amerina Pieri (aka Nonni or Nonni’merina) Christmas 2005
And, while canned peas produce a pretty good dish, I prefer something a little fresher. Because really good fresh peas are available for only a few weeks a year at the Farmers Market in Santa Fe, I usually use frozen peas.
If the frozen peas haven’t been in your freezer so long that they start to dry out and freeze into a block they are superior to “fresh” peas except during the few weeks a year when they are really locally-grown and truly fresh.
Click HERE to join our mailing list and you’ll never miss a recipe again!
My mother-in-law usually uses canned tomato sauce when making this, as did Nonni (at least when she made it on this side of the Atlantic Ocean!).
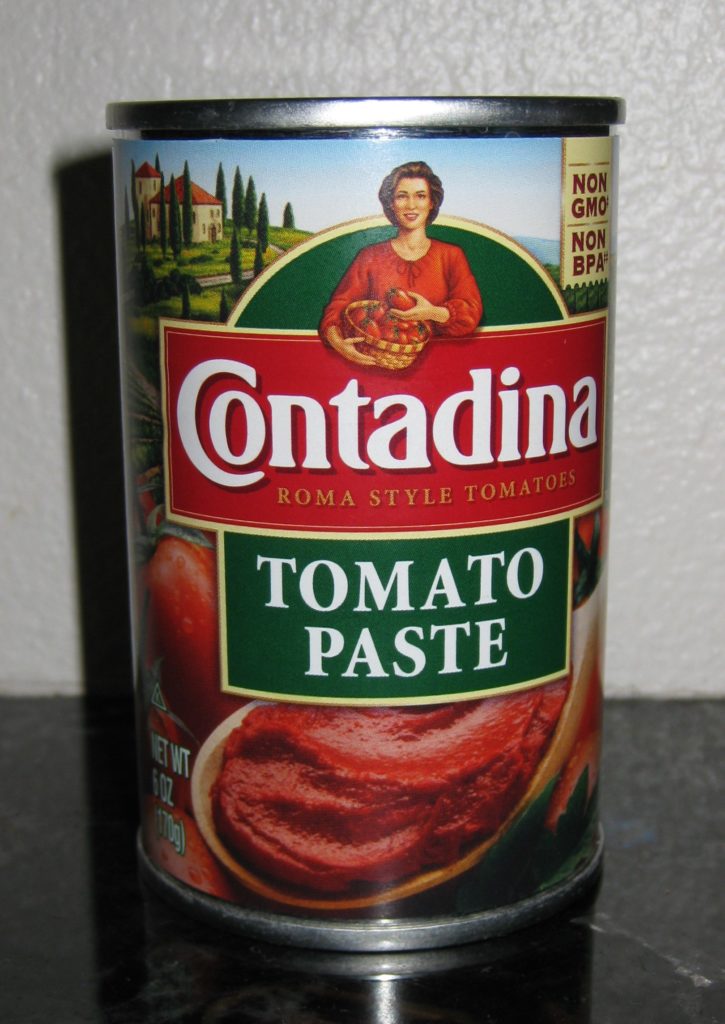
I use tomato paste and water. If you read the ingredient lists on cans of tomato sauce that you can buy in the United States, you will find that most are made from tomato paste and water, so why not just do it yourself? Those few brands of tomato sauce that are not made from diluted tomato paste are a little too sour for my taste. I would opt for a good-quality tomato puree instead.
My favorite brand of domestically produced tomato paste
Tomato paste has a richer flavor than tomato sauce or tomato puree. I attribute this to the extra cooking that is needed to concentrate the tomatoes. Those little cans provide the foundation of a taste that could otherwise only be achieved with hours of simmering.
Homemade tomato puree would be another good option if you want a fresher, more summery taste. Here’s where you can find my recipe.
If you have a favorite family recipe and a bit of a story to tell, please email me at santafecook@villasentieri.com and we can discuss including it in the blog. I am expanding the scope of my blog to include traditional recipes from around the country and around the world. If you haven’t seen Bertha’s Flan or Melinda’s Drunken Prunes, take a look. They will give you an idea of what I’m looking for.
Print Recipe
Piselli in Umido (Peas in Tomato Sauce)
Fresh or canned peas can be used in place of frozen. Fresh peas will take longer to cook. The canned peas should be cooked briefly to avoid overcooking. I like to rinse off frozen vegetables to remove any ice crystals on the exterior. I find the ice crystals can carry a “freezer” taste.
As far as I know, it is the only food he refused to eat.
It was all about the texture. Mind you, this is from a man who’s comfort food was a BIG bowl of cold mashed potatoes with buttermilk poured over top.
I understand the texture thing but for me the offending texture is slimy…like Jello (or cold mashed potatoes with buttermilk).
The next worst texture is hot cereal. It’s not as bad as Jello but it’s not a favorite. It took a long time for me to enjoy polenta because it has a texture just like hot cereal. I think my dislike for hot cereal has diminished as I’ve gotten older and I can probably now keep Jello down, which as a kid wasn’t always the case.
Click HERE to join our mailing list and you’ll never miss a recipe again!
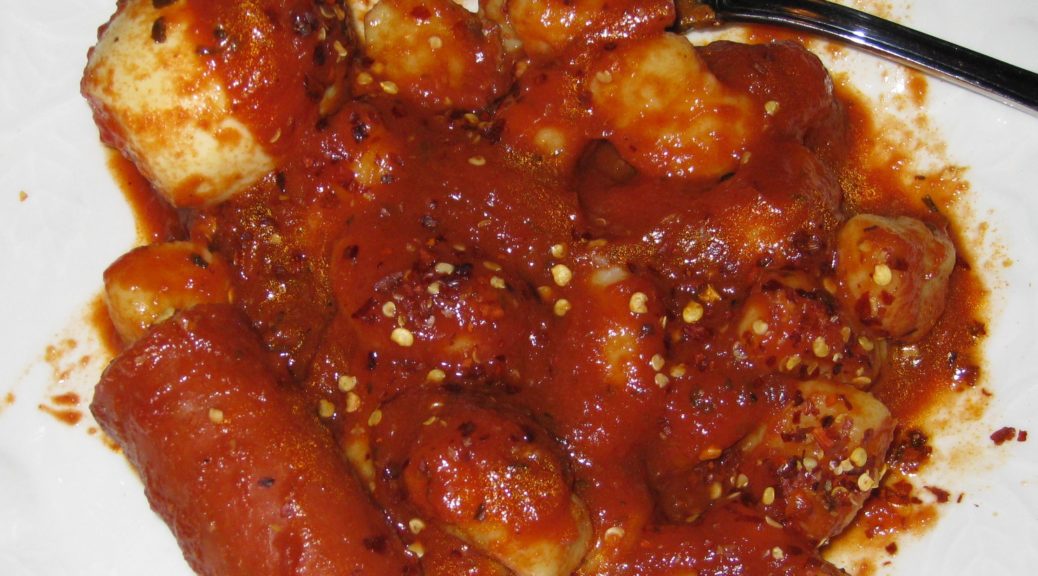
But gnocchi? In the pantheon of foods, gnocchi reign supreme. They are my favorite food. Not to be morose, but they would be my death row meal (assuming a prison chef could make them like my mother with her pepperoni sauce!).
The pepperoni sauce is an interesting twist.
Since my father didn’t like gnocchi, we didn’t have them when he was home for dinner. My father worked out of town from time to time, so there were weeknight meals where he wasn’t around.
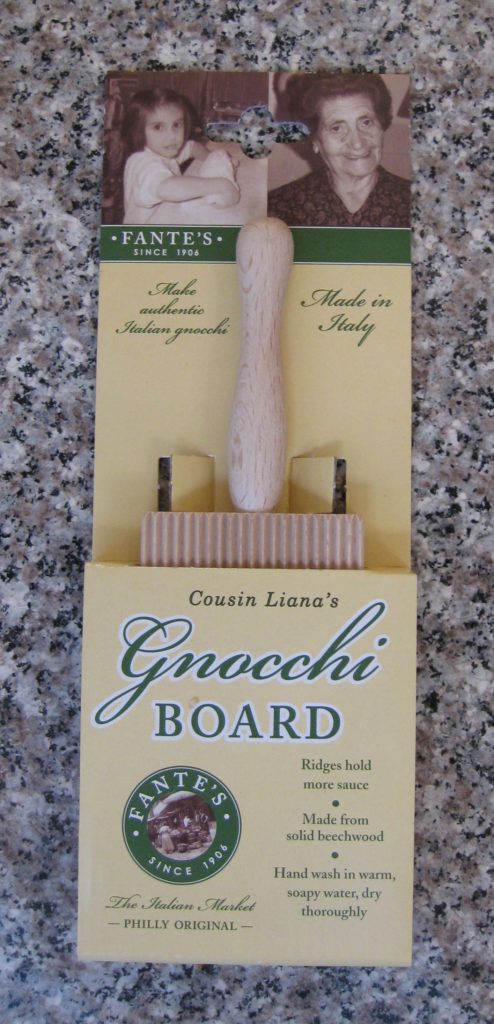
The back of a fork is commonly used to imprint ridges on gnocchi but a gnocchi board does a much better job
My mother would freeze her Sunday sauce, which was made with large pieces of pork. Sometimes a container of sauce wouldn’t have any meat. A common Italian approach to adding a bit of protein to a meal of pasta with red sauce is to simmer some shelled hard-boiled eggs in the sauce for a little while and serve them with the pasta.
My mother did that, but she also would take pieces of pepperoni, pierce them with a fork in a few places, boil them for about 20 minutes to render some of the fat and to soften the meat, and then add them to sauce to simmer for half-an-hour or so.
That sauce, which only appeared on weeknights from leftover Sunday sauce is my favorite sauce for my favorite food!
Follow us on your social media platform of choice
Let’s face it, pepperoni is an American creation. To be sure, it’s a riff on any number of Italian regional salame piccante (hot salami). In fact, you can’t get a pepperoni pizza in Italy but you can get a pizza with slices of salame piccante.
It took a while for our Italian relatives to wrap their heads around pepperoni. In Italian, pepperoni are peppers not a cured meat product. The word is also plural, not singular. Americans often adopt the plural form of an Italian word (whether changing the meaning or not) and then treat it like it’s singular.
Consider panini. One sandwich is panino. More than one are panini. The same is true with gnoccho and gnocchi or raviolo and ravioli. Americans tend to say paninis and raviolis (fingers on blackboard screeching sound) if they mean more than one. We don’t really have a rule about this as far as I know. It’s just random. Or so it appears to me.
Italian, on the other hand, has a very clear rule when adopting foreign words. The singular form of the word becomes the Italian word. That word is use for both the singular and the plural, with the adjective changing to indicate more than one.
Take bar, for example. The “Italian” word for bar is bar. (This is a critical bit of information that one learns early when taking Italian lessons.) If you’re going to the bar, in Italian you would say “il bar” (the bar). If you’re going out for a night of pub-crawling to many bars you would say “i bar” (the bars).
Now, you might ask yourself, when you would ever eat just one gnoccho. Gnocchi translates as dumplings. So if you had a large American or Eastern European dumpling, it would be a gnoccho, and you might have just one. Today, however, we are making small gnocchi, and one is never enough.
If you have a favorite family recipe and a bit of a story to tell, please email me at santafecook@villasentieri.com and we can discuss including it in the blog. I am expanding the scope of my blog to include traditional recipes from around the country and around the world. If you haven’t seen Bertha’s Flan or Melinda’s Drunken Prunes, take a look. They will give you an idea of what I’m looking for.
Print Recipe
Gnocchi di Patate (Potato Gnocchi)
There are some very strong opinions about making gnocchi. The first is whether they should be very soft or somewhat firm. That preference tends to drive other decisions but sometimes in different directions. My husband’s Great Aunt Juliana liked soft gnocchi so she did not use eggs. She insisted that the gnocchi should be mixed while the potatoes were still hot, though other folks who like soft gnocchi use the potatoes after they’ve cooled and lost some of their moisture so less flour is needed. I like firmer gnocchi, so I use eggs. I also let the potatoes cool (as my mother did) because 1) it’s easier on the fingertips and 2) the trivial amount of moisture lost or not by cooling or not is no competition for the addition of eggs.
Put the potatoes in a large stockpot and cover with a generous amount of cold water. Bring to a rolling boil and cook until a knife can be easily inserted, approximately 20 minutes. This will depend on the potatoes and the altitude so begin testing after about 15-17 minutes.
Remove the potatoes from the water and allow them to cool enough to peel, about 15 minutes.
Meanwhile, put three cups of flour on the counter or a pasta board.
Pass the peeled, but still warm, potatoes, through a ricer on top of the flour. Note: it is very difficult to rice cold potatoes so this step should be completed as quickly as possible after the potatoes have been removed from the water.
Allow the potatoes to cool completely.
Sprinkle the salt on the potatoes.
Using your fingers, begin to mix in the flour.
Add two eggs. Work in the eggs, incorporating more flour.
Add the remaining two eggs and work in enough flour to make a dough that is just very slightly tacky. It will firm up a bit as the flour completely hydrates.
Cut off a small piece of dough and roll it into a cylinder approximately 1/2 inch in diameter.
After all the gnocchi have been rolled and cut bring a large pot of abundantly salted water to a rolling boil.
Add some of the gnocchi, maybe 18-24 depending on the amount of water.
As soon as the water returns to a full boil. Remove the gnocchi with a spider or slotted spoon.
Put them in a serving bowl with a small amount of whatever sauce you are using on the bottom.
Add more gnocchi to the boiling water.
Meanwhile drizzle a bit more sauce on the gnocchi in the bowl and sprinkle with a bit of Parmigiano Reggiano cheese, if desired.
Add each batch of gnocchi to the serving bowl, keeping it warm in a low oven and sprinkling each later with some sauce (and cheese, if desired).
Once all the gnocchi have been added, gently stir the gnocchi to distribute the sauce and cheese.
I really don’t know what to call these little breads any longer.
Growing up we always called them Biscotti. The Italian word biscotti, which is plural for biscotto, can be translated as cookies or biscuits. However, in the United States, the word biscotti is now completely identified with a particular type of pastry; those slices of sweet bread that are toasted until crisp (or crisp on the outside and soft on the inside depending on style).
We called those Anise Toasts when I was growing up since they were always flavored with anise in our house. That was how we differentiated these softer anise-flavored sweet breads from the chewier, and toasted, anise-flavored pastries.
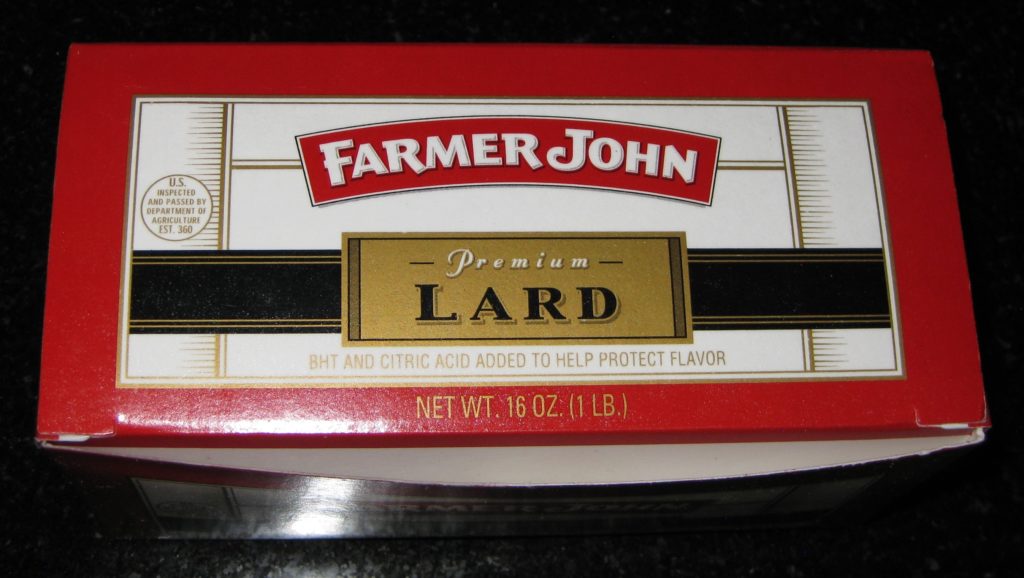
I found this lard at the supermarket. It is not hydrogenated and has just a few reasonable preservatives unlike the hydrogenated lard sold in those blue boxes
I believe that the word biscotto is derived from the words that mean twice (bis) cooked (cotto) making it an apt label for those toasted things. Despite that, however, it really is used to refer generically to a cookie.
Follow us on your social media platform of choice
The Italian word torta is translated as cake or pie or tart depending on the context. Sometimes that context can be provided only by more description. For example, the Italian word limon is used for both a lemon and a lime. To refer to a lime, you could say limon verde (green lemon) if it was not otherwise clear from the context that you meant a lime vs. a lemon. (This would be critical, for example, when providing directions for making a Margarita!) I think limon verde could also be used to refer to an unripe lemon but that’s getting a bit esoteric and, honestly, above my meager grasp of Italian.
But it points out the difficulties with translating seemingly simple concepts, like biscotti!
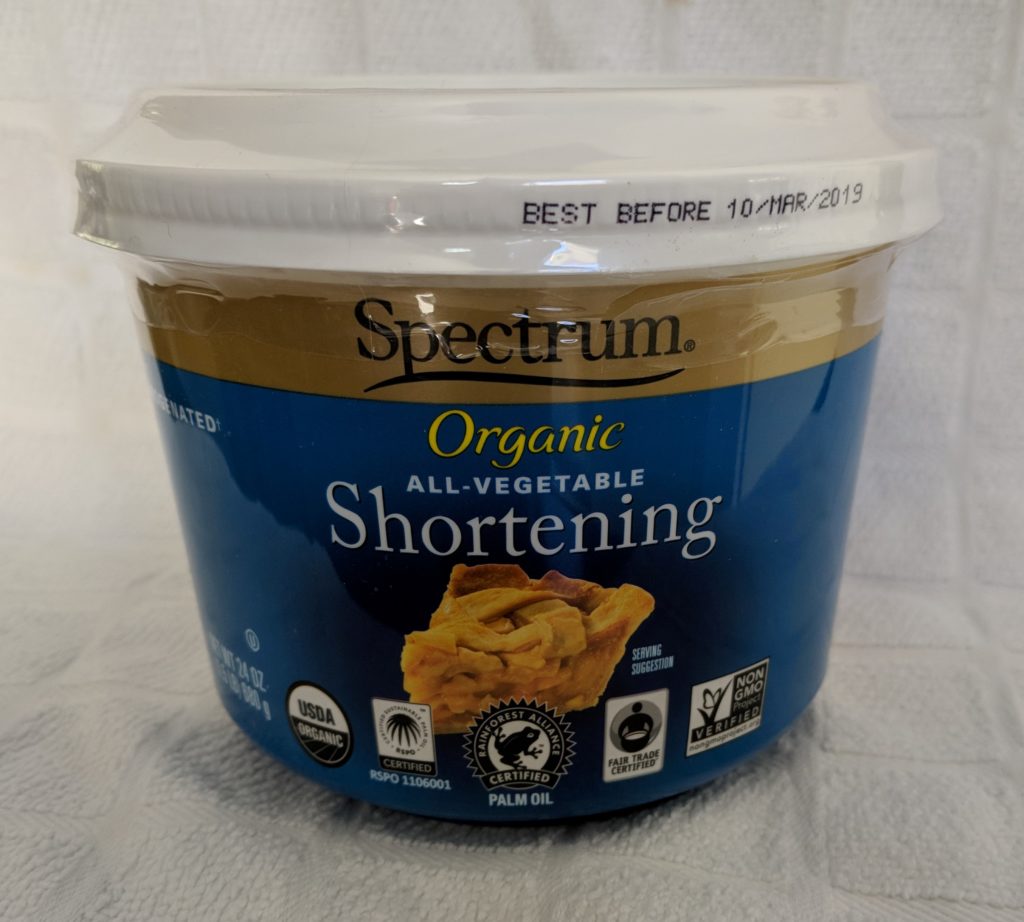
Palm Oil is a solid vegetable shortening that is not hydrogenated
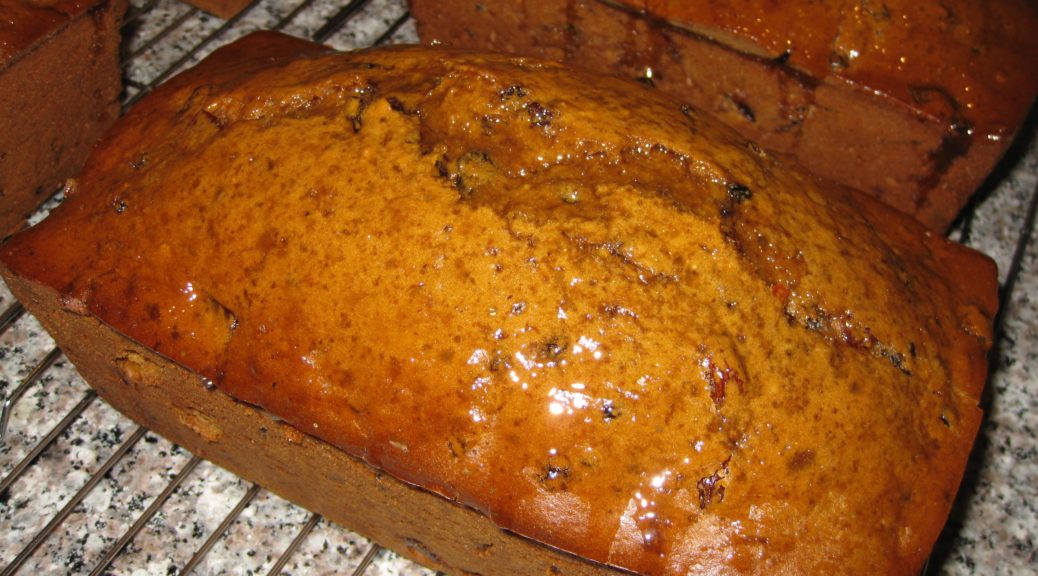
I’m posting this recipe now because my mother always made these at Easter, but their appearance was not limited to that one holiday. Sometimes, for Easter, the dough would be baked in a big braided circular loaf with colored eggs tucked into the braids. Honestly, though, that was usually done by a friend of my mother’s, Mille Verbano, rather than by my mother who almost always made small ones as I now do.
Sometimes this is called Easter Bread but, truly, there are different types of Easter bread all over Italy so that term only works within a very specific socio-cultural context. Although we never called this Easter bread in our house, if a relative did so, I would know immediately what he/she meant.
Click HERE to join our mailing list and you’ll never miss a recipe again!
I’m not a “dunker” but my mother and her sisters, Aunt Mamie (Mary, really, but as a toddler I said Mamie and that name stuck and became what everyone called her) and Aunt Margie loved to dunk bready things in coffee in the morning. If you’re a dunker, these biscotti are perfect.
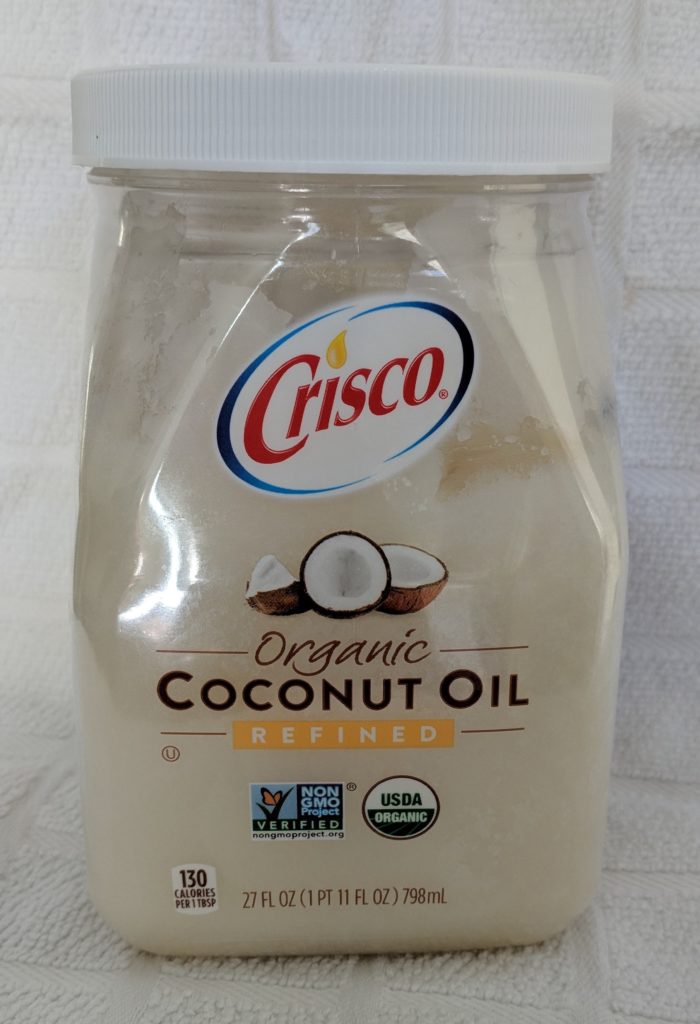
Coconut oil is a vegetable fat that is solid at cool room temperature
Some of you may remember my soapbox post about hydrogenated fats as a replacement for the lard often called for in traditional Italian pastries. In deference to those of you who do not want to render your own lard (which I suspect is most of you), I was prepared to test this recipe with several non-hydrogenated vegetable fats, palm oil and refined coconut oil. While shopping for other ingredients in Palm Springs I stumbled upon lard…pure, simple lard…not the hydrogenated lard that now dominates supermarket shelves. I just had to try it. I’ve not seen Farmer John lard in supermarkets in Santa Fe but I am hopeful that this signals a resurgence of the availability of unadulterated and chemically unaltered lard for baking.
I promise to test out future recipes with the non-hydrogenated vegetable fats, though!
If you have a favorite family recipe and a bit of a story to tell, please email me at santafecook@villasentieri.com and we can discuss including it in the blog. I am expanding the scope of my blog to include traditional recipes from around the country and around the world. If you haven’t seen Bertha’s Flan or Melinda’s Drunken Prunes, take a look. They will give you an idea of what I’m looking for.
Print Recipe
Anise Twists (Italian Anise Sweet Bread)
Shiny aluminum sheet pans work best. Dark pans will cause the bottoms of the breads to get too dark before they are cooked through. For reference, the pictures below show me making half a batch of Anise Twists, not the full recipe given below.
Melt the lard over gentle heat and allow to cool until lukewarm but still liquid.
Dissolve one teaspoon of the sugar in the warm water, not more than 110°F.
Add the yeast and allow it to proof.
Meanwhile, combine flour, remaining sugar, anise seeds and salt.
Form a well in the center and add 6 eggs and the melted and cooled lard.
Using a circular motion, begin to mix the flour into the liquids in the well.
Add the proofed yeast.
Continue incorporating flour until it is all mixed in.
Add a touch more flour or water, if needed, to create a supple, non-sticky dough.
Knead for approximately 10 minutes.
Place the dough in a bowl. Cover the bowl and allow the dough to double in bulk.
Punch the dough down. Cover and allow to double again.
Cut off small pieces of dough and roll into thin ropes, not much thicker than a pencil.
The dough will have a tendency to shrink back. Roll it out. Let it shrink back a bit. Wait a few minutes for the gluten to relax. Roll it out again. Let it shrink back a bit. Repeat until the dough is the proper thickness. I find it helpful to roll 3 or 4 pieces of dough at a time. It makes the process more efficient.
Cut the dough into lengths. For the straight pieces, the lengths should be approximately 7 inches. For the circular pieces the lengths should be approximately 12 inches.
Fold the lengths of dough in half and twist few times.
Put on ungreased sheet pans, either straight or in circles.
Brush each with beaten egg. Sprinkle with additional anise seeds.
Invert another sheet pan on top. Allow the bread to rise an hour.
Bake at 350°F for 15-20 minutes, until golden brown.
Google and Wikipedia and Bing have all let me down!
Often when I’m writing a blog, I’ll do a search or two to shore up some facts.
In this instance, I was trying to find a picture of a product and to confirm my understanding of exactly what it is. That product is New Sugar.
My searches turned up nothing.
Back in college, I would buy new sugar on trips to the West Indies. The stuff I bought was sold in cans. It was dark brown, partially crystalized and partially a thick liquid. It was not as dark or as thick as molasses. My recollection is that new sugar is basically sugar cane juice boiled down until it thickens and some of the sugar crystallizes.
It’s what my recipe for Jamaican Easter Bread (aka “Bun”) calls for.
Click HERE to join our mailing list and you’ll never miss a recipe again!
Long ago, when my meager supplies of new sugar were exhausted and I was no longer going to the West Indies on a regular basis, I created a substitute for new sugar that fooled even my Jamaican friends. (Hint, it’s in the recipe below.)
If my recipes contain a substitute for a difficult-to-find ingredient, I like to make the substitution clear and to provide directions on how to use the original ingredient if available.
In my blog entries, I try to provide some sort of personal or cultural or social context for each recipe. In this instance, I wanted to highlight new sugar.
I was about to give up when I tried different search terms. I had only known it as New Sugar, but, finally, searching on “Wet Sugar” got me one website that had what I was looking for.
The website confirmed my understanding of what new sugar, aka wet sugar, is: boiled sugar cane juice. It also confirmed that it is much more difficult to find than it was 30-50 years ago. I hate to admit it, but I was buying new sugar more than 40 years ago!
My recipe for Bun (that’s really what it’s called in Jamaica…just Bun) came from Valrie Tracey a Jamaican friend from college. Valrie and I and my roommate, Ray Hugh from Guyana, were close friends in college. Though I’ve lost touch with Valrie, Ray and I are still in touch via Facebook. And, yes, her name is spelled Valrie, apparently due to an error on her birth certificate as her parents intended for her name to be Valerie!
Follow us on your social media platform of choice
In addition to new sugar, Valrie’s recipe called for “Mixed Spice,” a commonly used mixture in the cooking of Britain and many former British colonies. I don’t like using spice combinations that I haven’t made myself, like pumpkin pie spice or curry powder. If the brand goes out of existence or changes its formula one can’t recreate the dish exactly the same way again. For that reason, starting in college, I worked out my own formulas for spice mixtures that I used on a regular basis.
Valrie Tracey in 1975
Rather than have you make a batch of Mixed Spice before making a batch of Bun, I added the individual spices, in the correct amounts, to the recipe.
After resurrecting this recipe from one of my two 5 x 7 metal index card boxes of recipes that I started back in college and sharing the Bun with a number of friends, I began to seriously wonder why I hadn’t made it in over 40 years!
I can assure you, I won’t wait long to make it again.
I like to toast the Bun and add some butter and jam but in Jamaica it would often be served with a wedge of cheese. However you serve it, I’m certain you’ll enjoy it.
If you have a favorite family recipe and a bit of a story to tell, please email me at santafecook@villasentieri.com and we can discuss including it in the blog. I am expanding the scope of my blog to include traditional recipes from around the country and around the world. If you haven’t seen Bertha’s Flan or Melinda’s Drunken Prunes, take a look. They will give you an idea of what I’m looking for.
Print Recipe
Jamaican Easter Bread (Bun)
If you can find new sugar (also known as wet sugar) you can use 2 ½ cups of new sugar in place of the brown sugar and molasses. The dough for this version of Bun is quite wet, more like cake batter than bread dough. When I was making this back in college days and had to mix it by hand, I added enough flour to make a dough that could be kneaded. With a stand mixer, I allow the mixture to be wet. You might want to try both variations and see which you prefer.
Scald the milk by heating over medium high heat, stirring frequently to prevent a skin from forming, until bubbles begin to foam up around the side.
Allow the milk to become lukewarm (approximately 110°F).
Combine lukewarm milk, yeast, 1 teaspoon of sugar from the amount above, and 1 pound of flour in the bowl of a mixer.
Using the paddle, mix well then allow the sponge to sit, covered, until it doubles in bulk.
After the sponge has doubled, mix in 1/3 of the remaining flour and 1/3 of the remaining sugar.
When combined, add the butter, molasses and all the spices and flavorings. Mix well.
Add ½ of the remaining flour and ½ of the remaining sugar. Mix well.
Add the eggs and mix well.
Add the remaining flour and sugar. Mix for about 10 minutes on medium speed.
Mix in the fruit.
Divide the batter into 4 well-buttered 8” x 4” bread pans. Cover and sit at room temperature for about an hour. The batter will not really rise but the yeast is the only leavening so it needs to have time to make air bubbles that can expand and leaven the bread.
Bake at 300°F for approximately 90 minutes, until a tester comes out clean.
Glaze
When the bread is nearing completion, make the glaze by bringing the sugar and water to a boil and simmering a few minutes until syrupy.
As soon as the bun comes out of the oven, brush some of the glaze on top. Allow to cool 10 minutes in the pans.
Remove the bun from the pans and brush with more glaze. Allow to cool another 10 minutes.
I didn’t grow up with a tradition of curing meats at home. There was a long tradition of homemade hot Italian sausage headed up by Uncle Joe Medile but no meat curing.
I started curing meats in medical school. These were wet-cured products, corned beef and pickled pork. I used them primarily to make West Indian food which was a significant part of my repertory at the time.
I bought myself a container of salt peter (sodium nitrate) and mixed my cures from old recipes. The use of salt peter is no longer permitted commercially for wet cures and only as a minor addition to a cure containing sodium nitrite for meats that require a long, dry cure. Wet cures are now made with sodium nitrite only.
Follow us on your social media platform of choice
During a long, dry cure, the sodium nitrate breaks down into sodium nitrite, acting like a time-release curing agent.
I frequently had two large containers of wet cure in my kitchen, one for beef and one for pork. Refrigeration wasn’t necessary, which was a good thing, because I didn’t have lots of extra refrigerator space as a medical student.
Because of the small quantities of nitrates and nitrites used to cure meat, it is much easier to buy curing salt that consists mostly of table salt with appropriate amounts of curing salt mixed in. Prague Powder #1 is a mixture of salt and sodium nitrite. It is used for wet curing and for dry curing that doesn’t extend for weeks. Prague Powder #2 is salt with both sodium nitrite and sodium nitrate. It is used for dry curing. Prague Powders are always colored pink to differentiate them from ordinary salt.
After my first year of medical school my meat curing came to an end as I was involved in much more demanding clinical rotations and then ultimately internship and residency.
Click HERE to join our mailing list and you’ll never miss a recipe again!
Though I occasionally made Italian sausage, I didn’t start curing meats again until around 2000 when we had a temperature and humidity controlled wine cellar at The Henry Rohkam House, our home in Chicago.
The Rohkam House in Chicago when we lived there
It actually started innocently enough. When she heard about our wine cellar, Aunt Margie (my mother’s sister and Uncle Joe’s wife) asked me if I was going to make salami. I hadn’t thought about it until that point but it seemed clear to me that she had memories of “the old Italian guys,” perhaps even her father, making salami and curing it in their wine cellars.
There was a temperature and humidity controlled wine cellar in the basement of the Coach House that was perfect for curing salumi of various types
For several years, I made different types of cured salumi including Calabrese salami and pepperoni.
It was fun, and really pretty easy. It was also rewarding to slice up one’s own homemade salami for an antipasto platter when company arrived.
The drawing room at Villa Sentieri
Although we have a temperature and humidity controlled wine cellar at Villa Sentieri in Santa Fe, I haven’t made salami since moving there full time in 2012. I have, however, made pancetta. In fact, for a number of years now the only pancetta that I’ve used has been my own home-cured version.
The wine cellar at Villa Sentieri. We’ve been trying to drink down our collection, hence the bare look!
It’s even easier than making salami. You just weigh out the ingredients, rub them on a slab of pork belly and refrigerate it. There is no grinding of meat and stuffing of casings. Although it takes several months to turn pork belly into pancetta, the actual active time can’t amount to more than 30 minutes over the entire time period, and most of that is the initial step of weighing out the ingredients and rubbing them on the meat.
Although I now buy about an eight-pound piece of pork belly when making pancetta, I started making pancetta with one-pound pieces from my butcher. If you’re at all inclined to try home curing meat, a small quantity of pancetta is a great place to start.
If you have a favorite family recipe and a bit of a story to tell, please email me at santafecook@villasentieri.com and we can discuss including it in the blog. I am expanding the scope of my blog to include traditional recipes from around the country and around the world. If you haven’t seen Bertha’s Flan or Melinda’s Drunken Prunes, take a look. They will give you an idea of what I’m looking for.
Print Recipe
Pancetta
The amounts below are for 450 grams of pork belly, approximately one pound. You will need to increase the ingredients proportionately if the pork belly is larger. Measurements are critical with the salt and Prague Powder. If you are making a larger quantity, a small electric coffee mill can be used to grind the spices. Just be certain they are finely powdered before mixing with the salt.
Weigh out the ingredients, increasing the amount in proportion to the weight of the pork belly.
Finely grind the juniper berries, peppercorns, allspice, and cloves in a mortar or small electric coffee grinder.
Juniper berries
Black peppercorns
Allspice berries
Cloves
Combine the ground spices with the nutmeg, shredded bay leaf, garlic, salt and Prague Powder #2.
Bay leaf
Garlic
Canning and pickling salt
Prague Powder #2
Mix well.
Place the pork belly in a non-reactive container with a tight-fitting cover.
Rub the cure over the meat, massaging it in.
Refrigerate the pork belly, tightly covered, turning every 2-3 days for 7-10 days, until it is of a uniform firmness. Some liquid will leach out of the pork.
Rinse the cured pork belly to remove excess cure.
Pat the cured pork belly dry.
Season the pancetta with a generous amount of coarsely ground black peppercorns.
Weigh the cured pork belly and write down the weight and the date.
Put the cured pork belly fat side up on a non-reactive rack over a shallow tray and refrigerate, uncovered, until it loses 20-25% of its weight, approximately 4 weeks.
Wrap it tightly in plastic wrap and refrigerate approximately one week to allow it to evenly hydrate. Even so, the edges will be drier than the middle.
If you are not using the pancetta within a few weeks, cut it into pieces and freeze, tightly wrapped.
Like many psychiatry residents, I used to moonlight to make extra money.
The money was good and the work was usually not difficult. Many moonlighting jobs required being on-premises overnight. Most of the time, this usually just involved sleeping but, again, not always.
One of my easier moonlighting jobs was at a private psychiatric hospital in the Philadelphia suburbs. I had to do the histories, physicals, and psychiatric evaluations on the newly admitted patients and then be available for any issues that came up during my shift. Usually I got to sleep all night.
This was in stark contrast to one of my other moonlighting jobs at the crisis service that covered a swath of northeast Philadelphia. The patients were more acute and admissions unplanned. Sleep was elusive.
Follow us on your social media platform of choice
One morning as I was finishing up some work on one of the units at the private psychiatric hospital I spied a pizza box in the staff lounge, clearly intended for anyone who wanted to have some.
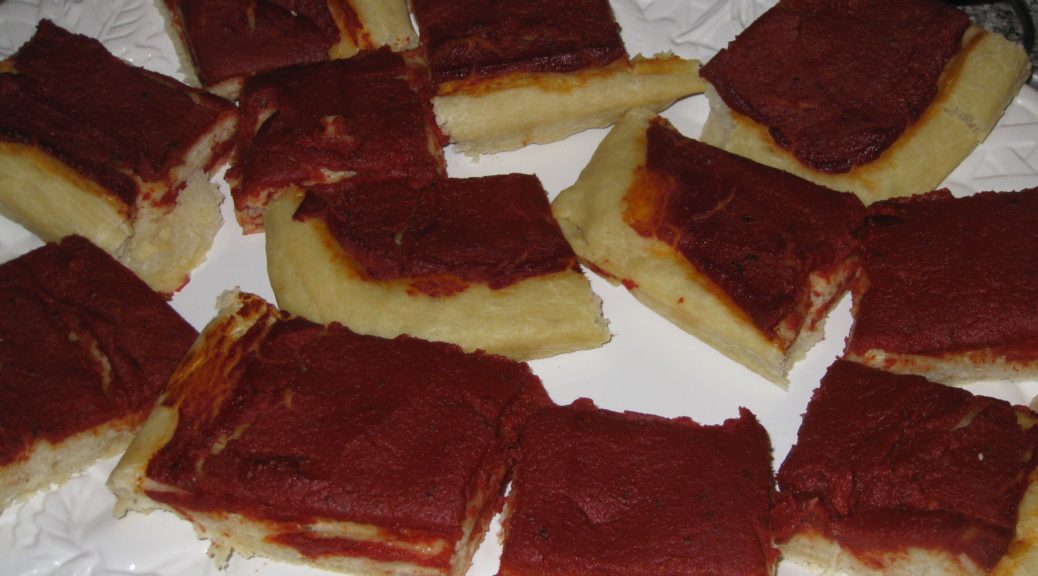
I opened the box and was presented with my first tomato pie, basically a focaccia topped with a prodigious amount of a jam-like tomato sauce. There was no cheese and there were no toppings.
I had never heard of tomato pie like this. Sometimes the term tomato pie was applied to a run-of-the mill pizza, usually by my Uncle Joe, but this was a whole different creation.
Not only was it naked, except for the tomato sauce, the sauce was very dense (almost like tomato paste) and thickly applied to the dough.
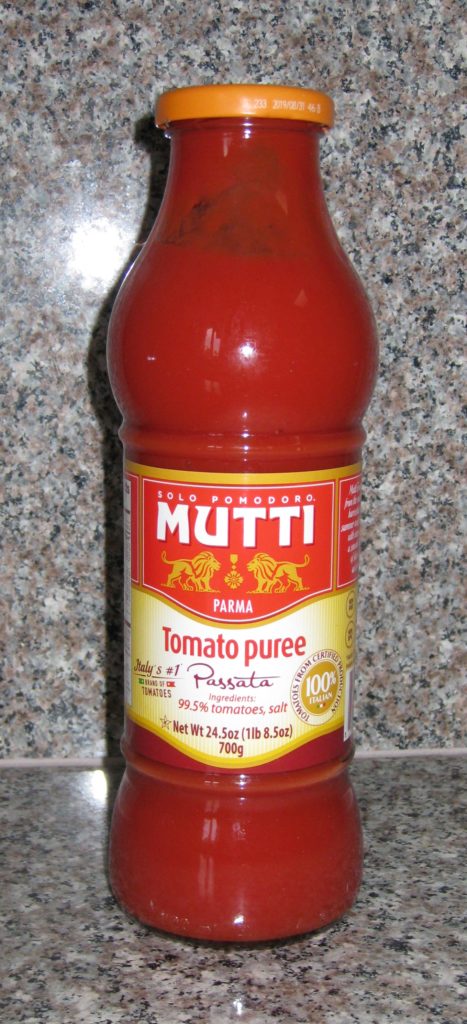
Good quality tomato puree is essential for this sauce. I prefer imported Italian tomato puree, called passato (or passata) (both are correct) di pomodoro
Growing up, a regular mid-morning Sunday snack (after church and before our major meal of the day around 1:00 or so) was a bowl of my mother’s long-simmered tomato sauce that was almost always bubbling away on the stove on Sunday mornings and a stack of bread to dip into it. Italian bread was preferred but I’d make do with American “slice” bread if need be…often six slices…to hold me over until mealtime.
Tomato pie was heaven-made for someone like me. It was bread and sauce in an easy-to-eat package. No bowl or dipping required.
Click HERE to join our mailing list and you’ll never miss a recipe again!
It’s pretty astounding to realize that I had lived in Philadelphia for about 11 years before encountering my first tomato pie. I don’t really understand why. Two of the bastions of Philadelphia tomato pie are on Ninth Street, an area that I started going to my freshman year in college.
I’m a big fan of making dough for pizza and focaccia in my bread machine. If you don’t have a bread machine, use a mixer with a dough hook. Failing that, some elbow grease and a smooth kitchen counter will do the trick.
If you have a favorite family recipe and a bit of a story to tell, please email me at santafecook@villasentieri.com and we can discuss including it in the blog. I am expanding the scope of my blog to include traditional recipes from around the country and around the world. If you haven’t seen Bertha’s Flan or Melinda’s Drunken Prunes, take a look. They will give you an idea of what I’m looking for.
Print Recipe
Philadelphia-Style Tomato Pie
Tomato Pie is a thick crust pizza dough topped with copious amounts of very thick tomato sauce. No cheese is put on the pie before baking. Some folks sprinkle grated Pecorino on the finished pie. It is usually served at room temperature. If the garlic taste in the sauce is too strong for you, the garlic can be sautéed in a small amount of olive oil before mixing into the tomato puree mixture. It is best to make the sauce a day in advance and refrigerate it. If you don’t have a bread machine, mix the dough in a mixer with a dough hook for about 10 minutes after the dough comes together. You can also mix it by hand which will give you a bit of an upper-body workout.
Grate the garlic on a Microplane grater or crush to a paste.
Combine all the ingredients for the sauce.
Cover the sauce and refrigerate overnight.
Before using, taste and adjust seasoning.
Dough
Prepare the dough using the dough cycle of the bread machine.
At the end of the cycle put the dough into an oiled bowl or covered container and allow to rise until doubled.
Assembly
Oil a half-sheet pan (13" x 18") with a few tablespoons of olive oil.
Stretch dough into the pan.
The dough will spring back. Stretch it out then allow it to rest a few minutes. Stretch more, then allow it to rest a few minutes. With resting in between stretches, the gluten will relax and the dough won't spring back.
Cover the pan. I invert another half-sheet pan on top.
Allow to rise until doubled, approximately 30 minutes.
Spread all of the sauce on top.
Bake at 350°F until crust is browned and sauce is thick, approximately 35-45 minutes.
Cool in the pan.
Cut into squares and serve at room temperature.
Sprinkle with grated Pecorino cheese, if desired, once cool.
Although I typically heat up left over pasta and have it for lunch, it definitely pales in comparison to the freshly made dish.
In the pre-microwave days of my youth, leftover pasta was heated gently in a sauté pan with a little bit of water added. Now, the microwave makes quick work of the same task.
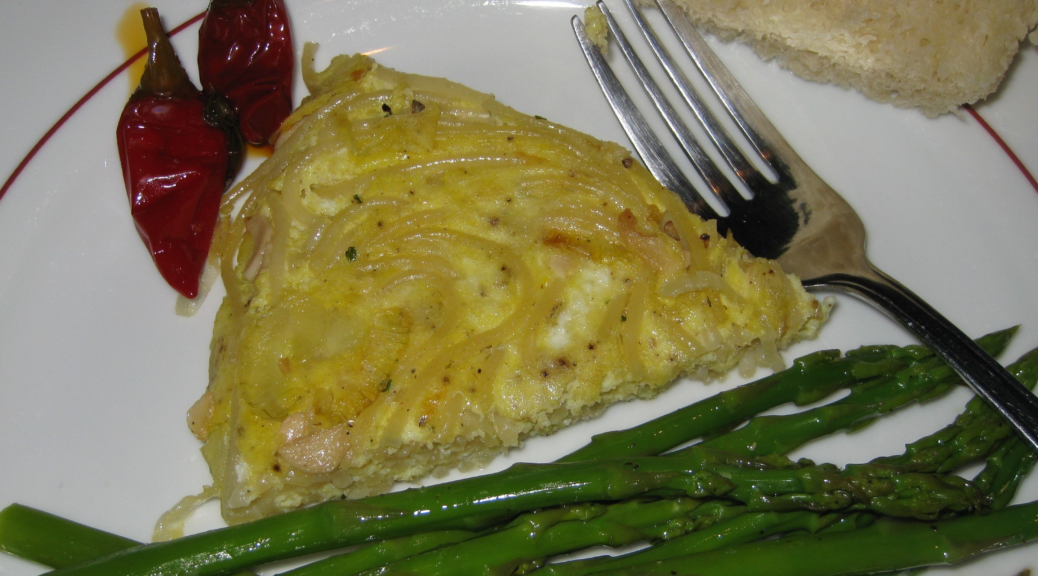
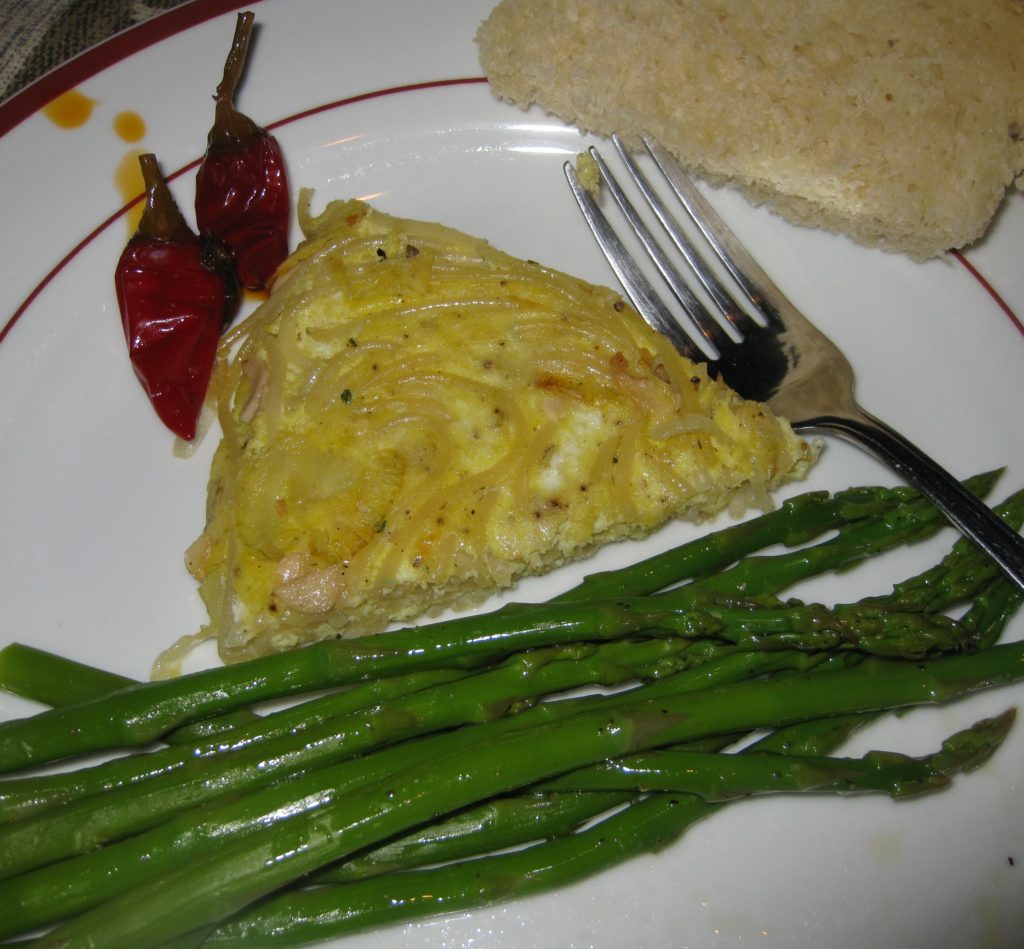
If you have leftover pasta, though, consider turning it into a frittata. I think it constitutes an entirely new dish, and not leftovers, because it’s being turned into something totally different.
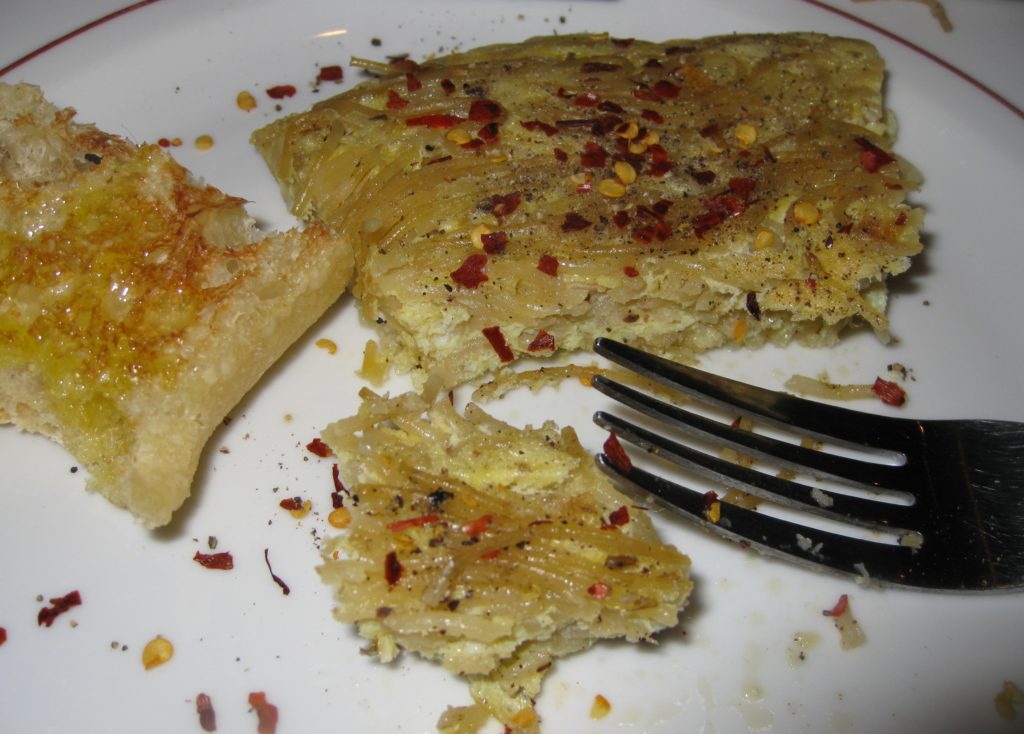
A slice of frittata with a few Calabrian oil-cured peppers on the side
We eat so much pasta in our house that if we turned the leftovers into frittate (the plural of frittata) our dinners would alternate between pasta and frittata almost every day of the week! That’s why some of the leftover pasta is simply heated up for lunch.
Follow us on your social media platform of choice
A frittata is often referred to as an Italian omelet. But an omelet it most definitely is not. It is cooked using a different technique with a different intended outcome.
Calling a frittata an Italian omelet is like calling everything made from ground beef a hamburger. (OK, off my soapbox for now.)
You can use most any combination of pasta and sauce for a frittata but you don’t want there to be lots of extra sauce or it will be difficult to get the eggs to set.
Most often, I’ll use a long thin pasta, like spaghetti or spaghettini with either a tomato sauce or anchovies and garlic. They both work well. That said, I’ve made frittate from a wide array of leftover types of pasta. Shape is no object!
If you happen to know somebody who raises chickens or if you have access to freshly laid eggs at a farm stand or farmers’ market this is an excellent use for them. There’s little that stands between you and the eggs, so using really good, fresh eggs is noticeable.
Crushed red pepper is a good alternative to Calabrian oil-cured peppers, but definitely not as flavorful
As I mentioned earlier this week, I’m losing the battle to raise chickens at our house.
Click HERE to join our mailing list and you’ll never miss a recipe again!
A frittata is cooked slowly in a sauté pan until the eggs set and turn golden brown on the bottom. I prefer to do this with the pan covered as it aids in setting the top of the eggs, too.
Once the bottom is set, there are two methods to finish the frittata. One is to put the frittata under the broiler or in the oven. The good folks at Wikipedia think this is the only way to do it. In fact, I would suggest that most Italians do not do that. They simply flip the frittata over. (OK, I was back on the soapbox for a moment there.)
If you’re going to finish the frittata by flipping, however, you need to be sure that the top of the frittata is not runny. It should be just barely set.
In case you missed it, I previously published a recipe for an onion frittata. Although it uses a large quantity of onions, they cook down into sweet, golden deliciousness before the eggs are added.
And…before we leave the subject of leftovers…leftover frittata makes a great filling for a sandwich, especially with a few oil-cured Calabrian peppers!
If you have a favorite family recipe and a bit of a story to tell, please email me at santafecook@villasentieri.com and we can discuss including it in the blog. I am expanding the scope of my blog to include traditional recipes from around the country and around the world. If you haven’t seen Bertha’s Flan or Melinda’s Drunken Prunes, take a look. They will give you an idea of what I’m looking for.
Print Recipe
Frittata di Spaghetti (Spaghetti Frittata)
This is a wonderful Italian way to use leftover pasta by turning it into something completely different. The proportions are approximate and will depend on how much pasta is leftover. The pictures show this being made with about half a pound (uncooked weight) of spaghettini with anchovy and garlic (see the Notes section below for a link to the recipe) but it works equally well with most pastas and sauces, including tomato sauce. Use 8 eggs if you have a larger amount of leftover pasta or if you need to stretch the dish to feed more. Use either onion or garlic as the aromatic. Which you choose will depend on which better compliments the pasta. In this case, because the sauce had a lot of garlic, I chose onion to add a bit of a sweet note. If using a tomato sauce, I would have chosen garlic. Whether or not to use Parmesan cheese follows the same logic. Italians feel that cheese rarely goes with fish, like the anchovies in this sauce, so I didn’t use it.
Heat the oil in a 12 inch (preferably non-stick) sauté pan.
Add the onion or garlic and sauté over medium heat until the onion is soft and caramelized or the garlic is fragrant.
Add the pasta and sauce and heat gently.
Toss the pasta a few times to be sure it heats evenly.
Meanwhile, beat the eggs with salt and pepper to taste.
When the pasta is heated through, spread it evenly on the bottom of the pan.
If you cannot clearly see enough of a slick of oil on the bottom of the pan to protect the eggs from sticking, add a bit more. (Some sauces sop up the oil more than others.)
Pour the eggs over the pasta, being careful to distribute them evenly.
If using cheese, sprinkle it over the top of the eggs.
Cover the pan and reduce the heat to low.
Keep the eggs covered the whole time and move the pan around on the stove, even putting it off-center much of the time, to be sure the heat is evenly distributed around the bottom of the pan.
Cook until the top of the eggs is just set. That is, there is no runny egg left. This will take approximately 25-30 minutes.
When the eggs are set, slide them out of the pan onto a cookie sheet or pizza pan.
Put the sauté pan upside down on the eggs and then flip the whole set-up over.
Return the eggs to the heat, uncovered, for approximately 5 minutes to lightly brown the bottom.
Slide on to a serving platter and cut in wedges to serve.
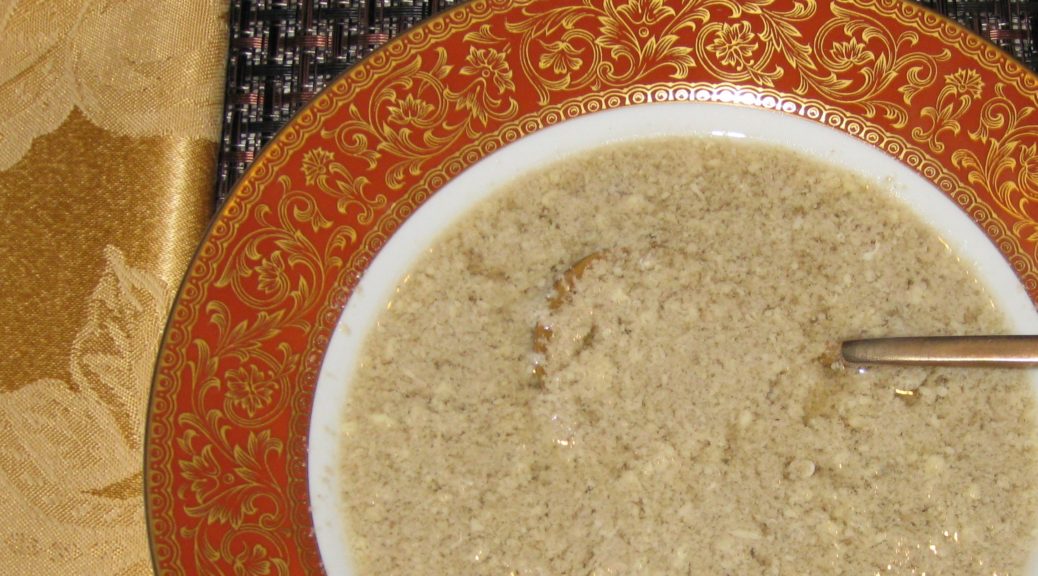
The name of this Italian soup, Stracciatella, comes from the Italian verb meaning “to shred,” a reference to the strands of egg in the soup.
I learned to make this from Auntie Helen d’Aquili when I was in college.
Auntie Helen and I in 1976. Can you believe my hair!!!
It’s really simple to make but, like so many Italian dishes, it relies on few ingredients that must be of high quality. In this case the broth is absolutely paramount as is high-quality Italian imported Parmigiano Reggiano cheese.
Follow us on your social media platform of choice
I have a few friends in Santa Fe who raise chickens and I am occasionally gifted with freshly laid eggs but good supermarket eggs are usually what I use.
I’ll let you in on a little domestic struggle, however. I want to raise chickens. My husband doesn’t. So far, he’s winning the struggle but I haven’t given up. His excuses are pretty lame as far as I’m concerned. The most common one is that chickens will attract coyote.
HELLO! We live in the forest. We are surrounded by coyote and other wildlife. Just an hour ago, while sitting at my desk getting ready to write this blog, a big deer walked through the paved area in front of our house gnawing down our landscaping like it was a salad bar.
Click HERE to join our mailing list and you’ll never miss a recipe again!
Most summer nights we hear the coyote yipping as go hunting. They are mere yards from our house. I don’t think a few chickens will bring them any closer than the already abundant rabbits currently do. We just need to build a coyote-proof chicken enclosure. There’s a great how-to right here (Frank! Frank, are you listening?).
Frank seems pretty happy in this selfie we took on Kauai. Chickens roam everywhere on Kauai. I think that is part of Frank’s happiness though he has yet to admit it.
Homemade broth is essential. Chicken or beef broth are both standard choices, though Auntie Helen used beef. You can make an excellent beef broth as part of the process of making Marisa’s Mystical Meatballs. In fact, this soup would make an excellent first course followed by the meatballs and accompanied by a vegetable or two and some rice.
If you have a favorite family recipe and a bit of a story to tell, please email me at santafecook@villasentieri.com and we can discuss including it in the blog. I am expanding the scope of my blog to include traditional recipes from around the country and around the world. If you haven’t seen Bertha’s Flan or Melinda’s Drunken Prunes, take a look. They will give you an idea of what I’m looking for.
Print Recipe
Stracciatella (Italian Egg Drop Soup)
This classic Italian soup requires top-notch broth and Parmigiano Reggiano cheese. Homemade broth is essential. See the Notes section, below, for a link to my blog post that contains instructions on making a wonderfully flavorful beef broth.
As a freshman in college who made tentative forays into non-Western European cuisines, I was transformed into a person who couldn’t find a cuisine he wouldn’t try, and didn’t like, by the end of sophomore year.
Junior year was really an intensive study in cooking. It’s the year I became a respectable Sri Lankan, Indian, Chinese, and West Indian cook. There were many other cuisines that I dabbled in but those four formed the basis of what I cooked during the year. By then I considered myself a good Italian cook but my repertory and skill level have expanded significantly since then.
Starting junior year, and for many years thereafter, Reggie and Nanacy Rajapakse taught me much of what I know of Sri Lankan food. Several cookbooks by Charmaine Solomon, as well as the [Ceylon] Daily News Cookery Book, provided much additional guidance. Several trips to Sri Lanka with Nanacy, many years later, confirmed to me that I had captured the taste of Sri Lankan food.
In 2005, I accompanied Nanacy Rajapakse to her nephew’s wedding. The groom (with flower on his lapel) and his family approach the wedding venue.
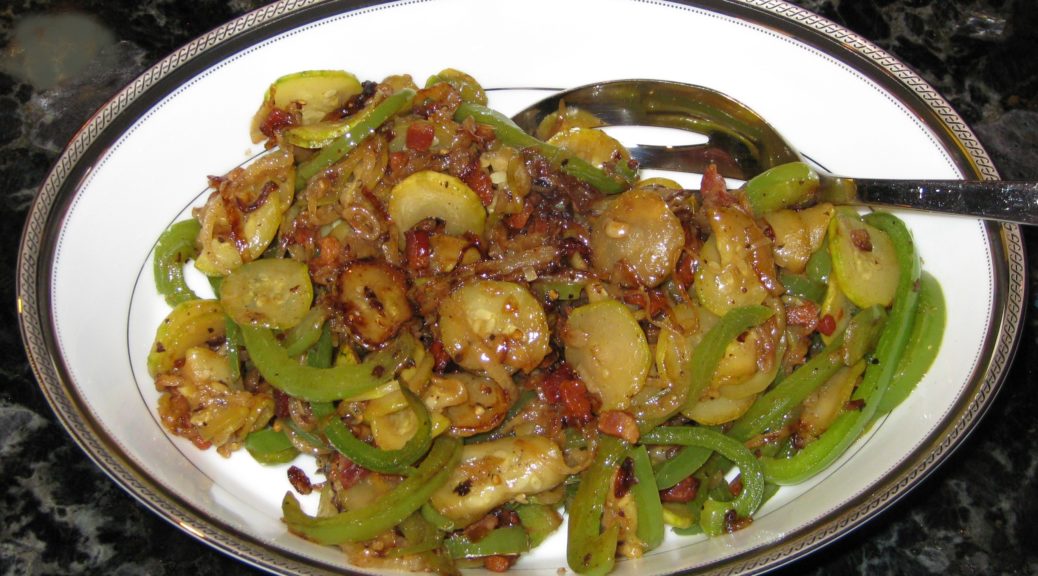
I understand that Sri Lankan food may be a stretch for some of my readers but I really want to introduce you to it. As a starting point, I’ve selected a vegetable dish that pairs really well with a wide range of cuisines, Zucchini and Peppers with Fennel Seed and Cinnamon.
Follow us on your social media platform of choice
I actually made this a few weeks ago at an otherwise all-Italian meal. It paired really well. The dinner guests, all of whom were Italian, didn’t think for a moment that it wasn’t Italian!
The wedding ceremony
It’s an example of a style of cooking vegetables in Sri Lanka called tempering. The vegetables are cut into relatively small pieces. Aromatics (onion, garlic, ginger, etc.), depending on the dish, are first sautéed. The vegetables and seasonings are added and everything is cooked relatively quickly, 10 minutes or so depending on the vegetable.
Most Sri Lankans are ethnically Sinhalese. The next largest group are Tamils, followed by individuals of Arab descent (called Moors locally). Typically, Sinhalese are Buddhist, Tamils are Hindu, and Moors are Muslim. There is a smattering of others ethnic groups and religions.
A reception for the newlyweds, several days after the wedding. Nanacy is on the right and her sister Thilaka is on the left
Hindus and Buddhists in South Asia, are nominally vegetarian. Muslims typically don’t eat pork. This recipe, which is ethnically Sinhalese, includes bacon which 92% of the Island’s population theoretically would typically refrain from eating. But they don’t!
Click HERE to join our mailing list and you’ll never miss a recipe again!
In fact, I found no shortage of meat (and meat-eaters) on my trips to Sri Lanka. Even the most ubiquitous of condiments, pol sambola, contains flakes of dried fish which would typically be avoided by both Buddhists and Hindus. Clearly there is some sort of “accommodation” that the Sri Lankans have made around the idea of being vegetarian because the local cuisine contains a lot of (very wonderful) meat and fish dishes.
On the other hand, it’s also an easy place to be vegetarian. One of my trips to Sri Lanka coincided with one of my periods of vegetarianism (which I ultimately gave up for cultural and health reasons). There was an array of vegetarian options available at every meal.
A view of the Indian Ocean not far from Thilaka’s house south of Colombo
The most difficult time came when neighbors of Nanacy’s sister Thilaka, with whom we were staying, invited me over for a lunch of “curry and rice” which, although it sounds innocent enough, means you’re in for a delightful meal and lots and lots of food. On the other hand “short eats” refers to snack food.
The neighbors had gone all out! There was a huge array of dishes, each more wonderful than the last. It truly was the best food I ate in Sri Lanka. I tried to just eat the vegetarian options but it was clear that my hosts were distraught, though they would never have said anything to me.
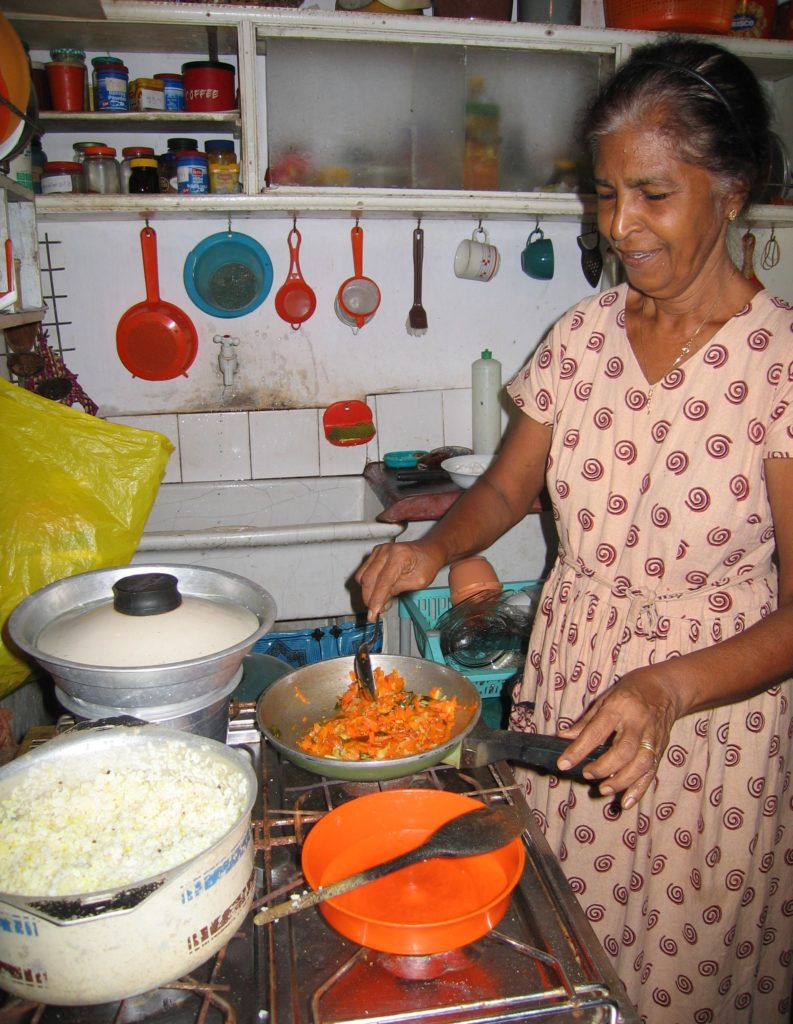
Thilaka tempering vegetables for dinner
I decided that the appropriate response to their generosity was to eat everything. My hosts quickly became delighted (as did my taste buds)! Only years later did I come to understand that in Sri Lanka (and many Theravada Buddhist countries of South East Asia) Buddhist monks are obliged to accept all food offered to them, even meat, unless they suspect the animal was slaughtered specifically for them.
Since I was most certainly not a monk, I’m sure they couldn’t understand why I was only eating the vegetarian dishes rather than everything that was offered to me. In the end, it was a happy accommodation for everyone involved.
If you have a favorite family recipe and a bit of a story to tell, please email me at santafecook@villasentieri.com and we can discuss including it in the blog. I am expanding the scope of my blog to include traditional recipes from around the country and around the world. If you haven’t seen Bertha’s Flan or Melinda’s Drunken Prunes, take a look. They will give you an idea of what I’m looking for.
Print Recipe
Sri Lankan Zucchini and Peppers
I learned to make this from Nanacy Rajapakse who is from Sri Lanka. Nanacy made it with bacon, and, while very good with bacon, it is also wonderful without. As a variation, cabbage, cut into ½ inch wide strips, can be substituted for the zucchini. Feel free to adjust the quantity of spices to your taste. Curry leaves can be difficult to obtain outside of large metropolitan areas with large South Asian or Southeast Asian populations. There is no substitute. If not available, just omit the curry leaves as I often do.


")
")
")
")
")
")
")


")
")
")
")
")
")
")
")
")
")

")
")
")
")
")

")
")
")
")
")
")
")
")
")
")
")
")
")
")
")
")
")
")
")
")
")
")
")


")
")
")
")
")
")
")
")


")
")
")
")
")
")
")
")
")
")
")
")
")
")
")
")
")
")
")
")
")
")
")
")
")
")
")
")
")
")
")
")
")
")

")
")
")
")
")
")
")
")
")
")
")
")
")
")
")
")

")
")
")
")
")
")
")


")
")
")
")
")
")
")
")
")
")