Cannellini and Fennel Soup

January 3, 2018

A few years ago I was at a party and struck up an interesting conversation with a couple of guys originally from the East Coast.  One of the guys was of Italian heritage and the conversation turned to food, naturally!

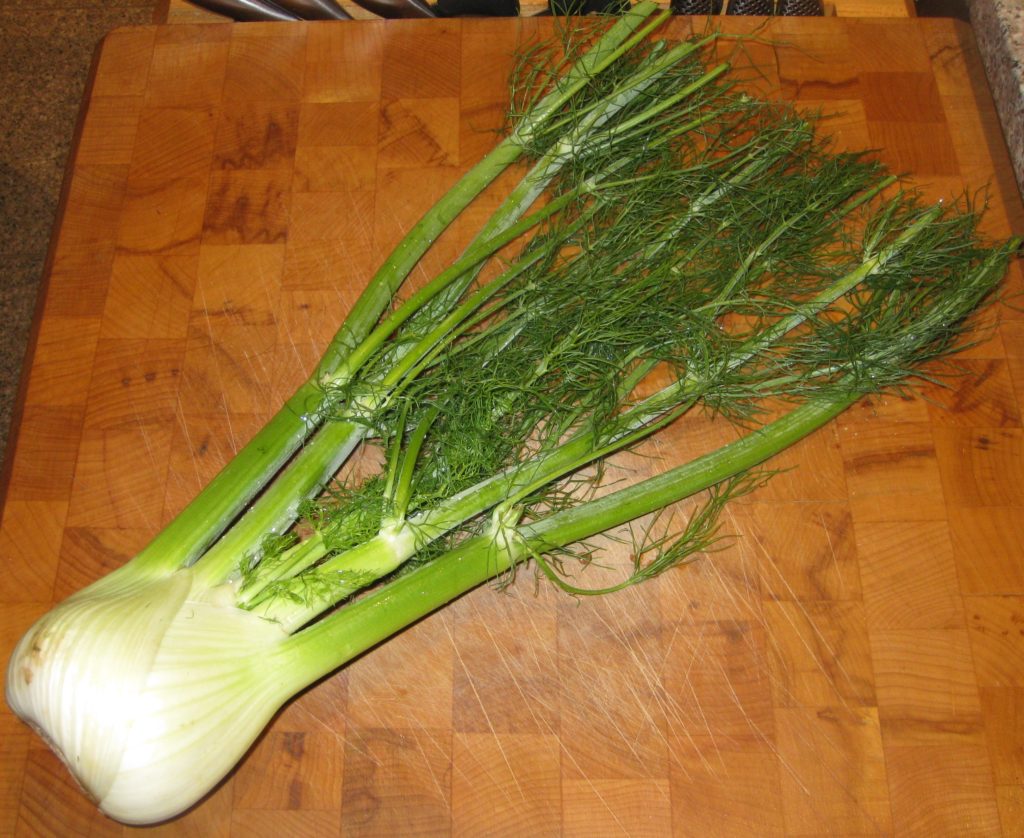
He described a soup he grew up eating that included fennel stalks as well as the bulb.

It caught my interest because I’d not encountered a recipe that used the stalks before; some of the fronds, yes, but not the stalks.  It always seems like such a waste to me to throw them out as they contain so much flavor.

But they’re tough!


Click HERE to join our mailing list and you’ll never miss a recipe again!


In this soup, the stalks are pureed in a food processor and added to the diced bulb and some cannellini beans.

Fennel bulb and stalks. For most preparations only the white bulb is used. This soup uses the stalks, too.

It is wonderfully flavorful, completely vegetarian, and comes together in a snap.

If you have some of my Cannellini alla Toscana lurking in your freezer, by all means use them in the soup.  If not, canned cannellini will work just fine.

As for the guys who gave me the recipe, I can’t find anyone who knows who they might be.  I’ve talked to the hosts of the party and they’re stumped.  I always like to include a personal interest story along with each recipe and I’ve truly exhausted what I know about this particular version of this soup.


Follow us on your social media platform of choice


From my research, however, I can tell you that this appears to be a popular soup in Italy given the number of recipe variations I was able to turn up written in Italian.  Most contain meat, such as speck, and other vegetables, such as carrots and celery.  One even contains seaweed!  None of the recipes is quite as simple as this one…and I love the simplicity.

Give it a try and let me know what you think.


If you have a favorite family recipe and a bit of a story to tell, please email me at santafecook@villasentieri.com and we can discuss including it in the blog. I am expanding the scope of my blog to include traditional recipes from around the country and around the world. If you haven’t seen Bertha’s Flan or Melinda’s Drunken Prunes, take a look.  They will give you an idea of what I’m looking for.


Print Recipe
Cannellini and Fennel Soup
This is one of the very few recipes I have seen that uses the stalks of the fennel plant, not just the bulb. Adding the stalks and fronds really intensifies the fennel flavor. You can substitute 4 cans (approximately 15 ounces each) of cannellini beans in place of the home-cooked beans. See the notes section, below, for a link to the Cannellini alla Toscana recipe. You can easily cut this recipe in half.
Votes: 0
Rating: 0
You:
Rate this recipe!
Cuisine Italian
Prep Time 20 minutes
Cook Time 1 hour
Servings
people
Ingredients
Cuisine Italian
Prep Time 20 minutes
Cook Time 1 hour
Servings
people
Ingredients
Votes: 0
Rating: 0
You:
Rate this recipe!
Instructions
  1. Cut the stalks and fronds off the fennel.
  2. Coarsely chop the stalks.
  3. Grind the chopped stalks and fronds in a food processor. Reserve.
  4. Dice the fennel bulbs.
  5. Mince the garlic.
  6. Sauté the garlic in the olive oil until fragrant.
  7. Add the diced fennel. Season with salt. Sauté approximately 5 minutes.
  8. Add the wine. Cover the pot and cook until the fennel begins to soften.
  9. Add the cooking liquid from the cannellini (but not the beans) adding water if necessary to cover the fennel. Simmer until the fennel is almost completely cooked.
  10. Add the cannellini. Simmer 10 minutes.
  11. Add the ground fennel stalks and fronds and salt and pepper to taste.
  12. Season with salt and pepper.
  13. Simmer for 15 minutes, until fennel is tender but not mushy.
  14. Serve with grated Parmigiano Reggiano cheese.
Recipe Notes

Here’s where you can find the recipe for Cannellini alla Toscana.

Copyright © 2018 by VillaSentieri.com. All rights reserved.

Share this Recipe

Slow-Cooked Pork Roast with Sauerkraut and Sausage

December 29, 2017

I grew up in Johnstown, PA. The town was founded by a Swiss German immigrant, Joseph Schantz in 1800. Over the years, in various documents, recorders anglicized his last name, most commonly rendering it “Johns,” a name the family ultimately adopted. The name of the town was ultimately changed from Schantzstadt to Johnstown.

Johnstown Panorama (Photo by Greg Hume)

I can’t say there was much of a noticeable German influence when I was growing up in the 1950s to 1970s, except for one: New Year’s Day dinner.

Regardless of one’s ethnic background, the most common dinner on New Year’s Day was “Pork and Sauerkraut.” It was commonly acknowledged that this was a nod to Johnstown’s German heritage. And, much like black-eyed peas in the South, was viewed as a way to bring good luck to the coming year.

As you might expect, recipes for pork and sauerkraut vary. Sauerkraut and a large cut of pork are, obviously, essential. Sausages of some sort are common, as are dumplings.


Click HERE to join our mailing list and you’ll never miss a recipe again!


The recipe that I use is close to what my mother made except that I enhance the seasonings in the sauerkraut along more Germanic lines, with onion, carrot, apple, and juniper berries. My mother’s was more basic and similar to the way the Slovak side of my family prepared sauerkraut. My cousin Angie, of Italian heritage, added a brown gravy to hers, which also has Germanic roots.

The Inclined Plane goes from downtown Johnstown to the suburb of Westmont (Photo by Greg Hume)

Long and slow cooking is essential as much for pull-apart-tender pork as it is to mellow out the sauerkraut. Among Central and Eastern Europeans, sauerkraut tends to be cooked for several hours to tenderize it and tame its sour bite.

Kielbasa was a favorite sausage in our house and was always included in pork and sauerkraut. It was always locally made and never procured from large national meatpackers. Often times, other sausages, such as bockwurst or bratwurst, would also be added. But kielbasa was king in pork and sauerkraut and, in the sausage pantheon, second only to hot Italian sausage in our house.


Follow us on your social media platform of choice


The kielbasa that we ate on a regular basis was made from pork, or pork and beef, but venison kielbasa was common too. The first day of deer-hunting season was a public school holiday. You can imagine the importance of venison.

Some of the hunters would have their venison (or some of it, at least) turned into kielbasa, flavored with garlic and smoked. I remember on several occasions going with my father to have work done on the car in late December. The service station had a big platter of meats, cheeses, and pickles laid out for customers to nibble on. Among the offerings was venison kielbasa made from a deer that the owner of the service station had shot.

One of my resolutions for the new year is to find a small, artisanal purveyor of kielbasa that’s as good as what I remember from childhood.


If you have a favorite family recipe and a bit of a story to tell, please email me at santafecook@villasentieri.com and we can discuss including it in the blog. I am expanding the scope of my blog to include traditional recipes from around the country and around the world. If you haven’t seen the post on Melinda’s Drunken Prunes, it will give you an idea of what I’m looking for.


Print Recipe
Slow-Cooked Pork Roast with Sauerkraut and Sausage
Saueraut from the refrigerated section of the market is usually of better quality than canned, especially if the sauerkraut is from an artisinal producer. Draining the sauerkraut and rinsing it well under cool water will produce a more mellow taste. If you want dumplings with this (and who wouldn't?), remove the meat from the pan and keep warm while cooking dumplings on top of the sauerkraut on the stovetop. See the notes section below for my recipe for dumplings.
Votes: 0
Rating: 0
You:
Rate this recipe!
Course Mains, Meats
Cuisine German
Prep Time 20 m
Cook Time 6 1/2 hours
Servings
people
Ingredients
Course Mains, Meats
Cuisine German
Prep Time 20 m
Cook Time 6 1/2 hours
Servings
people
Ingredients
Votes: 0
Rating: 0
You:
Rate this recipe!
Instructions
  1. Cut the cloves of garlic, top to bottom, into approximately 4-6 slivers each.
  2. Pierce the pork around the outside about 1 inch deep with the tip of a sharp knife.
  3. Insert slivers of garlic into the slits
  4. Season the pork generously with salt and pepper.
  5. Brown the pork in a heavy Dutch oven using the oil.
  6. Add white wine, cover tightly, and transfer to oven at 350°F.
  7. After one hour, reduce heat to 225°F.
  8. Slice the onions in half top-to-bottom then cut crosswise into thin slices.
  9. Shred the carrot on the tear-drop side of a box grater.
  10. Cut the apple into small dice.
  11. After the pork has been cooking for a total of about 3 hours, drain and rinse the sauerkraut.
  12. Slowly sauté the onion in the butter or bacon fat until caramelized, approximately 20 minutes.
  13. Add the shredded carrot and diced apple and sauté until heated through.
  14. Add sauerkraut, juniper berries, caraway seeds, bay leaf, and black pepper to taste.
  15. Add water and bring to a boil.
  16. Add the boiling sauerkraut to the pork after the pork has cooked for a total of four hours (1 hour at 350°F plus 3 hours at 225°F).
  17. An hour later nestle the kielbasa and other sausage into the sauerkraut.
  18. Continue to cook, covered, until the pork is fall-off-the-bone tender. Approximately 1-2 more hours.
  19. Remove the pork and sausages.
  20. Skim fat from the top of the sauerkraut.
  21. Put the Dutch oven on the stove and cook dumplings on top of the sauerkraut if desired.
  22. Meanwhile, pull the pork into big chunks. Keep the pork and sausages warm.
  23. Serve the sauerkraut in a separate bowl, or use it to surround the pork and sausages.
Recipe Notes

This is where you can find my recipe for dumplings.

Copyright © 2017 by VillaSentieri.com. All rights reserved.

Share this Recipe

Cabbage and Noodles (Halushki)

November 27, 2017

One of the interesting consequences of working on this blog is that it is getting me to cook more Slovak food.

We ate way more Italian food than Slovak food when I was growing up but, nonetheless, Slovak food was a significant presence on our table.

Things that only lived in my memory, like the Chicken Paprikash that I posted a few weeks ago, and my Grandma Mihalik’s Butter Cookies that are coming up in a week or two, are now real. And it’s not only the Slovak food. The Chinese Five-Spice Roast Pork from last week hasn’t been on my table in more than 40 years!


Click HERE to follow us on Instagram


Part of the reason is that, as much as I enjoy cooking, I hadn’t devoted as much time to planning what I was going to cook as I did when I was younger.  That is, until I got deep into this blog (and the restaurant cookbook I’ve been asked to write).

In Junior and Senior years of college there was a plan for dinner for every day of every week. Sometimes there was a plan for lunch, too!

Good provisions weren’t conveniently located to the University of Pennsylvania campus except for some specialty items from the ethnic markets near campus or the occasional very basic item from one of two nearby (in-super) supermarkets. Grocery shopping was done weekly and involved a trip to Ninth Street (sometimes called the Italian Market), and to the Pathmark supermarket in Broomall, PA.

Every meal got planned and a shopping list was created.

The planning was usually done in the evenings when I needed a break from studying (which I know some of you think I never did!). I would sit down with a cookbook or two, or my box of recipes handwritten on 3” x 5” index cards, or the typewritten recipes from Mrs. Hugh, my roommate’s mother and, over the course of the week, generate a list of what my roommate and I were going to have for dinner each night. Some were favorites but many were new, like the whole poached fish I made from Marcella Hazan’s first cookbook or Mrs. Hugh’s Crispy Duck (see the photo embedded in this blog post).

One of my favorite books was a slim volume by Charmaine Solomon. Charmaine was from Sri Lanka and two of the resident advisors in my college house, Reggie and Nanacy Rajapakse, were also from Sri Lanka and knew Charmaine. Charmaine’s Far Eastern Cookbook was copyrighted in 1972 (the year I started college). The edition I have was printed in 1973 so it was quite new when I bought it in 1974 shortly after entering the International Residence Project. I read that book cover to cover, like a novel, many times. I could sit for hours and pore over Charmaine’s recipes.

My dog-eared and much beloved copy of Charmaine Solomon’s Far Eastern Cookbook

In 1976, when I graduated college, Reggie and Nanacy bought me another of Charmaine’s cookbooks as a present, The Complete Asian Cookbook.

Another favorite cookbook was the [Ceylon] Daily News Cookery Book which was in the collection of the Van Pelt library at the University of Pennsylvania. I would check it out, keep it as long as I could, return it, and then check it out again. It was a hardcover book with a red cloth cover. It was simply titled the Daily News Cookery Book.  Reference to Ceylon was nowhere to be found in the title.  Many years later, on a trip to Sri Lanka, I was able to get a reprint of the book (with the word Ceylon added to the title).

My point, though, is that my cooking repertoire expanded because I worked at it. Ray and I planned every meal, we went grocery shopping, we cooked, and we most certainly ate. I was still able to keep up a good cooking pace through medical school but after that, as I got busier and busier, it became harder and harder.

While I can put food on the table any given night without much thought, recreating past favorites or trying out new recipes requires more planning. I now have a calendar specifically devoted to cooking. Dishes get planned out weeks, if not months, in advance. It’s a lot of work, yes, but it’s tremendously rewarding to prepare my favorite foods, many of which I haven’t had in many years, and introduce them to others.

Cabbage and Noodles, sometimes called Halushki, was frequently on our table. I remember it particularly being served with Salmon Patties, one of my favorite Friday meals when we didn’t eat meat. We had it other times, too, but the association of Cabbage and Noodles with Salmon Patties is very strong.


Follow us


Click HERE to join our mailing list and you’ll never miss a recipe again!

Print Recipe
Cabbage and Noodles (Halushki)
Although three pounds of cabbage sounds like a lot, it cooks down a tremendous amount. If you wish, you can add a teaspoon or two of caraway seed to the cabbage during the last 20 minutes of cooking. Though my family did not do that, it is not unusual to do so.
Votes: 0
Rating: 0
You:
Rate this recipe!
Prep Time 15 minutes
Cook Time 2 hours
Servings
people
Ingredients
Prep Time 15 minutes
Cook Time 2 hours
Servings
people
Ingredients
Votes: 0
Rating: 0
You:
Rate this recipe!
Instructions
  1. Quarter and core the cabbage.
  2. Slice each quarter crosswise into ½ inch wide ribbons.
  3. In a heavy-bottomed pot large enough to hold the cabbage comfortably melt four tablespoons of the butter.
  4. Sauté the onion in the butter until golden.
  5. Add the cabbage. Season generously with salt and pepper.
  6. Sauté on medium heat, stirring often, until the cabbage wilts.
  7. Reduce the heat if the cabbage starts to stick to the pot.
  8. Continue to cook on medium low, partially covered and stirring often, until the cabbage is silky, golden, and sweet. This will take 1 ½ to 2 hours total from start to finish.
  9. The cabbage can be cooked several hours in advance to this point. Warm the cabbage before proceeding.
  10. Bring 3 quarts of water to a rolling boil. Add 1/3 cup of salt.
  11. Cook the egg noodles in the salted water until just done. They should be slightly toothy and definitely not mushy.
  12. Drain the noodles.
  13. Add the noodles to the cooked cabbage along with the remaining 2 tablespoons of butter. Toss well.
  14. Taste and adjust salt and pepper.
Recipe Notes

Copyright © 2017 by VillaSentieri.com. All rights reserved.

Share this Recipe

Salsa Friulana d’Ivana (Ivana’s Friulan Tomato Sauce)

November 17, 2017

My mother-in-law grew up in the town of Treppo Grande in the Italian province of Friuli. Friuli is in northeastern Italy. It is the major portion of the region of Friuli-Venezia Giulia.

Her father and two uncles lived with their families in three houses that wrapped around a courtyard. Her grandmother lived in the same complex. The extended family included numerous cousins.

Another uncle moved to the United States with his wife and their son early on.  Two more children were born to them in the US.


Follow us on Twitter:  click HERE


At the age of 12, shortly after the end of World War II my mother-in-law, her brother (our Uncle Ray), and mother came to the States. Her father had been in the US working with the intention of bringing over the family but then the war broke out and the family could not be reunited until it ended.

One set of cousins stayed in Treppo Grande.  Another set of cousins moved to France.

In 1990 the “cousins,” as the US contingent called themselves, hatched a plan to organize a group trip to their hometown of Treppo Grande and to Digoin, France where the other set of “courtyard cousins” lived.

Naturally, planning for the trip required many “meetings” among the cousins; meetings that were fueled with copious amounts of food and alcohol interspersed with a little “business!”

The trip happened in August 1991. My husband and I went along with the “cousins” and their spouses.

The “United States” cousins and three of four spouses in Treppo Grande along with Carolina Fabbro, a friend of my mother-in-law’s mother.  She died a few years ago at more than 100 years of age.

We first met up in Paris for a day or two and did some sightseeing.

Afterwards, we were picked up in a small bus that had been arranged by Olvino, one of the original “courtyard cousins” who lived in Digoin. As I recall, the driver only spoke French. Among us we spoke English, Italian, Friulan (the language of Friuli), and a smattering of Spanish and German, but no French. Thankfully the driver knew where he was going and, for all other needs, we managed to communicate in some rudimentary, but effective, manner.

Interesting to me was that the vehicle had graph paper that kept a running record of the bus’s speed. Apparently the driver could be asked to produce the graph paper by the police and could be fined if it showed that he had exceeded the speed limit. Can you imagine that happening in the United States???

I was also fascinated when we stopped for lunch. The driver had a glass of wine. I will repeat that.  This professional bus driver had a glass of wine with lunch then got behind the wheel. Apparently, he was legally permitted to have one, just one, glass of wine and still drive.

Admittedly, one glass of wine is not going to get anyone’s blood alcohol level close to a level that produces intoxication but it pointed out that 1) the French are highly (overly?) regulated and 2) Europeans have a more relaxed approach to alcohol (probably to life in general, actually!).

I had a similar experience in 1994 when I did several consulting gigs in Europe. I frequently had lunch with physicians from the hospitals where I was consulting. Everyone (yes, everyone) had a glass of wine or beer with lunch and then went back to the hospital to work.

But I digress.

We spent several fun days in Digoin, where the local cousins had rented out a small hall, with a kitchen, because none of them had a house big enough to host all of us, and all of them, for meals.

There must have been six banquet tables shaped into a “U” around which we all sat. The crowd included not only those of us from the States, but the cousins who lived in Digoin along with their significant others, their children, and their children’s significant others.

Conversations frequently included four languages. The “cousins” typically spoke Friulan with each other. From there, the conversation would get translated into Italian, English, and French so that everyone could understand anything of interest to the group.

I don’t remember what we ate for dinner the first night except for the pasta which was sauced with a red sauce made by Ivana, Olvino’s wife.

I was transported by that sauce.

Tomato sauces in Friuli are different from the rest of Italy in that they have noticeable amounts of “warm” spices such as cinnamon, cloves, and nutmeg.  My mother-in-law makes a sauce similar to the one that Ivana makes but there are differences. For example, hers includes only beef. Today’s recipe, however, is a tribute to Ivana.

This is my interpretation of Ivana’s recipe. Since the original recipe contained a list of ingredients but no quantities, I had to figure out what worked.


Follow us


Click HERE to join our mailing list and you’ll never miss a recipe again!

Print Recipe
Salsa Friulana d'Ivana (Ivana's Friulan Tomato Sauce)
There should be a little bit of red-tinged oil floating on top of the sauce to improve the mouthfeel of the pasta—just a little. If you cannot find lean ground pork, you may want to grind your own. An actual meat grinder will work better than a food processor but if you’re using a food processor be careful not to grind the meat too finely. For the beef, I suggest using 93% lean. This recipe makes enough sauce for approximately 4 pounds of pasta. Extra sauce freezes well.
Votes: 0
Rating: 0
You:
Rate this recipe!
Prep Time 30 minutes
Cook Time 3 hours
Servings
cups
Ingredients
Prep Time 30 minutes
Cook Time 3 hours
Servings
cups
Ingredients
Votes: 0
Rating: 0
You:
Rate this recipe!
Instructions
  1. If using canned tomatoes rather than crushed tomatoes or tomato puree, pass the tomatoes through a food mill and reserve.
  2. Grind the pork if you cannot get ground pork in your market.
  3. Grind the garlic, onion, and parsley in a food processor. If you used a food processor for the pork, there is no need to clean it. Alternatively, chop them very, very finely by hand.
  4. Heat the olive oil in a heavy bottomed Dutch oven.
  5. Add the garlic-onion-parsley mixture. Sauté until the raw smell is gone.
  6. Add the ground beef and pork and sauté on high heat until the meat is browned.
  7. Add the tomato puree or crushed tomatoes.
  8. Add all remaining ingredients.
  9. Sage
  10. Rosemary
  11. Basil
  12. Bay leaves
  13. Cinnamon
  14. Cloves
  15. Nutmeg
  16. Simmer gently, partially covered, stirring frequently for approximately 2 ½ hours.
  17. Adjust salt and pepper during cooking.
  18. Toss approximately 1/4 of the sauce with one pound of cooked pasta.
Recipe Notes

Copyright © 2017 by VillaSentieri.com. All rights reserved.

Share this Recipe

Chicken Paprikash (Chicken with Paprika-Sour Cream Sauce)

November 13, 2017

I really don’t remember my Slovak grandmother doing much cooking. By the time I was old enough to pay attention to who was cooking, she was mostly just making the occasional pot of soup.

My Grandmother

My grandparents owned a semi-detached house and Uncle Frankie and Aunt Mary lived next door. Although they had separate front porches, they shared a back porch. Going back and forth was easy.


Follow us on Facebook:  Click HERE


Aunt Mary kept my grandparents well-supplied with food. My Aunt Ann pitched in from time to time as well.

My Grandfather

My grandparents were really keen on soup. I guess when you’re raising a family of seven sons through the Great Depression and its aftermath, on a steelworker’s income, preparing filling and budget-friendly food becomes a necessity.

After the early 1960s when my Uncle Gusty moved back to the United States from Japan with his wife and their children, all seven of my grandparents’ sons lived in Johnstown with their wives and children. Most of us would visit on Sunday afternoons arriving sometime after lunch and leaving before dinner.

My Grandfather and Father in the late 1960s. I used to wear the tie my dad is wearing to high school. I still have it! My father insisted that I tie a Full Windsor. Now I know where he got his preference!

Very frequently a large pot of soup would appear for anyone who needed a little something to hold him or her over till dinner. Often it would be potato soup or sour mushroom soup (made with dried mushrooms and spiked with a little vinegar). My father talked longingly about a sour cabbage soup called kissel which nobody was making any longer.

Other than soup, baba (sometimes written bubba), and sweets at the holidays, I don’t remember eating much at my grandparents’ house though I do remember my grandfather and my uncles consuming a fair amount of beer, and, on special holidays, shots of whiskey.

Me with my Grandparents in 1976

Most of the Slovak food that I ate was at home or at one of my uncle and aunt’s houses.

Chicken Paprikash is considered a Hungarian dish but it was common on the Slovak side of my family.  My grandfather was born in 1890 in a small town, Nitrianske Sucany, not too far from Bratislava, in what is now Slovakia.  My grandmother was born a few years later.  In 1909 when my grandfather came to America, he left what was then the Austro-Hungarian Empire.  Slovakia did not exist as a country.  Food diffuses with cultural contact (think about the popularity of Spam in both Hawaii and Korea which can be traced to the presence of the US military).  I suspect that’s how Chicken Paprikash became something made by my Slovak grandparents.

My version of Chicken Paprikash is a combination of my mother’s and my Aunt Ann’s. When I went to look up the recipe to make in preparation for this blog I discovered that I had never written it down! Luckily I remembered just how to do it.


Follow us


Click HERE to join our mailing list and you’ll never miss a recipe again!

Print Recipe
Chicken Paprikash
Using bone-in chicken with skin improves the flavor of the final dish. Flabby skin from braised chicken is not appetizing, however, so remove it near the end of cooking before putting the chicken in the finished sauce. Since paprika is the major flavor in this dish be sure to use fresh, high-quality paprika, preferably Hungarian. Sweet paprika was the norm in my family, not hot, and certainly not smoked which would totally change the flavor. You can use whatever chicken parts you prefer but I think the texture of slowly braised thighs is superior. Serve the chicken with buttered noodles or mashed potatoes, both of which go really well with the sour-cream-enhanced sauce.
Votes: 2
Rating: 5
You:
Rate this recipe!
Course Mains, Poultry
Cuisine Slovak
Prep Time 20 minutes
Cook Time 2 1/2 hours
Servings
people
Ingredients
Course Mains, Poultry
Cuisine Slovak
Prep Time 20 minutes
Cook Time 2 1/2 hours
Servings
people
Ingredients
Votes: 2
Rating: 5
You:
Rate this recipe!
Instructions
  1. Pat the chicken dry and season liberally with salt and pepper.
  2. Heat the oil in a large, heavy-bottomed sauté pan.
  3. Sauté the chicken on both sides, starting skin-side-down, until brown on both sides. Do not crowd the chicken. Do this in batches if necessary.
  4. Remove the browned chicken to a platter.
  5. Empty the oil from the pan and wipe clean.
  6. Add two tablespoons of butter. Sauté the diced onion until golden.
  7. Add the garlic and sauté until fragrant, approximately 1 minute.
  8. Add 3 tablespoons of paprika and sauté for approximately 15 seconds (paprika burns very easily).
  9. Add one cup of broth and mix well.
  10. Add the bay leaf, browned chicken pieces and any accumulated juices to the pan. Add additional salt and pepper to taste. Cover and braise on low until very tender, approximately 1 ½ hours being sure to taste for salt occasionally. Add additional broth if needed to keep the pan from drying out.
  11. About 15 minutes before the chicken is done, remove the skin and discard.
  12. When the chicken is fully cooked, remove it to a platter.
  13. Remove the bay leaf.
  14. Pour the cooking liquid, without straining, into a small pot and keep it warm on low heat. You can skim fat from the top of the cooking liquid if you would like.
  15. Wash and dry the pot used to cook the chicken. Melt the remaining 6 tablespoons of butter in that pot.
  16. Add the finely diced onion and sauté until golden.
  17. Add the flour and cook 2-3 minutes, until no longer raw.
  18. Add the remaining 1 tablespoon of paprika and sauté 15 seconds.
  19. With the flour-onion-paprika mixture on medium heat, begin to ladle in the reserved cooking liquid a little at a time, stirring well after each addition to avoid lumps.
  20. When all the cooking liquid has been incorporated, add any remaining chicken broth, if all of the original 2 cups was not used to braise the chicken.
  21. Bring to a boil and cook for one minute. The sauce should be quite thick. It will thin with the addition of sour cream. If the sauce is too thin, boil it longer as you will not be able to boil it once the sour cream has been added.
  22. Stir in the sour cream. Adjust salt and pepper. Add the chicken and heat gently without boiling.
Recipe Notes

Copyright © 2017 by VillaSentieri.com. All rights reserved.

Share this Recipe

Mom’s Ravioli

September 27, 2017

My strongest olfactory memory of childhood is gradually waking up on Sunday morning to the smell (perfume is a better characterization as far as I’m concerned) of garlic being sautéed in olive oil.

That was how most Sundays started.

My mother would get up early and start making her long-simmered Southern Italian Tomato Sauce (referred to as Ragu or Sugo if one’s Italian roots were close, “Gravy” if one grew up in New York or nearby, and often just “Sauce”). We unceremoniously called it “Spaghetti Sauce” though it was used on much more than spaghetti!

I think the better part of my culinary-cultural history is represented by that sauce. Every Italian family’s sauce is different, even if stylistic similarities can be identified. The sauces made by my mother and her two sisters that I knew, Aunt Margie and Aunt Mamie, were clearly related but also different. Each was good but it’s not as if they didn’t deviate from my Grandmother’s recipe. They were similar in that garlic and meat were browned in oil; tomato products, water, and seasonings were added; and the whole thing simmered for hours. The meats varied, the tomato products (tomato paste, tomato puree, whole canned tomatoes, etc.) and the proportions of them definitely varied as did the seasonings and other aromatics.

My mother’s “Spaghetti Sauce” to call it by its “historic” name, a name that I no longer use, is, without doubt, my most precious culinary treasure. I have only ever given the recipe out twice. In the 1970’s I gave it to John Bowker and his wife Margaret Roper Bowker. John was the dean of Trinity College in Cambridge, England. Recently I gave it to Robert Reddington and John O’Malley in Palm Springs after Bob lamented the loss of the recipe for the long-simmered tomato sauce he learned to make while living in Chicago.

With my mother’s sauce as the near-constant backdrop to our Sunday dinners, the rest of the meal varied. The sauce could be served with spaghetti or some other cut of dry pasta, or with my mother’s home-made fettuccine, or with ravioli. Although my favorite pasta is gnocchi, we never had those on Sundays as my father didn’t like them. Gnocchi (always home-made) were reserved for a weeknight meal during the times that my father worked out of town.

The sauce has an abundant amount of meat in it, pork, always cut in big pieces, never ground or chopped. Nonetheless, the pasta was often accompanied by my mother’s slow-cooked roast pork or maybe a roast chicken.

It seems incongruous now, but in the 1960s, before the widespread use of antibiotics, chickens were expensive! (I’m not in favor of the prophylactic use of antibiotics but I’m just saying that’s why chickens are relatively inexpensive now.) I still have a handful of my mother’s “City Chicken” sticks from the 1960s. They are round, pointed sticks slimmer than a pencil but thicker than bamboo skewers. Pieces of pork and veal would be skewered in alternating fashion on the sticks, breaded, and fried like chicken drumsticks. This was less expensive than chicken!!

City Chicken sticks

But back to Sundays…

Sometimes, after the sauce was bubbling away, my mother would make ravioli. Next to gnocchi, they are my favorite pasta, but manicotti and lasagna aren’t far behind.

We would eat our big meal around 1 PM on Sunday and my mother would get all of this done in time for that meal, including taking time to go to church, during which my Aunt Mamie, who lived upstairs, would be tasked with stirring the “Spaghetti Sauce.”

My mother’s (now my) ravioli mold.

Making ravioli in a group is a lot more fun. I also find that making the ravioli on a different day from the day they are cooked and eaten means that I am not as tired and I enjoy them more. The pictures in this post are from a Sunday when I got together with Rich DePippo, Susan Vinci-Lucero, and my in-laws, Marisa and Frank Pieri, to make ravioli. I think we made about 30 dozen ravioli!


Follow us


Click HERE to join our mailing list and you’ll never miss a recipe again!

Print Recipe
Mom's Ravioli
The filling can be made a day in advance and refrigerated, tightly covered. Ravioli freeze well. To do so, lightly flour a sheet pan that will fit in your freezer and put the ravioli in a single layer. Freeze about 30-45 minutes, until firm. Quickly put the ravioli in a zipper-lock bag and return to the freezer. Repeat with the remaining ravioli. My mother always made her dough by hand but I use a kitchen mixer and the beater, not the dough hook. Years ago, ground meat was not labeled with the percent fat. My mother would select a cut of sirloin, have the butcher trim off all visible fat and then grind it. I find that 93% lean ground beef replicates the experience.
Votes: 0
Rating: 0
You:
Rate this recipe!
Prep Time 2 hours
Passive Time 30 minutes
Servings
people
Ingredients
Filling
Dough
Prep Time 2 hours
Passive Time 30 minutes
Servings
people
Ingredients
Filling
Dough
Votes: 0
Rating: 0
You:
Rate this recipe!
Instructions
Filling
  1. Put the frozen spinach in a small saucepan. Add a few tablespoons of water. Cover and cook, stirring occasionally, until the spinach is completely thawed.
  2. Pour the spinach into a large sieve.
  3. After the spinach has cooled enough to handle, squeeze handfuls of the spinach to remove as much liquid as possible.
  4. Heat the olive oil in a 12-inch sauté pan until shimmering. Add the beef.
  5. Cook over high heat until the liquid has evaporated, breaking up the meat while cooking.
  6. Reduce the heat to medium and add the garlic, 1 teaspoon of salt, and black pepper to taste. Continue to sauté for 2-3 minutes more.
  7. Add the spinach to the beef.
  8. Continue to cook over medium to medium-low heat while breaking up the spinach and completely combining it with the beef.
  9. When the beef and spinach are well combined and no obvious liquid remains in the pan, add the beaten egg. Stir well and cook two minutes more. The egg should completely incorporate into the filling and no longer be visible.
  10. Adjust salt and pepper.
  11. On low heat, add 1/4-1/3 cup of breadcrumbs and combine well to absorb any remaining liquid or oil. If necessary to absorb any remaining liquid, add another tablespoon or two of breadcrumbs. If you cooked off all the liquid when browning the beef, and used lean beef, 1/3 cup of breadcrumbs should be enough.
  12. Cool the filling to room temperature before filling the ravioli.
Dough
  1. Put the flour, egg, and egg whites in the bowl of an electric mixer outfitted with a paddle.
  2. Mix on low until combined.
  3. Add the water, a little at a time, until the dough just comes together. The dough should not be the slightest bit tacky. You may not need all the water.
  4. Remove the dough from the mixer and roll into a log. Cover with a kitchen towel and allow to rest for 15 to 30 minutes before rolling out.
Assembly
  1. Set up your pasta machine, either a hand crank version or an attachment for your mixer.
  2. Cut off a small handful of dough.
  3. Flatten the dough, dust with flour, and run it through the pasta machine on the thickest setting.
  4. If the dough is catching on the rollers it may be too wet. Sprinkle liberally with flour.
  5. Run the dough through the same setting one more time.
  6. Run the dough through the pasta machine narrowing the setting by one notch each time. If the dough is getting too long to cover much more than two lengths of the ravioli mold, cut off the excess and continue.
  7. When rolling out the dough, use slow, even motion. If the dough is not rolling out to the full width of the machine, or at least wide enough to cover the width of the ravioli mold, fold it in half crosswise and run it through the machine again on whatever the last setting was.
  8. If the dough is not rolling out smoothly, and the issue is not that it is too damp, run the dough through the machine again on the same setting.
  9. On most pasta machines with five settings for thickness, you will want to stop rolling out the dough on the next-to-thinnest setting.
  10. Put the rolled out dough on a lightly floured surface and cover with a kitchen towel. Repeat with 2 or 3 more portions of dough.
  11. Allow the remaining dough to rest, covered, while filling and cutting the first batch of ravioli.
  12. To fill the ravioli, take the rolled out dough and lay it across the ravioli mold.
  13. Add a slightly rounded teaspoonful of filling to each ravioli. Do not overfill or the ravioli may break when being cooked.
  14. Fold the dough over the top.
  15. Lightly pat the top sheet of dough.
  16. Using a rolling pin, cut the dough along the zig-zag edges. Be careful to fully cut through the dough around the edges as well as between each raviolo.
  17. Remove the ravioli and place on a lightly floured surface. Cover lightly with a kitchen towel.
  18. Repeat with the remaining dough and filling.
  19. Cook, refrigerate, or freeze the ravioli.
Recipe Notes

Copyright © 2017 by VillaSentieri.com. All rights reserved.

Share this Recipe

Tiella (Southern Italian Vegetable and Pasta Casserole)

September 18, 2017

When I was growing up, we mostly socialized within the extended family plus a very few close family friends (that’s you, Joe and Betty Slivosky!).

It was a time (the 60’s) and place (small-town Western Pennsylvania) where it was rare to call in advance of a visit. One just showed up. This usually happened in the evening after dinner, though almost never on Monday or Thursday when the stores downtown were open until 9 PM and we dressed and went shopping after dinner.

Everyone would sit around (usually in the kitchen) drinking coffee (with caffeine), chatting…and smoking. Oh, the smoking! Occasionally the men would drink beer but unless it was a holiday or celebration of some sort, hard liquor was a rarity.

On Sundays, visiting frequently occurred (or at least started) in the afternoon and there might be two or three stops before heading home.

I can’t tell you how many times I heard the same stories. It’s one of the ways I developed a connection with family members, like my maternal grandparents, who died when I was very young.

To be sure, sometimes my cousin Donna and I would abandon the adults and pursue some childhood activity but we still hung out in the kitchen much of the time.

Often times the conversation would veer towards food; things my grandmother would make, the huge platters of cannoli one of my great aunts would make, what was eaten on holidays, and on and on.

There was the oft-repeated reminder of how my grandfather could come home late at night with a group of friends and how my grandmother would cook for them near midnight. There were stories of my grandmother cleaning and cooking chicken feet. My mother would talk about the time she killed a chicken in the basement and it got away from her and ran, headless, around the room. My father would remind everyone that the only food he didn’t like was gnocchi.

Food was a central feature of our lives.

So was conversation.

There were also times I would just sit in the kitchen and chat with my mother for hours. Relatives and food were common topics of conversation. There were dishes my grandmother made that I heard about over and over but never tasted because my mother never made them for some inexplicable reason. One of them was a quickly sautéed veal chop with a pan sauce made of the drippings in the pan, crushed canned tomatoes, peas, and seasonings. Back in the days when I cooked veal, I actually made it. Now I do it with pork chops.

The other dish that stands out in my memory from these conversations is Tiella. My mother talked of it frequently but never made it. The instructions were basic, a layer of pasta, a layer of potatoes, a layer of zucchini, and a can of tomatoes crushed by hand and poured on top. The whole thing was then baked. There wasn’t much of a discussion of which seasonings to use or proportions of ingredients. It was just assumed it would have garlic (of course it would have garlic) and the herbs that were commonly used in our family. Proportions…well…it just needed to look “right.”

For the number of times my mother rhapsodized about this dish, I can’t figure out why she never made it.

The first time I tried to make it was in the early 1990’s at our little house on Griffin Street in Santa Fe. That first time around, it didn’t live up to the hype, for sure, but it christened the house in an odd way.

In November 1992 my mother, my husband’s mother, and my husband’s grandmother traveled to Santa Fe with us for Thanksgiving week. We looked at property and fell for a little (1151 square foot) house on Griffin Street. My mother was terminally ill at the time. When we got back home, my mother insisted that we use her money for the down payment, which we did. She kept saying that she wanted to live long enough to return to that house in the spring. It didn’t happen. She died in early January.

All of the kitchen gear, china, and glassware for the house on Griffin came from my mother’s house. So, it was fitting that I should make this dish for the first time using my mother’s kitchenware in a house that we owned thanks to her.

It took me many years of working (off and on) on the seasonings and proportions to get it to taste great. (Well, I think it does.) The only real liberty I took with the dish is to use fresh tomatoes rather than canned when I make this in the summer.


Follow us


Click HERE to join our mailing list and you’ll never miss a recipe again!

Print Recipe
Tiella (Southern Italian Vegetable and Pasta Casserole)
This is a wonderful late summer dish when tomatoes are at their peak. If you make it at other times, use a 28 ounce can of whole tomatoes in place of the tomato puree and fresh tomatoes. Pour the liquid in the can over the potatoes instead of the puree. Crush the tomatoes by hand, add the seasonings described for fresh tomatoes, and arrange the crushed tomatoes on top.
Votes: 0
Rating: 0
You:
Rate this recipe!
Prep Time 1 hour
Cook Time 2 hours
Passive Time 30 minutes
Servings
people
Ingredients
Prep Time 1 hour
Cook Time 2 hours
Passive Time 30 minutes
Servings
people
Ingredients
Votes: 0
Rating: 0
You:
Rate this recipe!
Instructions
  1. Preheat the oven to 350°F.
  2. Combine the olive oil and crushed garlic in a small sauté pan. Sauté garlic until lightly browned. Remove the garlic and reserve the oil.
  3. Put the raw ditalini in the bottom of a deep, circular casserole, approximately 10 inches in diameter. The pasta should form a single layer with a fair amount of extra room for it to expand.
  4. Add 2 tablespoons of Parmesan cheese, ¼ of the minced garlic, and 2 tablespoons of the garlic oil and mix well.
  5. In a bowl, toss the sliced potatoes with half the rosemary, ⅓ of the oregano, ¼ of the basil, 2 tablespoons of Parmesan cheese, ¼ of the minced garlic, 2 tablespoons of the garlic oil, and a generous amount of salt and pepper.
  6. Arrange the potatoes neatly in overlapping layers on top of the ditalini. Do not wash the bowl.
  7. Season the tomato puree with salt and pour over the potatoes.
  8. In the same bowl used for the potatoes, toss the zucchini with the remaining oregano, ¼ of the basil, the remaining rosemary, 2 tablespoons of Parmesan cheese, ¼ of the minced garlic, 2 tablespoons of the garlic oil, and a generous amount of salt and pepper.
  9. Arrange the zucchini on top of the potatoes. Do not wash the bowl.
  10. Neatly arrange half the tomatoes on top of the zucchini. Season with half the remaining minced garlic, half the remaining basil, and salt and pepper.
  11. Arrange the remaining tomatoes on top and season with salt and pepper as well as the remaining garlic, basil, and all the parsley.
  12. Put the tiella in the preheated oven.
  13. Remove the crusts from several slices of day-old Italian or French bread. Whiz the bread in a food processor to make coarse crumbs.
  14. While the tiella bakes, toss the breadcrumbs with the remaining garlic oil in the bowl used for the potatoes and zucchini.
  15. After the tiella has baked for 90 minutes, sprinkle the oiled crumbs on top and bake till golden, approximately 30 minutes more.
  16. Allow to rest at least 30 minutes before serving. The tiella can be served warm or at room temperature. It can also be reheated in the oven briefly before serving, if desired.
Recipe Notes

Here’s the link for my recipe for homemade tomato puree (passata di pomodoro).

Copyright © 2017 by VillaSentieri.com. All rights reserved.

Share this Recipe

Pasta con Salsa Cruda (Pasta with Uncooked Tomato Sauce)

September 8, 2017

Pasta with a sauce of uncooked tomatoes, herbs and aromatics is one of the delights of late summer. While this is very easy to make, and only a few tomatoes are needed, the tomatoes must be vine-ripened.

If you have just one tomato plant you’ll probably have enough tomatoes to make a batch of Salsa Cruda. Farmers Market tomatoes are a good option this time of year, too.

Some of our tomato plants in front of the greenhouse and behind mesh to protect them from deer

I make this with our home-grown tomatoes which are always red but using some of the amazing heirloom tomatoes in colors of yellow, green, or purple available in farmers markets would make a dramatic sauce.

Colorful heirloom tomatoes on the bar at The Kirby Hotel in Douglas, Michigan: @thekirbyhotel

If you can’t get vine-ripe tomatoes, or you want to make a similar sauce at a time other than late summer, you can use two or three roasted red peppers in place of the tomatoes. I’ll be posting a recipe for roasted peppers next month, after tomato season is over. In a pinch, you can buy a jar of good-quality roasted peppers.

Although this recipe is not a traditional “family of origin” recipe it is one that I have been making for almost 30 years. I consider it to be one of my traditions.

While you can still get vine-ripened tomatoes, give this easy and delicious recipe a try.


Follow us


Click HERE to join our mailing list and you’ll never miss a recipe again!

Print Recipe
Pasta con Salsa Cruda (Pasta with Uncooked Tomato Sauce)
This makes enough sauce for one pound of pasta. Use pasta with a shape that will hold the sauce, such a small shells or fusilli. Although you can make the sauce in the time it takes the pasta water to come to a boil, it is better if the sauce is allowed to sit at room temperature for about an hour to allow the flavors to meld. Since the sauce is not hot, it is important to warm the serving bowl with boiling water just before using. I usually put some of the pasta-cooking water to warm the bowl. The optional aromatics (hot peppers, kalamata olives, and blue cheese) are really optional but definitely help to round out the flavor.
Votes: 0
Rating: 0
You:
Rate this recipe!
Prep Time 15 minutes
Cook Time 15 minutes
Passive Time 1 hour
Servings
people
Ingredients
Prep Time 15 minutes
Cook Time 15 minutes
Passive Time 1 hour
Servings
people
Ingredients
Votes: 0
Rating: 0
You:
Rate this recipe!
Instructions
  1. Coarsely chop the hot pepper.
  2. Coarsely chop the garlic.
  3. Combine olive oil, garlic, and hot peppers, if using, in the food processor.
  4. Process until finely chopped.
  5. Add basil, parsley, Parmesan cheese and Kalamata olives, if using.
  6. Pulse a few times to chop.
  7. Add tomatoes, blue cheese, if using, salt, and black pepper and pulse until finely chopped, but not pureed.
  8. There should definitely be some texture to the sauce.
  9. Bring three quarts of water to a rolling boil.
  10. Season the water with 1/3 cup of salt.
  11. Add the pasta and cook until al dente.
  12. When the pasta is done, reserve about ½ cup of the pasta-cooking liquid to thin the sauce if needed.
  13. Drain the pasta.
  14. Drain the hot water from the serving bowl. Add the pasta and sauce to the warmed bowl. Toss well.
  15. If needed, thin the sauce with some of the reserved pasta water. This will likely not be the case but it is always a good idea to have some pasta-cooking water available just in case.
Recipe Notes

Copyright © 2017 by VillaSentieri.com. All rights reserved.

Share this Recipe

Carne di Manzo in Umido (Thinly Sliced Beef in Tomato Caper Sauce)

August 30, 2017

As I am writing this, my husband’s Great Aunt Fidalma and cousin Massimo are visiting us from Tuscany. We’ve had quite a week of eating and drinking.  Every night, actually, was something like a party. At the lowest head count we were 6, but more often 9, and once 20!

From left to right: Massimo, me (holding Abby), my father-in-law, Zia Fidalma, Zia Ida, my mother-in-law.

Last night I fried a bunch of zucchini flowers to accompany cocktails. Zia Fidalma made little elongated meatballs (polpette) with ground beef and mortadella seasoned with onions, garlic, and herbs. I made risotto with mushrooms and my mother-in-law made long-simmered green beans in tomato sauce, something like my green beans in tomato sauce with bacon.

Risotto with Mushrooms, Meatballs, Green Beans in Tomato Sauce

While we were sitting at the table after dinner doing what Italians do (talking about growing food, talking about preparing food, talking about food we’ve eaten, and talking about the next meal) Zia Fidalma started to describe a dish of thinly sliced beef cooked in tomato sauce with capers.

“Carne di Manzo in Umido!” I said.  She concurred.

I told her that Carne di Manzo in Umido was, in fact, the long-planned blog post for Wednesday.

It is a dish I had at her home in Tuscany about 20 years ago. I wrote down the recipe in a combination of English and Italian and American and Metric measures sitting at her kitchen table. It took me a while to get it right but I think I’ve nailed it.

Here’s a quick rundown of the food we’ve had over the past week:

August 23rd: Pasta with Zucchini, Chicken Thighs braised in Red Wine and Balsamic Vinegar, Salad, Cherries in Brandy, Homemade Limoncello, and Homemade Bay Leaf Liqueur (being posted in October).

Cherries in Brandy
Homemade Limoncello

August 24th: Tiella (being posted in September), Grilled Hot and Sweet Italian Sausage, Grilled Broccolini drizzled with Olive Oil, and more Cherries in Brandy, Homemade Limoncello, and Homemade Bay Leaf Liqueur.

August 25th: Zia Fidalma’s Rouladen (German, I know, but Zia Fidalma lived in Germany for many years), Mashed Potatoes, Corn on the Cob and, you guessed it, more Cherries in Brandy, Homemade Limoncello, and Homemade Bay Leaf Liqueur.

Zia Fidalma making the filling for her rouladen
A watchful eye on the cooking rouladen
Rouladen bubbling away
Zia Fidalma and a platter of rouladen
Me making mashed potatoes (with a side of bourbon)

August 26th (for 20 people): A Massive Antipasto Platter thanks to cousins Paul and Kim Phillips (and a shopping spree at Cheesemongers of Santa Fe), Baked Penne with Ham, Peas, Mushrooms and Roasted Garlic Besciamella, Porchetta, Corn Sautéed in Butter, Sformato di Spinaci, and Italian Almond Torta with Raspberries and Plum Crostata (thanks to Rich DePippo). Then there were those ever-present Cherries in Brandy, Homemade Limoncello, and Homemade Bay Leaf Liqueur.

Kim and Paul fortify themselves at the Santa Fe Farmers Market before heading off to a marathon shopping session at Cheesemongers of Santa Fe
Antipasto
A bit more antipasto
Baked Penne with Ham, Peas, Mushrooms and Roasted Garlic Besciamella
Porchetta
Sformato di Spinaci
Almond Torta with Raspberries and Plum Crostata

August 27th brought some sanity as we had leftovers from the 26th. (We could still feed a small army with the remains of Paul and Kim’s Antipasto Shopping Spree.)

August 28th: As described above, meatballs, risotto, and green beans.

I neglected to mention that we went through cases of wine and then there was a dark chocolate cake from Chocolate Maven Bakery in Santa Fe that kept making its appearance most nights right before we broke out those cherries.

Dark Chocolate Cake from Chocolate Maven Bakery

Eating will slow down a bit now that the relatives have left. As I finish writing this the house is perfumed from a large pot of chicken broth that will get portioned and frozen ready to be pulled out of the freezer in the coming weeks for wave after wave of risotto made with the freshest vegetables the market has to offer.


Follow us


Click HERE to join our mailing list and you’ll never miss a recipe again!

Print Recipe
Carne di Manzo in Umido
Thinly sliced beef is browned and then simmered in the barest amount of tomato sauce with an array of herbs. A bit of capers round out the flavors.
Votes: 0
Rating: 0
You:
Rate this recipe!
Course Mains, Meats
Cuisine Italian
Prep Time 20 minutes
Cook Time 2 hours
Passive Time 1 hour
Servings
people
Ingredients
Course Mains, Meats
Cuisine Italian
Prep Time 20 minutes
Cook Time 2 hours
Passive Time 1 hour
Servings
people
Ingredients
Votes: 0
Rating: 0
You:
Rate this recipe!
Instructions
  1. Herbs, clockwise from top right: nepita, bay leaf, sage, rosemary, oregano.
  2. Combine the flour and 1 ½ teaspoons of salt. Mix well.
  3. Pound the steak lightly with a mallet.
  4. Season the steak with salt and pepper. Cut the pieces in half if they are too large after pounding.
  5. Dredge the steak in the seasoned flour and reserve. It is best to do this about an hour in advance as the flour will adhere to the meat better.
  6. Bruise the garlic with the side of a large chef’s knife.
  7. Put a thin film of olive oil on the bottom of a very large sauté pan. Heat over medium high heat.
  8. When hot, add as much of the beef as will fit without crowding in a single layer. Add half the garlic.
  9. Sauté the meat and garlic until the meat is browned on both sides.
  10. Remove the browned meat to a platter. Repeat with the remaining meat and garlic, in however many batches are needed.
  11. If the garlic starts to turn dark brown, remove it or it will become bitter.
  12. When all the meat is browned return it to the pan with any accumulated juices. Leave the cooking oil in the pan.
  13. Try to arrange the meat so that the pieces overlap rather than putting one piece of meat directly on top of another.
  14. Add all the other ingredients except the capers.
  15. Cover and simmer gently until meat is tender flipping the meat every 20 minutes or so. It will take at about one and one-half to two hours to get the meat tender depending on the cut and your elevation.
  16. Add water from time to time if the sauce boils away.
  17. Rinse the salt off the capers and add them during last five minutes of cooking. Taste and adjust salt and pepper.
  18. There should be a very small amount of sauce along with oil that is red from the tomato. Do not remove the oil, it adds significantly to the mouthfeel of the sauce.
Recipe Notes

Copyright © 2017 by VillaSentieri.com. All rights reserved.

Share this Recipe

Calabacitas: A New Mexican Classic

August 21, 2017

Talk about a dish that simply wouldn’t exist in any recognizable form without new world crops, calabacitas is it! Squash, corn, and chile are all new world plants.

Calabacitas is Spanish for zucchini but is also the name given to a dish of zucchini, corn, and (usually) green chile.

Often served as a side dish, calabacitas makes an awesome burrito, too. Accompany it with some frijoles (and probably a tortilla or three) and you’ve got a great high-protein vegetarian dinner. Leave out the cheese and it’s vegan! Truth be told, I’m plus-minus on the cheese in any case. When serving this for company I usually sprinkle cheese on top as in this recipe, but if it’s just for “us,” cheese isn’t usually even a thought.

This is the time of year to serve the most sublime calabacitas possible as zucchini, corn, green chile, and tomatoes are all in the farmers’ market. But calabacitas is too good to be had only a few weeks a year and, honestly, versions made with frozen corn, canned tomatoes, and roasted green chile that you’ve squirreled away in your freezer along with the ever-present zucchini in the produce aisle are too good to pass up any time of year.

For me, calabacitas shares a serious failing with succotash. They are both great ideas in my estimation but the execution often falls flat.

When I set out to finally perfect a version of calabacitas that I felt comfortable serving, I thought back on all the less-than-perfect renditions I’d had since I first set foot in New Mexico in 1991.

The litany of offenses includes being too watery, being too rich, having huge chunks of zucchini that seem mismatched next to corn kernels, being under-seasoned and being aggressively seasoned.

That set out a plan of action for me. The zucchini should be cut approximately the same size as corn kernels. There needed to be a minimum amount of liquid in the finished dish. Loads of cream or butter or cheese were out of the question. The seasoning should complement the vegetables, not assume control of the dish.

Zucchini (the namesake vegetable) and corn were a given. Pretty much everything else was up for grabs. Tomatoes, which are sometimes included, seemed right for color and a bit of acidic brightness that the zucchini and corn lack. They have the added bonus of being another New World crop. Roasted green chile, also sometimes included, was right for several reasons. It screamed “New Mexico,” it would add a bit of complimentary smokiness to the blend, and, honestly, I’m a chile-head.

My preference was for hot or extra-hot chile. This is wrong for several reasons. First, calabacitas is not traditionally a spicy dish. Second, after one of the dinners where I tested out my evolving recipe, one of the guests said that it was unfortunate that the entire “calabacitas conversation” that evening centered on how hot it was and not on how good it was.

In cooking I prefer to bow to tradition but if there’s ever a place where I butt heads with tradition, it’s in making dishes spicy. But I decided there and then that I should follow tradition and use mild chile in my calabacitas.

Finally I was on to the aromatics and seasoning. Onion and garlic are my go-to combination unless there is some compelling reason for one or the other (usually based on tradition). The herbs eluded me for a while. I really wanted to use Mexican Oregano (which isn’t actually oregano) because of its New World origins but it just seemed to overpower the dish. In the end, I decided that a modest amount of Mediterranean Oregano played best in the sandbox with the other ingredients.

Let me know what you think of my rendition of a New Mexico classic.


Follow us


Click HERE to join our mailing list and you’ll never miss a recipe again!

Print Recipe
Calabacitas: A New Mexican Classic
Traditionally calabacitas is not a spicy dish so it is best to use mild roasted green chile unless you and all your eaters are chile heads. Bacon fat gives a great flavor but olive oil or other vegetable oil is fine, too. Frozen corn works well as there are so many other flavors in the dish but using fresh corn cut off the cob is a definite treat. I prefer to thaw frozen corn before cooking. Ice crystals can sometimes carry a "freezer" taste and rinsing them off can eliminate it. Also, it is easier to time the cooking of the corn in combination with other ingredients if it is not frozen when cooking starts. Rotel packs tomatoes in 10 ounce cans and they’re a bit of a Southwestern classic in and of themselves. In a pinch feta cheese can be used instead of Cotija
Votes: 0
Rating: 0
You:
Rate this recipe!
Prep Time 40 minutes
Cook Time 30 minutes
Servings
people
Ingredients
Prep Time 40 minutes
Cook Time 30 minutes
Servings
people
Ingredients
Votes: 0
Rating: 0
You:
Rate this recipe!
Instructions
  1. Dice the zucchini.
  2. Thaw the corn under running water.
  3. Roasted New Mexico green chile.
  4. Peeled and seeded chile, ready to be chopped.
  5. Sauté the onion until translucent.
  6. Add the garlic and continue to cook until the onion is golden but not brown.
  7. Add the zucchini and sauté until the zucchini is hot.
  8. Add the corn, green chile, tomatoes, oregano, salt, and pepper.
  9. Simmer until the liquid has evaporated and the zucchini and corn are cooked, about 10-15 minutes, depending on your preference.
  10. Adjust oregano, salt and pepper in the last few minutes of cooking.
  11. Serve sprinkled with crumbled Cotija cheese.
Recipe Notes

Copyright © 2017 by VillaSentieri.com. All rights reserved.

Share this Recipe