Barbecued Chicken Thighs

July 25, 2018

For someone who tries to eat lower on the food chain, I sure love using my smoker.

Granted, I could smoke things like cheese and even some vegetables but meat is where the smoker really shines!

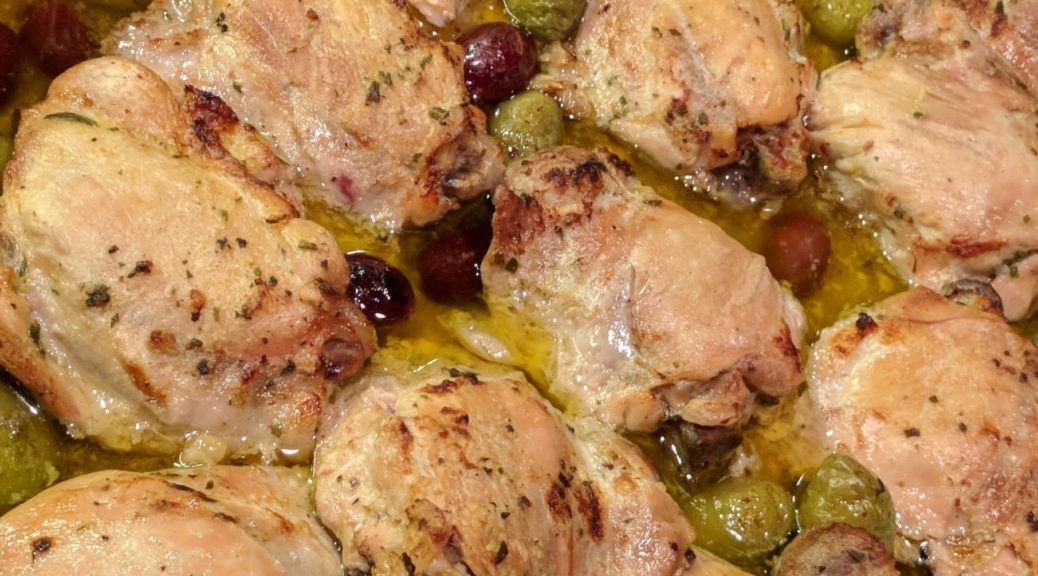
I’ve smoked pork shoulders, ribs, and turkey breasts, and I continue to expand my repertory, but I really enjoy smoking chicken thighs.

Smoking is often an all-day affair.  Sometimes it’s an all-night affair if one is smoking large enough pieces of meat.  So far, I’ve limited myself to smoking things that can go into the smoker at a reasonable time of the day.  I’m not one of those guys who wants to sit beside his smoker through the night with a cooler of beer at his side!

Join our mailing list and you’ll never miss a recipe again!

Chicken thighs cook in a relatively short period of time so they’re great when you want to limit attending to the smoker to just a few hours before dinnertime.

My smoker has an adjustment for the heat output but not temperature, per se. If the wind or external temperature change, the internal smoker temperature changes, too. Some day I’ll get a smoker with an actual thermostat but so far this one has served me well.

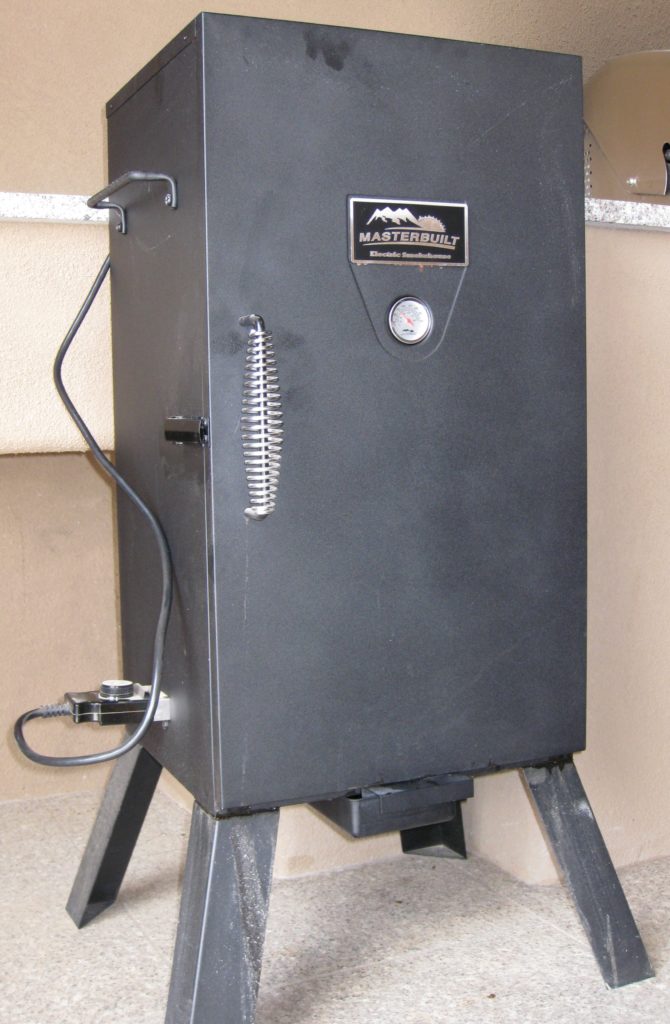
If you get a smoker with an automatic thermostat there would be almost no need to attend to the chicken thighs.  While I have a nice smoker, it doesn’t have a thermostat.  It has a control that puts out an adjustable but then constant amount of heat based on the setting similar to the way car heaters used to work before cars had real thermostats.  If the outdoor temperature or wind changes, the temperature inside the smoker will change due to the constant heat output.

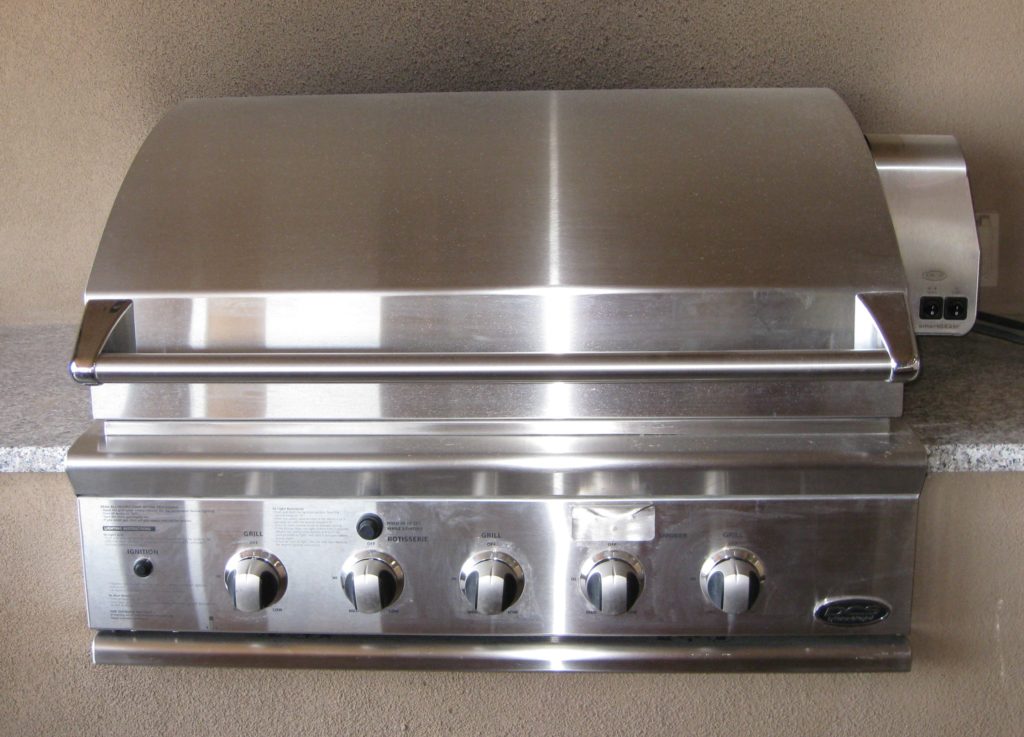
Before I had a smoker, I used my gas grill to smoke.  It has a separate burner just for creating smoke from wood chips.  It has three other burners to actually cook the food plus a rotisserie burner.  Under many circumstances, the burner for the wood chips puts out enough heat to keep the grill at the proper smoking temperature.  When the weather turns cold, like the time I smoked a turkey on Thanksgiving, a little heat from one of the other burners is needed…just not a burner that’s actually under the food.

I sometimes use my gas grill to smoke things, including a whole turkey once.

This recipe makes use of two of my previously published recipes, my barbecue rub and my barbecue sauce.

Follow us on your social media platform of choice


If you don’t have a smoker (and I realize that most people don’t) you really can do these on a grill with indirect heat, either gas or charcoal.

Put on oven thermometer on the grate where you intend to put the chicken.  There should not be any heat coming from under that grate.  Heat up the opposite side of the grill using either gas or charcoal.  With a little experimentation, you’ll be able to keep the side of the grill, where the chicken will go, at the proper smoking temperature.  If your grill doesn’t have a separate place for wood chips, add some wood chips, soaked in water for 30 minutes, to the hot part of the grill from time to time.

Happy smoking!!! (Oh, and don’t forget the beer!)

Print Recipe
Barbecued Chicken Thighs
These chicken thighs are moist and fall-apart tender. See the Notes section for links to my recipes for barbecue rub and barbecue sauce. Professional kitchens often weigh liquids, hence the 4000 grams of water. 4000 grams would essentially be the same as 4 liters. The advantage of weighing the water, though, is that you can add ice to cool the brine down while still being exact about the quantity of water. This recipe scales easily.
Votes: 0
Rating: 0
You:
Rate this recipe!
Course Mains, Poultry
Cuisine American
Prep Time 40 minutes
Cook Time 4 hours
Passive Time 2 hours
Servings
people
Ingredients
Course Mains, Poultry
Cuisine American
Prep Time 40 minutes
Cook Time 4 hours
Passive Time 2 hours
Servings
people
Ingredients
Votes: 0
Rating: 0
You:
Rate this recipe!
Instructions
  1. Dissolve the salt in the water.
  2. Refrigerate the brine until cold. If you are weighing the water, you can add ice cubes to cool the brine quickly.
  3. Add the chicken thighs and weigh them down with a plate or a zipper lock bag full of water. Brine for two hours in the refrigerator.
  4. Remove the chicken thighs and pat them dry.
  5. Lay the chicken thighs skin-side down.
  6. Sprinkle liberally with garlic powder.
  7. Sprinkle with oregano.
  8. Sprinkle with barbecue rub.
  9. Wrap the skin around thigh, trying to enclose the meat as much as possible. Tie with twine.
  10. Rub the thighs generously with barbecue rub.
  11. Smoke at 225°F for 4 hours.
  12. Fifteen minutes before thighs are done, brush with barbecue sauce. Continue cooking for 15 more minutes.
Recipe Notes

Here is where you will find my recipe for barbecue rub and my recipe for barbecue sauce.

Copyright © 2018 by Villa Sentieri, LLC. All rights reserved.

Share this Recipe

Maraschino Cherry Cake

July 18, 2018

In  September 2012, at a wine paring dinner at The Compound Restaurant in Santa Fe during the holy days of Santa Fe Wine and Chile Fiesta, a group of us hatched an idea to start a dinner group.

After a lot of discussion and email exchanges, we decided to name the group Santa Fe Ate, both for what we do and for the (play on the words regarding the) number of people in the group.

From the “Things You Can Cook in a Wood-Burning Oven” dinner: Roasted Cauliflower with whipped Goat Cheese, Ricotta, and Olive Oil Dip and Cannellini alla Toscana

We had our first dinner in January 2013 and we’ve been going strong ever since.  We meet about once every three months, rotating houses.  At each dinner we decide the theme for the next dinner.  This may not be the best time to make such a consequential decision given the amount of alcohol typically consumed.  For example, one of our themes was French Indo-China 1920s to 1930s!

Join our mailing list and you’ll never miss a recipe again!

Frank and Doug don’t really cook so their group assignment is always to come up with a signature cocktail and appropriate wine pairings for each course.  They have leeway to be creative in finding or creating a cocktail, which they have to do for even for cultures where drinking alcohol is not really common.  If the theme of the dinner relates to a wine producing region, the wines are generally from that region to the extent feasible.

From the French Indo-China 1920s to 1930s dinner: Cambodian Fish Amok (Fish and Coconut Milk Curry Baked in Banana Leaves)

The other six of us do successive rounds of emails refining the list of dishes to be prepared and organizing them into courses.  Our task is to be as authentic to the theme as possible.

French Indo-China 1920s to 1930s was probably our most narrow theme.  Others have included, for example, Summer in Provence, Winter in Friuli, Along the Silk Road, Persia (not Iran but Persia), Comfort Food, and Things You Can Cook in a Wood-Burning Oven (for which the entire meal was cooked in our outdoor wood-burning oven).

The only meal we’ve had which strayed from the basic plan was Timballo.  Timballo is a (typically large) pastry-encased and baked dish of layered pasta, hardboiled eggs, cheese, meatballs, and other meats, all moistened with tomato sauce.  Each of the cooks was assigned one or more components of the timballo to make at home.  We got together to assemble and bake the final dish.  This was a multi-hour process, even with all the prep work done in advance.

Unmolding the timballo

To help pass the time, Frank and Doug devised a blind wine-tasting in which we had to try to identify the varietal and provenance of each wine.  I believe the eight of us tasted six bottles of wine.  After we finished those, we opened some more.  This was the dinner at which we decided the theme of French Indo-China 1920s to 1930s.  You may notice a correlation between alcohol intake and unusual dinner themes!

Follow us on your social media platform of choice


Earlier this year, our theme was Betty Crocker’s Picture Cook Book, first edition, published in 1950.  Every dish had to come from the cookbook with no changes, substitutions or updating unless absolutely necessary.  One of the appetizers was anchovies rolled around cornichons!

Betty Crocker’s Picture Cook Book, 1950, First Edition

The food was actually surprisingly good.  I suspect part of that was related to how each of us selected our dish or dishes (Becky, who did appetizers selected three!).  The wines were, undoubtedly, fabulous.  In the United States, if you were drinking wine in the 1950s you were likely drinking French wine, and good French wine, at that!  On that night, so were we!

I made a Maraschino Cherry Cake with Almond Crème Filling and Maraschino Boiled Frosting.  Though if I were making the cake again, I would probably substitute my recipe for Italian Pastry Cream for Betty’s Crème Filling, I really wouldn’t make any other changes.

Here’s the recipe directly from the first edition of the Betty Crocker Picture Cookbook with a few minor adaptions of the technique by me.  For you bakers out there, I’m providing the original sea-level measurements as published in the cookbook.  Since I baked this at nearly 8000 feet in elevation, I followed Betty’s recommendations for adjusting for high altitude.

Getting ready to make Maraschino Cherry Cake
Print Recipe
Maraschino Cherry Cake
You can divide the work for this cake over several days. The filling can be made up to three days in advance and refrigerated, tightly covered. Stir in the toasted almonds just before using. The cake layers can be made a day in advance, wrapped tightly and refrigerated. The frosting should be made when you’re ready to frost the cake. The original recipe called for “rich milk” in the almond crème filling. Remember, this recipe was published before the advent of homogenized milk. Half-and-half is a good substitute. Except in professional recipes, it is rare to see egg whites measured in volume but it is a very good idea as the white, much more than the yolk, varies with the size of the egg.
Votes: 0
Rating: 0
You:
Rate this recipe!
Prep Time 1 hour
Cook Time 1 1/2 hours
Passive Time 6 hours
Servings
people
Ingredients
Maraschino Cherry Cake
Almond Crème Filling
Maraschino Cherry Cooked Frosting
Prep Time 1 hour
Cook Time 1 1/2 hours
Passive Time 6 hours
Servings
people
Ingredients
Maraschino Cherry Cake
Almond Crème Filling
Maraschino Cherry Cooked Frosting
Votes: 0
Rating: 0
You:
Rate this recipe!
Instructions
Maraschino Cherry Cake
  1. Sift together the flour, baking powder and salt. Reserve.
  2. Combine milk and Maraschino cherry liquid. Reserve.
  3. Cream butter.
  4. Cream in sugar until fluffy.
  5. Add dry ingredients in four additions, alternating with milk-juice mixture in three additions. Mix lightly, but well, after each addition.
  6. Stir in nuts and Maraschino cherries.
  7. In a separate bowl, beat egg whites until stiff.
  8. Fold beaten egg whites into batter, using about ¼ of the egg whites first to loosen the batter.
  9. Pour into two greased and floured 9” cake pans.
  10. Bake 350°F approximately 30-35 minutes, until a tester inserted in the center comes out clean.
  11. Cool the pans on a rack approximately 10 minutes.
  12. Remove layers from pans and cool completely.
Almond Crème Filling
  1. Combine the sugar, cornstarch, salt and half-and-half in a heavy-bottomed saucepan.
  2. Bring to a boil, stirring constantly.
  3. Slowly pour about half of the boiling half-and-half mixture into the egg yolks, whisking constantly, to temper the yolks.
  4. Put the saucepan with the remaining half-and-half mixture back on the heat.
  5. Pour the tempered yolks back into the saucepan, whisking constantly.
  6. Bring the mixture to a boil. Boil 1 minute, stirring constantly.
  7. Remove from the heat and stir in the almond and vanilla extracts.
  8. Pour the pastry cream into a bowl. Cover with plastic wrap, putting the wrap directly on the pastry cream to avoid a skin.
  9. Refrigerate until cold.
  10. Stir in chopped almonds just before using.
  11. Just before making the frosting, put one cake layer on a serving platter. Top with Almond Crème Filling.
  12. Top with second layer.
Maraschino Cherry Cooked Frosting
  1. Combine the egg whites, sugar, cream of tartar and Maraschino cherry liquid in a double boiler.
  2. Cook over boiling water, beating constantly with an electric mixer until a spreadable consistency, approximately 5-7 minutes. The top of the double boiler should not touch the boiling water in the bottom.
  3. Beat in the vanilla and almond extracts.
  4. Immediately frost sides and top of cake.
  5. Decorate the top with whole Maraschino cherries
Recipe Notes

Copyright © 2018 by Villa Sentieri, LLC. All rights reserved.

Share this Recipe

Guyanese “Cook Up” (Rice and Black Eyed Peas Cooked in Coconut Milk)

July 13, 2018

The combination of rice and legumes (peas, beans, lentils) is common throughout much of the world.  Sometimes the beans and rice are cooked together like Cajun Red Beans and Rice, Ecuadorian Gallo Pinto or Italian Risi e Bisi.  Sometimes the beans and rice are cooked separately but served together as with Cuban Black Beans and Rice.  The combination of black beans and rice, mixed into a single dish, is traditionally called Moros y Cristianos, a not very politically correct term that translates as Moors and Christians.

Jamaican Rice and Peas is probably the most well-known version of the combination from the West Indies, a term that is typically applied to the English-speaking parts of the Caribbean.  As I’ve mentioned before, although Guyana is on the South American mainland, it was administered as part of the British West Indies and most definitely has a West Indian culture.

Join our mailing list and you’ll never miss a recipe again!

Jamaican Rice and Peas is typically meatless.  It is most often made with red kidney beans.  Part of the cooking liquid is coconut milk.

The house where Ray Hugh, my college roommate, grew up and where I stayed on several occasions, Georgetown, Guyana

Cook Up, the Guyanese version of rice and peas, is most definitely not meatless.  In my experience, it is rare to have fewer than two types of meat in Cook Up.  Coconut milk also figures prominently.

I made four trips to Guyana starting just prior to my junior year in college and ending just prior to starting my internship after finishing medical school.  During the first three trips, I stayed with Ray Hugh, my college roommate, at his father’s house.

During the last trip, I was working as a physician at the public hospital in Georgetown, Guyana.  I rented a room in a private house.  That visit was scheduled to last for five months with a brief return to the States for my medical school graduation after about three and a half months.  As graduation approached, and the prospect of working long hours as an intern became more real, I decided that when I flew home for graduation I would stay put and relax for a bit before starting internship.

Follow us on your social media platform of choice


I enjoy going to food markets whenever I travel, be they local convenience stores, supermarkets, open-air markets, or any other variant!  Stabroek Market in Georgetown is a roofed-over open-sided market housed in a sprawling Nineteenth Century building.  Vendors sell food and almost  any other necessity.

Stabroek Market in Georgetown, Guyana (photo: Google, stabroeknews.com)

Although the house where I stayed had a cook, she only cooked lunch, a very substantial lunch I might add!  I sometimes cooked dinner.  Stabroek Market was where I did my shopping.

Thyme figures prominently in Guyanese cooking.  There are three different herbs that are referred to as thyme in Guyana.  The first is what we think of as “regular” thyme, sometimes called French thyme.  The second is referred to as fine-leaf thyme or Guyanese thyme.  The third is called thick-leaf thyme or broad-leaf thyme.

Although there are many varieties of thyme, thick-leaf thyme is not really thyme but a semi-succulent perennial plant that has wide distribution.  Guyanese thyme, which is quite difficult to obtain in the United States may actually be a variety of oregano.  Thyme, oregano, and marjoram are all closely related.

Rather than sweat trying to find different varieties of thyme, I use “regular” (French) thyme and a little oregano and/or marjoram to round out the flavors.  Since no two cooks use the same herbs in the same quantities, and since many Guyanese cooks would just use French thyme, I think the addition of a little oregano and/or marjoram to mimic fine-leaf thyme produces a traditional taste.  However you do it, thyme  should be the predominant flavor.  Since thyme can taste medicinal in large quantities, use it sparingly at first if it’s not an herb you’re accustomed to cooking with.

Print Recipe
Guyanese "Cook Up" (Rice and Peas with Coconut Milk and Meats)
There are more variations of Cook Up than there are Guyanese cooks. Consider this recipe a starting point. You can use more kinds or different meat, such as diced corned beef or pickled pork (essentially made the same was as corned beef but with pork). Typically, in Guyana, the meats and black-eyed peas would be cooked in the same pot, being added when appropriate to finish cooking at the same time. Liquid would be adjusted by sight and the rice and other ingredients added and the cooking finished. When I made this frequently, I had all the timing down and got quite good at estimating the volume of liquid in the pot. These days, I cook the different ingredients in steps, and actually measure the liquid, as described below.
Votes: 8
Rating: 2.38
You:
Rate this recipe!
Course Mains, Meats, Poultry
Cuisine West Indian
Prep Time 15 minutes
Cook Time 3 1/2 hours
Passive Time 1 hour
Servings
people
Ingredients
Seasoned Chicken
Smoked Meat Broth
Final Assembly
Course Mains, Meats, Poultry
Cuisine West Indian
Prep Time 15 minutes
Cook Time 3 1/2 hours
Passive Time 1 hour
Servings
people
Ingredients
Seasoned Chicken
Smoked Meat Broth
Final Assembly
Votes: 8
Rating: 2.38
You:
Rate this recipe!
Instructions
Seasoned Chicken
  1. Combine chicken thighs with all chicken seasoning ingredients.
  2. Mix well. Refrigerate several hours or overnight.
Smoked Meat Broth
  1. Make the smoked meat broth using the ham shanks or ham hock and water. You can do this by simmering them, covered, for 4-5 hours; cooking in a pressure cooker or Instant Pot for 60 minutes; or using a slow cooker set on low for 6-8 hours.
  2. When the broth is done, remove and reserve the ham shanks or ham hock. Skim the fat from the broth, add water to make 8 cups, and refrigerate if not using immediately.
  3. Dice the meat from the ham shanks or ham hock and reserve.
Final Assembly
  1. Dice the bacon.
  2. In a large, heavy-bottomed Dutch oven or stockpot with a tight-fitting lid, brown the bacon.
  3. Remove and reserve the bacon.
  4. Brown the seasoned chicken pieces well, in batches, in a the bacon fat in the Dutch oven.
  5. As the chicken pieces are browned, remove them to a platter.
  6. After browning and removing all the chicken, add the onions to the Dutch oven and sauté until softened. If the onions do not release enough liquid to loosen the browned bits from the bottom of the pot, add a few tablespoons of broth or water.
  7. After loosening the brown bits, continue to sauté the onions until translucent.
  8. Add the garlic and sauté until fragrant.
  9. Return the chicken to the pot with the onions and garlic. Add any accumulated juices as well as any marinade that might be left in the bowl. Add 4 cups of broth. Cover the pot and simmer approximately one hour, until the chicken is tender.
  10. Remove and reserve the chicken.
  11. Add the black-eyed peas and bacon to the pot in which the chicken was cooked along with the remaining 4 cups of broth. Bring to a gentle boil and cook, partially covered, until the peas are cooked, approximately 30-45 minutes, adding two teaspoons of salt after about 15 minutes of cooking.
  12. When the peas are cooked drain them, reserving the cooking liquid.
  13. Measure the cooking liquid and either add water or boil it down to make four cups.
  14. Return the cooking liquid to the Dutch oven along with the cooked black-eyed peas and bacon, diced pork from the broth, rice, coconut milk and 4 teaspoons of salt. Bring to a boil, stirring a few times. Put the chicken pieces on top of the rice, cover the pot, reduce the heat to low, and cook for 20 minutes without opening the pot.
  15. Remove the rice from the heat and allow it to rest for 15 minutes without removing the lid.
  16. After 15 minutes taste a bit of the rice. It should be cooked, but if not, add a bit more water and cook briefly on low heat, covered, until the rice is fully cooked.
  17. Arrange the chicken on a serving platter.
  18. Stir the rice and put on the platter with the chicken or on a different one. Serve immediately with West Indian hot sauce.
Recipe Notes

Smoked ham shanks are the boney ends of smoked ham. They have a gentle smoke flavor, just like ham. Smoked ham hocks are much more aggressively smoked and one would be sufficient for this quantity of rice.

Copyright © 2018 by Villa Sentieri, LLC. All rights reserved.

Share this Recipe

Argentine Marinated Eggplant

July 9, 2018

Argentines love meat.

I mean, they really, really love meat!

When visiting family in Patagonia a number of years ago we had a meal that went something like this:

  1. Appetizer:  Fried calamari (15 kilos, no less)
  2. First course:  Grilled lamb chops
  3. Second course:  Grilled steak
  4. Third course:  Grilled chicken
  5. Fourth course:  Grilled sausage

All that was followed by maté, a caffeine-containing tisane made from the leaves of a native tree.


Follow us on your social media platform of choice


A tisane would be tea, if it were made from tea leaves but, since it’s not made from tea leaves, it isn’t properly called tea.  A tisane is different from a decoction though we sometimes erroneously call both of them tea.

In a tisane, the botanicals are steeped in hot water, as is tea.  Whereas, for a decoction, the ingredients are actually boiled.

Maté (photo by Jorge Alfonso Hernández / http://creativecommons.org/licenses/by-sa/3.0/)

I don’t remember what dessert was but we had something!

To be fair, there were some vegetables on the table.  But they didn’t migrate far from us Americans sitting at one end. The heads of this extended family, my husband’s great uncle and aunt from Italy, made a bit of a nod in the direction of vegetables. Their children, grandchildren, and the various spouses and significant others wanted nothing at all to do with anything that once had roots.

Nonetheless, Argentines excel at making side dishes that compliment grilled meat.  This eggplant is one example.  (I’m not sure who, exactly, eats these dishes but they do appear on tables!)

This eggplant great for a crowd since it is made in advance and can sit in the fridge for several days, getting better each day.  It’s a perfect accompaniment to grille meats.  That’s a plus now that summer grilling season is here.

Join our mailing list and you’ll never miss a recipe again!

I really like having an array of dishes in my repertoire that don’t require much (or any) last minute fussing when I’m trying to feed a crowd.  This dish fits the bill perfectly.

Maté plant in the wild (photo by Ilosuna / http://creativecommons.org/licenses/by-sa/3.0/)

I frequently get asked for the recipe which tells me it’s generally well liked.

Now that summer grilling season is upon us, give this a try!  I promise you won’t be sorry.

Print Recipe
Argentine Marinated Eggplant
If your dried oregano is more than a year old, you may want to get a new jar for this dish. The oregano is key to the flavor. If you can get very aromatic, dried wild oregano from Italy so much the better. See the Notes section below for some amazing wild oregano. Adjust the crushed red pepper to taste.
Votes: 0
Rating: 0
You:
Rate this recipe!
Course Sides, Vegetables
Cuisine Argentine
Prep Time 20 minutes
Cook Time 45 minutes
Passive Time 25 hours
Servings
people
Ingredients
Course Sides, Vegetables
Cuisine Argentine
Prep Time 20 minutes
Cook Time 45 minutes
Passive Time 25 hours
Servings
people
Ingredients
Votes: 0
Rating: 0
You:
Rate this recipe!
Instructions
  1. Peel the eggplant.
  2. Slice the eggplant into rounds approximately 1/8 inch thick.
  3. Salt the eggplant slices liberally and place them in a colander.
  4. Put a saucer on top of the eggplant and add a weight, such as a few canned goods.
  5. Allow the eggplant to sweat and drain for an hour.
  6. Meanwhile, mix the olive oil, garlic, oregano, red pepper, salt, and bay leaves. Set aside.
  7. Rinse and drain the eggplant.
  8. Bring the vinegar and water to a boil.
  9. Working in batches, add a few eggplant slices to the boiling vinegar and water mixture. Cook for 1 minute after the mixture returns to a boil.
  10. Blot the cooked eggplant on paper towels.
  11. Put a layer of cooked eggplant in a non-reactive container, such as a glass baking dish.
  12. Drizzle the eggplant with some of the olive oil mixture.
  13. Repeat layers of eggplant drizzled with the oil mxiture until all ingredients are used.
  14. Place a layer of plastic wrap directly on the eggplant.
  15. Put a dish or plate on the plastic wrap to weigh down the eggplant. Refrigerate for 24 hours.
  16. Allow the eggplant to come to cool room temperature and remove the bay leaves before serving.
Recipe Notes

Wild oregano from the hills of Calabria

Copyright © 2018 by Villa Sentieri, LLC. All rights reserved.

Share this Recipe

Risotto Friulano (Friuli-Style Risotto)

June 25, 2018

If you do an internet search on Risotto Friulano you will turn up more entries for risotto con lo sclopit than any other.

Sclopit (bladder campion in English) is native to large parts of Europe and beyond.  It is not native to the United States but grows abundantly from coast to coast. Its botanical name is Silene vulgaris.

The leaves of Silene vulgaris (sclopit in Friulan; bladder campion in English) are used in risotto (photo by D. Gordon E. Robertson [CC BY-SA 3.0 (https://creativecommons.org/licenses/by-sa/3.0) or GFDL (http://www.gnu.org/copyleft/fdl.html)], from Wikimedia Commons)
In my husband’s family, however, Risotto Friulano refers to risotto that is made with Salsa Friulano, a traditional tomato sauce made with ground meat, herbs and spices.  I’ve published two recipes for Salsa Friulano.  One is my mother-in-law’s and the other is Ivana’s, the wife of my mother-in-law’s cousin Olvino.  (By the way, I asked my mother-in-law about sclopit.  She’s never heard of it!)


Follow us on your social media platform of choice


My mother-in-law uses homemade chicken broth, and her Friulan tomato sauce for her Risotto Friulano.  Uncle Ray, her brother, uses canned beef broth instead of chicken broth.  Neither uses risotto rice, opting for long-grain rice, and neither really follows the common risotto technique of adding liquid slowly and allowing it to evaporate before the next addition.

We have long discussions about these differences.  While I don’t have a good explanation for the differences in technique other than cooking differences within their family, it’s my belief that the use of long-grain rice rather than short-grain “risotto” rice is a consequence of what was readily available when the family immigrated to the United States.

Sclopit leaves

I have a number of cookbooks from Friuli and all the recipes for risotto use what the Italians would call “riso per risotto,” rice for risotto.  It’s possible that this is a recent change in cooking habits in Friuli but I am more inclined to believe that the switch from risotto rice to long-grain rice happened in the United States, at least for my mother-in-law’s family.

Both my mother-in-law and Uncle Ray add enough liquid to their respective recipes for Risotto Friulano to make the final product pourable, like a traditional risotto.  Without the more starchy riso per risotto and the risotto technique, however, the result is not as creamy but still very good…and very traditional within the family.  Just ask my father-in-law, who is from Tuscany and not Friuli, whose Risotto Friulano he prefers!  (Hint, he’ll tell you mine tastes good, but…)


Join our mailing list and you’ll never miss a recipe again!


The most common types of rice for risotto are Arborio, Carnaroli, and Vialone Nano.  Arborio is the easiest to find and it is what I use most of the time.  Carnaroli and Vialone Nano are even more forgiving than Arborio as they are harder to overcook.  They are more difficult to source in American markets, however.

Arborio Rice is generally the easiest “riso per risotto” (risotto rice) to find in the United States

When I make Risotto Friulano, I follow standard risotto technique and use short-grain Italian rice.  I hope you enjoy it!

Print Recipe
Risotto Friulano (Friuli-Style Risotto)
My mother-in-law’s version of this is much simpler. She sautés long-grain rice in olive oil without any aromatics. She adds the sauce and then the broth. Broth is not added in small amounts but most of it is put in at once. Additional broth is added near the end If the rice can absorb it. Uncle Ray’s version is similar but with canned beef broth. Parmigiano is added at the end. If you’re going to make Marisa’s Mystical Meatballs, this is a wonderful use of the beef broth that will be created. See the Notes below for a link to the meatball recipe. If you are not using unsalted homemade broth, do not add salt as directed. Wait until the end and add salt to taste.
Votes: 0
Rating: 0
You:
Rate this recipe!
Prep Time 10 minutes
Cook Time 45 minutes
Servings
people
Ingredients
Prep Time 10 minutes
Cook Time 45 minutes
Servings
people
Ingredients
Votes: 0
Rating: 0
You:
Rate this recipe!
Instructions
  1. Bring the broth and the Salsa Friulana to a bare simmer in separate pots.
  2. Heat a two or three quart heavy-bottomed saucepan over medium-high heat. Add the olive oil.
  3. Briefly sauté the onion in the oil. As the liquid from the onion evaporates and the onion just begins to turn translucent, reduce the heat to medium add the garlic.
  4. x
  5. Sauté on medium until the onion is translucent. Do not brown the onion or garlic. You may need to reduce the heat.
  6. When the onion is translucent, return the heat to medium high and add the rice.
  7. Sauté for 3-5 minutes, until the rice grains are partially translucent. Do not brown the rice.
  8. The outer portion of the rice grains will get translucent while the inside will stay opaque white.
  9. Add the wine.
  10. Stir frequently, but not constantly, until the wine has totally evaporated. You will begin to see some starch leaching out of the rice. More and more of the starch will leach out as you cook the rice. This is what will make a creamy sauce.
  11. When the wine has evaporated, add one ladle of simmering broth, approximately 1/3 cup, and the salt. Stir thoroughly paying particular attention to loosening any spots where the starch seems to be sticking to the bottom of the pan. You don’t want to brown (or worse yet, burn) the starch.
  12. Cook, stirring frequently but not constantly, until the broth has evaporated.
  13. Keep repeating the process with 1/3 cup of broth, cooking, stirring, loosening any spots that are sticking, and allowing the liquid to evaporate, until you have used approximately 5 cups of the broth. The heat should stay as close as possible to medium high. The moderate boiling of the liquid will coax starch out of the rice to create the creaminess that is the hallmark of a good risotto.
  14. Add 1 ½ cups of Salsa Friulana and cook until some of the liquid has evaporated. It will not be possible to cook the rice until dry once the sauce is added.
  15. Season with black pepper to taste.
  16. Continue adding broth, one ladle at a time, until the rice is cooked and creamy but still al dente at the very center.
  17. Remove the rice from the heat. Stir in the Parmesan cheese then the remaining ½ cup of Salsa Friulana.
  18. Still off the heat, add hot broth, a little at a time, to create a creamy, pourable risotto, adding only as much as the starchy liquid in the risotto will absorb.
  19. Taste and adjust seasoning.
  20. Serve immediately. Pass additional Parmesan cheese at the table.
Recipe Notes

This is where you’ll find the recipe for Marisa’s Mystical Meatballs.

You can find my mother-in-law’s recipe for Salsa Friulana here and Ivana’s recipe here.

Copyright © 2018 by Villa Sentieri, LLC. All rights reserved.

Share this Recipe

Chicken Braised with Lemon, Sage and Olives

June 20, 2018

When we’re in Palm Springs in the winter, surrounded by an abundance of citrus trees, I feel like citrus ought to be featured in every meal.

Being able to walk out the door and pick lemons, limes, oranges, grapefruit and tangerines, and NOT doing it, seems like such a grand missed opportunity.  Even if the ingredients for the rest of the meal don’t come from within a few feet of my door, the citrus fruits and herbs can.

With that in mind, and the prospect of cooking a multi-course dinner for 15 people in a kitchen that’s about 8’ x 10’ got me to thinking.  Individually lemons, sage, and olives pair well with chicken so why not all of them together in the same dish?

Looking up into a lemon tree in Palm Springs

Next came the method.  With fifteen people I needed at least 15 pieces of chicken.  I was pretty sure that with all the other courses, one piece of chicken per person would be enough.  I added a few more for good measure.


Follow us on your social media platform of choice


Braising 18 pieces of chicken on the stove top would have consumed a good deal of space so I opted for the oven and a “hotel pan,” sometimes called a steam table tray.  You know, those cafeteria-style rectangular pans.  I have a mess of them in an array of sizes.  Made of stainless steel, they’re non-reactive.  You can cook and store food in them, simplifying the preparation process.  Shallow roasting pans are a good substitute.  Don’t use aluminum pans or other reactive materials due to the lemon juice in this dish.

To keep it simple, I decided not to brown the chicken first, but rather to do it at the end by turning up the oven.  I made a marinade by buzzing the ingredients in a blender, so even that is super-easy.

A hotel pan is a great way to prepare large quantities of food

Which part of the chicken to use was never in question.  I like what happens to chicken thighs with long, slow braising.  Keeping the bone in adds flavor and structure so I suggest avoiding boneless thighs.

If you keep the skin on you’ll have to remove it before browning and serving the chicken because it will be rubbery from the moist heat.  I usually prefer to keep the skin on as it helps keep the meat moist but the combination of low and slow cooking and a tight cover meant the effect of the skin would be marginal.  Removing the skin in the beginning makes the dish even simpler to prepare.  Besides, the skin is a great addition to the stock pot when making chicken stock or broth.


Join our mailing list and you’ll never miss a recipe again!


I keep a zipper lock bag in my freezer into which I put chicken skin and other bits that I trim off chicken then add the contents to the stock pot with backs and wings.  Skin contains a lot of fat but since it will be skimmed off at the end it’s not really a concern.  The collagen in the skin, however, will greatly improve the mouthfeel of the broth.  In the “old days” adding chicken feet to the stock pot served the same purpose but finding chicken feet is challenging.

A Palm Springs orange tree, in the distance, full of ripe oranges

While this dish was created in the Palm Springs winter, it works well year-round thanks to the non-stop availability of lemons.  The next time you’re cooking for a crowd, give it a try and let me know what you think.

Print Recipe
Chicken Braised with Lemon, Sage and Olives
I created this recipe for my father-in-law’s birthday, January 2018. The lemons came from the trees outside of our house in Palm Springs. Though not essential, I prefer to put a sheet of baking parchment over the chicken before covering with aluminum foil to keep the reactive aluminum completely out of contact with the acid in the lemon juice.
Votes: 0
Rating: 0
You:
Rate this recipe!
Course Mains, Poultry
Cuisine Italian
Prep Time 30 minutes
Cook Time 2 hours
Servings
people
Ingredients
Course Mains, Poultry
Cuisine Italian
Prep Time 30 minutes
Cook Time 2 hours
Servings
people
Ingredients
Votes: 0
Rating: 0
You:
Rate this recipe!
Instructions
  1. Make marinade by pureeing the olive oil, lemon juice, 6 cloves garlic, rosemary, salt, and pepper in a blender.
  2. Pour the marinade over the chicken thighs and mix well.
  3. Marinate chicken thighs overnight in the refrigerator.
  4. Lightly oil a non-reactive hotel pan or shallow roasting pan.
  5. Arrange lemon slices on the bottom of the pan.
  6. Put a sage leaf on each lemon slice.
  7. Put a chicken thigh on each sage-topped lemon slice, reserving the marinade.
  8. Scatter olives around the chicken.
  9. Smash the remaining 8 garlic cloves and scatter around the chicken.
  10. Pour the marinade over the chicken. Cover the pan tightly with foil. (If possible, cover the pan with a sheet of parchment before the aluminum foil.)
  11. Put the chicken into a preheated 350°F oven. Cook until the chicken is nearly fall-apart tender, 90-120 minutes.
  12. Using a turkey baster, remove most of the liquid from the pan. Put the liquid into a fat separator.
  13. Turn the heat as high as the oven goes. Put the pan of chicken on the top rack until it takes on some color, approximately 10-15 minutes. You can also use the broiler for this, though many broilers do not have enough heated surface area to brown the contents of a large pan.
  14. While the chicken is browning, skim the fat from the pan juices.
  15. Carefully move the chicken thighs, with lemon slices intact, to a serving platter or individual plates.
  16. Scatter the olives over the chicken.
  17. Pour some of the defatted pan juices over the chicken.
  18. Pass the remaining defatted pan juices at the table.
Recipe Notes

Copyright © 2018 by Villa Sentieri, LLC. All rights reserved.

Share this Recipe

Salsa Friulana di Marisa (Marisa’s Friulan Tomato Sauce)

June 11, 2018

Ma’s spaghetti sauce.  That’s what my husband calls it.

That’s pretty similar to what most of us of Italian heritage who grew up in the United States called the sauce that our mothers (yes, it was almost always the mothers) made most frequently.

It isn’t as if there aren’t more pasta sauces than one can count.  It’s just that for everyone I know of Italian heritage, there’s one that stands out above the rest.

For my husband’s family, this is the one.


Join our mailing list and you’ll never miss a recipe again!


It’s actually quite similar to Ivana’s sauce.  Ivana is married to my mother-in-law’s cousin Olvino.  Ivana grew up in Friuli but in a different town.  There are subtle differences in her sauce and my mother-in-law’s sauce, but if you read both recipes you’ll certainly see the similarities.

My mother-in-law doesn’t remember when she learned to make this sauce, or even if she learned from her mother or her aunt.  She does remember, however, that her father asked her how she could get married (she was engaged to my father-in-law) without knowing how to cook.

My mother- and father-in-law on their wedding day (apparently before she knew how to cook)

She got married, ultimately learned to cook, and then headed up the kitchen in Castleview, the restaurant that she and my father-in-law owned in Fox River Grove, Illinois.  The restaurant was named Castleview because it had a view of an adjacent…you guessed it…castle…well, sort of a castle.   For more information on the castle, you can look here.

The Bettendorf Castle in Fox River Grove, Illinois

By the time I came on the scene, it was difficult to catch more than a glimpse of the castle from the restaurant due to the growth of trees and other vegetation.

Another view of the Bettendorf Castle

My mother-in-law thought my version of her sauce was “pretty good.”  She did note that it was thicker than hers; probably because I cook it longer but also potentially due to a different brand of tomatoes.  If you want it thinner, cook it less or (my preference) just add more water or put a splash of pasta-cooking water in the bowl with the pasta and the sauce.  (Just between you and me, when I’m putting dinner on the table using my mother-in-law’s sauce, I usually boil it down a bit because it seems a little thin to me!)


Follow us on your social media platform of choice


In a few weeks I’ll be posting a recipe for Friulan Risotto that incorporates this sauce.  Stay tuned.

Print Recipe
Salsa Friulana di Marisa (Marisa's Friulan Tomato Sauce)
The amount of water needed will vary based on how thick the tomato puree is, how much liquid evaporates during cooking, and how thick or thin you like your sauce. Feel free to add more water during cooking if the mixture is becoming too thick. If the sauce is too thin uncover near the end of cooking and increase the heat to cook off more water.
Votes: 0
Rating: 0
You:
Rate this recipe!
Prep Time 20 minutes
Cook Time 3 hours
Servings
quarts
Ingredients
Prep Time 20 minutes
Cook Time 3 hours
Servings
quarts
Ingredients
Votes: 0
Rating: 0
You:
Rate this recipe!
Instructions
  1. Finely chop the parsley, carrots, celery, onion, and garlic in food processor.
  2. There should be a bit of texture to the mixture, not a puree. Reserve.
  3. Puree the crushed tomatoes in the food processor.
  4. Rinse the cans out with some of the water. Add the water to the pureed tomatoes. Reserve.
  5. Sauté the beef in the olive oil on high heat until no pink remains.
  6. Add the chopped vegetables.
  7. Sauté on high heat until all the liquid evaporates and then continue to sauté until the mixture darkens slightly and smells cooked.
  8. Add the wine and continue to cook until the wine has evaporated.
  9. Add the allspice, nutmeg, and cinnamon. Stir well.
  10. Add the tomato paste and sauté until it begins to smell sweet, approximately 5 minutes at medium-high heat.
  11. Meanwhile, rinse tomato paste can out with some of the water and add it to the pureed tomatoes.
  12. Add pureed tomatoes, bay leaf, oregano, basil and remaining water.
  13. Bring to a boil, reduce heat and simmer, partially covered for about 2 ½ hours, stirring every 20 minutes.
  14. After about an hour of cooking, begin to taste and adjust seasoning.
  15. Serve with the pasta of your choice.
Recipe Notes

Copyright © 2018 by Villa Sentieri, LLC. All rights reserved.

Share this Recipe

Smoky Baked Beans

June 1, 2018

In my first year of medical school (I know that only because of the apartment that I was living in at the time) my parents and my Aunt Ann came to visit for a weekend.  I’ve talked about Aunt Ann in previous blog posts, like this one that includes her recipe for Pineapple Cream Cheese Pie.  She was married to my father’s brother, Jano.

As often happened with my mother, the conversations frequently veered to food.  On this occasion, for some reason, my Aunt Mary’s baked beans.

Aunt Mary was really my mother’s Aunt Mary by marriage.  She was my Great Aunt Mary.  Actually, by the time I knew her, she wasn’t really my aunt, great or otherwise, because she and my mother’s Uncle Derp had gotten divorced.  Nonetheless, we all still called her Aunt Mary.  Well, really, due to some bizarre twist, we called her Aunt Mary Derp if we were referring to her in a conversation and it wasn’t otherwise clear which of the several Aunt Marys in the family was the one we meant.  Why we appended the name of her ex-husband to hers rather than using her last name, I’ll never know!!


Join our mailing list and you’ll never miss a recipe again!


In any case, my parents both talked about Aunt Mary’s baked beans.  They recalled that she baked them overnight.  My mother came up with a reasonable facsimile of what went into the beans.

We tried to do the initial boiling of the beans in a slow cooker while we went out for the day.  That was a failure.  On the low setting, the beans were still hard after hours and hours of cooking.  That got remedied by a quick boil on the stove.

My smoker has an adjustment for the heat output but not temperature, per se. If the wind or external temperature change, the internal smoker temperature changes, too.

We took the par-boiled beans and mixed them with all the other ingredients and put them in the oven overnight.  That was failure number two, but one we couldn’t recover from.  The long cooking period created a burnt taste in the beans given the high sugar content.  The beans hadn’t actually dried out but they must have gotten hot enough to start caramelizing the sugar.  The road from caramel to burnt isn’t long.  Unless one doesn’t get more than six hours sleep, we discovered that it wasn’t ideal to bake the beans overnight!

Eventually, I figured it out.  The recipe for my version of Aunt Mary’s Baked Beans now sits proudly on the hard drive of my computer along with two recipes of my own development.  I also have this great hack for doctoring canned baked beans that I learned from my cousin Shirley (it always generates requests for the recipe that I artfully dodge) but that isn’t actually written down anywhere.


Follow us on your social media platform of choice


Today, we’re going to focus on my recipe for baked beans cooked in a smoker.  I’ll also share a trick for making these in the oven if you don’t have a smoker.

When I make these, I put them on the bottom rack of my smoker, uncovered, with meat on the racks above.  Meat juices drip into the beans making them extra tasty!  The high humidity in the smoker keeps the uncovered beans from drying out.

Print Recipe
Smoky Baked Beans
Adding salt to the bean-soaking liquid is optional. It seasons them and also decreases the cooking time. I find it especially useful where I live as water boils at less than 198°F and beans take much longer to cook. If you don’t have a smoker, add 1 teaspoon of Liquid Smoke seasoning and cook the beans in the oven with a cover. As a reality check, if you’re paying close attention to the photos, you’ll notice that these are “adult” lima beans not baby lima beans. There must have been a run on baby lima beans when I went shopping for the ingredients for this recipe as none of the markets had them.
Votes: 0
Rating: 0
You:
Rate this recipe!
Prep Time 30 minutes
Cook Time 8 hours
Passive Time 12 hours
Servings
people
Ingredients
Prep Time 30 minutes
Cook Time 8 hours
Passive Time 12 hours
Servings
people
Ingredients
Votes: 0
Rating: 0
You:
Rate this recipe!
Instructions
  1. Wash and pick over the beans.
  2. Dissolve 1 ½ tablespoons salt, if using, in 2 quarts of water. Add the beans.
  3. Soak the beans for about 12 hours in the refrigerator.
  4. Drain and rinse the beans.
  5. Coarsely chop the red Bell pepper.
  6. In a blender jar, combine the Bell pepper with some of the 6 cups of water.
  7. Puree the Bell pepper.
  8. Add the chipotle pepper, if using, and puree again. Reserve the pepper puree.
  9. Sauté the bacon until golden.
  10. Add the onion and sauté until soft.
  11. Add the garlic and sauté until fragrant.
  12. Add the drained beans, pepper puree, remaining water, and bay leaves.
  13. Gently boil, partially covered until almost tender (1 to 2 hours). Add water from time to time if needed. The beans should be just barely covered with liquid at the end.
  14. Combine the ketchup, white wine, brown sugar, Worcestershire sauce, mustard, salt and black pepper.
  15. Stir the ketchup mixture into the cooked beans.
  16. Return to a simmer on the stovetop then bake (uncovered if using a smoker or covered if using the oven) at 225°F for six hours, stirring once or twice.
Recipe Notes

Copyright © 2018 by Villa Sentieri, LLC. All rights reserved.

Share this Recipe

Auntie Helen’s Lentil Salad

May 18, 2018

Auntie Helen had a way with lentils.

In addition to making lentil salad for summer cook-outs, she taught me that cooked lentils, topped with homemade tomato sauce, make a great main (or side) dish for a cold winter’s day.

Auntie Helen liked her scotch.  On the rocks.  And she was not shy about quantity.

Auntie Louise liked gin.  Also on the rocks.  Also not shy about quantity.

It was mostly under their tutelage that I went from drinking Bourbon Manhattans (Old Grand Dad at the time) to Bourbon, also on the rocks.  This was somewhere around the age of 19.

Auntie Helen in 1976

I soon made the jump from Old Grand Dad to Jack Daniels, which remained my tipple of choice for decades.  Now I’ve branched out to a wide array of bourbons but always on the rocks and in respectable quantities.


Follow us on your social media platform of choice


Auntie Helen and Auntie Louise were born, shortly after the turn of the 20th century, in a palazzo in Rome, now part of the American Embassy.  After their parents lost everything for the second time (there was talk that the first time it happened, they were bailed out by one of the Stroganoffs) the family emigrated from Italy to America.  Their father, a Count in Italy, worked delivering bread in Trenton, NJ.

Auntie Helen and Auntie Louise both became schoolteachers.  Neither married.  They lived together their entire lives.

They had a sweet little house on Yardley Road, just steps from the Yardley town line, in Morrisville, New Jersey.  I spent many weekends at their house, a little over an hour from where I lived in Philadelphia.

Auntie Helen did the cooking.  Auntie Louise made drinks and helped to clean up.

Auntie Louise in 1976

Though they came from a background that was more privileged than most immigrants of the time, they had little by the time the family got to the United States.  They did what many immigrants did, they assimilated and became almost “hyper” American.  I never heard either of them speak a word of Italian.  And, while Auntie Helen cooked an array of Roman specialties, she also cooked a lot of American food, including Impossible Pies, more the savory ones than the sweet ones; homemade Pumpkin Chiffon Pie (the only thing she cooked that I didn’t like); and cheese and egg strata for brunch (with lots of bacon on the side!).


Join our mailing list and you’ll never miss a recipe again!


I recently found a series of Impossible Pie recipes that Auntie Helen wrote out for me.  I can’t promise that I’ll make each of them, but I will post the recipes, in her own handwriting.  If nothing else, they’ll be a bit of a time capsule.

Meanwhile, please enjoy my take on Auntie Helen’s lentil salad.

Print Recipe
Auntie Helen's Lentil Salad
Auntie Helen’s lentil salad was more of a general concept that a definitive recipe. Feel free to add other ingredients to this, like a handful of chopped black oil-cured olives, some sliced scallions, or a sprinkling of dry oregano. You can replace some of the olive oil with the oil from a can of anchovies or add a teaspoon of anchovy paste if you’d like. It will add an umami touch without tasting fishy.
Votes: 0
Rating: 0
You:
Rate this recipe!
Prep Time 30 minutes
Cook Time 30 minutes
Passive Time 8 hours
Servings
people
Ingredients
Prep Time 30 minutes
Cook Time 30 minutes
Passive Time 8 hours
Servings
people
Ingredients
Votes: 0
Rating: 0
You:
Rate this recipe!
Instructions
  1. Wash and pick over the lentils but do not soak them.
  2. Drain the lentils.
  3. Combine the lentils and water.
  4. Bring the lentils to a boil and gently boil until just tender, 10-15 minutes, or maybe a little more based on your elevation.
  5. Drain the lentils.
  6. Mix the hot lentils with the diced onion, oil, and rosemary. Stir well.
  7. Bury the bruised garlic clove in lentils.
  8. Loosely cover the lentils and cool at room temperature.
  9. When the lentils are cool, they can be refrigerated for up to three days before proceeding.
  10. To finish the lentil salad, remove the garlic clove and discard.
  11. Dice the roasted red pepper.
  12. Add the diced roasted red pepper, vinegar, salt and pepper. Mix well and chill thoroughly.
  13. Remove the lentil salad from the refrigerator approximately one hour before serving.
  14. Adjust salt and pepper before serving. Add more olive oil if the lentils seem dry.
Recipe Notes

Copyright © 2018 by VillaSentieri.com. All rights reserved.

Share this Recipe

Penne with Roasted Garlic Cream Sauce

May 14, 2018

I apologize!

In my inaugural messages, I clearly stated that I would publish traditional recipes, many (though not all) of them Italian, but with the emphasis on traditional.

I get really stoked by the idea of preserving traditional recipes in written form (even if it’s a bunch of zeroes and ones on a cloud server somewhere)!

I also truly appreciate new and innovative dishes…especially cakes, for some reason.  But my very strong preference if I’m going to work on perfecting and publishing a recipe is to focus on traditional recipes.  (I’m happy to eat good food of any type, traditional or not, that someone wants to serve me, however.)


Follow us on your social media platform of choice


My editorial calendar for this blog, including what I’ve published and what I currently have planned to publish, numbers 212 recipes.  The number keeps growing.  Most of these recipes are ones I listed (off the top of my head, so to speak) when I was planning the launch of the blog in late 2016.  The list came from simply thinking about my favorite recipes.  As I trawl through my recipe archive periodically, looking for recipes for particular events, or even just dinner, I usually come upon at least a few more recipes that get added to the list.

Two hotel pans hold a double batch, 4 pounds of penne, for a summer dinner party for the family from Tuscany

Windows says I have 4133 recipes saved in my recipe directory.  That does not count the hundreds of hand-written ones that I’ve not scanned in yet.

But I have to admit, not EVERYTHING I make is traditional.  I have this killer salmon recipe that I got from the New York Times that is now a regular on our table.  Almost any vegetable recipe by David Tanis is a winner in my book, well really ANY recipe by David Tanis, but he has a way with vegetables.  He has many make-ahead-and-heat-up-in-the-oven options that remove a lot of last minute work when putting dinner on the table, whether it be for 2 or 20!

In my defense, these are recipes that I think will become classics in a few decades just as many of the recipes that I started cooking 45 years ago in college have become classics for me.  I think if a recipe still tastes good after half a century it can be considered a classic…which is getting pretty close to traditional.

This is just a portion of the antipasto for the dinner for our Tuscan relatives

Think about all the things you ate 50 years ago that you don’t make any more, like fried bologna simmered in ketchup!  That actually is something that my very traditional mother put on the table in the 1960s!  Granted, it was a main course (and I use the term lightly) that could be whipped up in under half an hour after a day’s work.  The truth is, I actually liked it at the time.

I differentiate the fried bologna category of foods that I don’t make any more from the fried salami category of foods that I still love but that just have fallen off my rotation.  Have you ever had a sandwich of pan-fried salami?  If not, give it a try.  (Thinly slice the salami.  Make a cut from the middle to one edge, like the first cut of a pie, to reduce puckering.  Cook in a skillet over medium heat till lightly browned on each side.  No oil needed.  Pile on bread.  Enjoy…dripping fat and all!)


Join our mailing list and you’ll never miss a recipe again!


So why the apologia?

Today’s recipe isn’t traditional.  I developed it about four years ago for dinner for a large group of people.  It was such a hit, that I kept making it.  I even made it last summer for a dinner party for the family from Tuscany!  So, while it’s not really traditional (which I take to mean something with a cultural history, something that individuals from a particular culture and location make or made on a regular basis), it has a very traditional FLAVOR.

I made this penne for my father-in-law’s birthday party this past January. Everyone had clean plates!

In my mind it’s not a REAL (i.e. traditional) dish because I made it up.  On the other hand, the flavor profile makes it fit into an established canon of northern Italian food.  Italians would recognize it as Italian food, just not traditional Italian food.

Because it isn’t traditional, I hadn’t planned on publishing it.  I got a number of requests for the recipe after I mentioned it in one of my emails and decided that I should reconsider my initial decision.  There aren’t many photographs but the steps are not really complicated.  I know you can do it without all the usual photos.

Who knows, maybe in another 45 years it’ll become a classic!

Print Recipe
Penne with Roasted Garlic Cream Sauce
This takes some time to put together but once it’s assembled you can spend time with your guests while it cooks. The sauce has a luxurious amount of butter, about twice what would typically be used based on the amount of flour. This improves the flavor and mouth-feel of the sauce. Because I originally created this dish for an event in Alamogordo, New Mexico, I topped it with pistachios which are grown there. Chopped walnuts or whole pine nuts could be substituted. If you want to prepare the dish in advance, be sure to cool the pasta in a bowl of ice water. Mix the cooled pasta with cold white sauce and the other ingredients. Pour into a baking dish, cover tightly, and refrigerate. Allow the covered dish to sit at room temperature 60-90 minutes before baking.
Votes: 0
Rating: 0
You:
Rate this recipe!
Prep Time 2 hours
Cook Time 2 hours
Passive Time 2 hours
Servings
people
Ingredients
Balsamella (White Sauce)
Final Assembly
Prep Time 2 hours
Cook Time 2 hours
Passive Time 2 hours
Servings
people
Ingredients
Balsamella (White Sauce)
Final Assembly
Votes: 0
Rating: 0
You:
Rate this recipe!
Instructions
Balsamella (White Sauce)
  1. Put the garlic in a single layer in a small oven-proof dish with a tight-fitting lid. Alternatively, put the garlic on a sheet of heavy-duty aluminum foil.
  2. Sprinkle the garlic with olive oil.
  3. Put the lid on the dish, or fold up and seal the aluminum foil.
  4. Roast the garlic at 300°F until soft and golden brown, approximately 45 minutes, stirring occasionally.
  5. Put the garlic and any olive oil you can scrape out of the dish into a blender jar.
  6. Add 1 cup of the milk.
  7. Puree the garlic and milk. Reserve.
  8. Warm the remaining milk in a heavy-bottomed saucepan.
  9. Melt the butter in another heavy-bottomed saucepan over medium heat. Stir the flour into the butter.
  10. Cook for a few minutes on medium heat but do not allow flour to color.
  11. Stir in the warm milk, one ladleful at a time, incorporating well after each addition to avoid lumps.
  12. After about half the warm milk has been incorporated, add the pureed garlic mixture.
  13. Use some of the warm milk to rinse out the blender jar and add it to the pot. Stir well.
  14. Add the remaining milk to the pot along with the bay leaves, rosemary sprigs, and lemon zest.
  15. Bring to a boil over medium high heat stirring (nearly) constantly and cook until the sauce reaches the thickness of heavy cream, approximately 5 minutes.
  16. Strain the white sauce through a fine-mesh sieve.
  17. If not using the sauce immediately, cover it with plastic wrap, putting the plastic directly on the surface to prevent the formation of a skin, and refrigerate. [If you are going to prepare the casserole in advance, make sure the balsamella is cold before combining with the other ingredients.]
Final Assembly
  1. Put the frozen peas in a large sieve. Rinse with cool water to thaw the peas. Allow the peas to drain and completely thaw while proceeding with the recipe.
  2. Heat the olive oil in a large sauté pan over high heat.
  3. When the oil is hot, but not smoking, add the diced mushroom caps. Toss well.
  4. When the mushrooms have absorbed the oil, add 1 teaspoon of fine salt. Mix well.
  5. Turn the heat to medium low until the mushrooms begin to sweat.
  6. Turn the heat to high and continue sautéing until the liquid evaporates.
  7. Continue to cook until the mushroom pieces are browned in places.
  8. Season with black pepper. Add ham and cook 2-3 minutes.
  9. Remove from the heat and reserve.
  10. Bring a large pot of heavily salted water to a rolling boil. Add the pasta.
  11. Boil until the pasta is partially cooked. It should still be a little crunchy on the inside.
  12. If you are going to cook the casserole immediately, drain the pasta but do not rinse. If you are going to assemble the casserole in advance, drain the pasta and chill it in a bowl of ice water. When cold, drain well.
  13. Combine pasta, peas, mushroom and ham mixture, and balsamella. Mix well.
  14. Pour into a large buttered casserole. For this quantity, I use a full-size steam-table tray, also called a “hotel pan.”
  15. Put a sheet of parchment on top then cover the pan tightly with heavy-duty aluminum foil. You can skip the parchment if you are going to cook the casserole immediately. Food should not stay in extended contact with aluminum, hence the parchment paper if the dish is being assembled in advance.
  16. Either refrigerate or bake at 350°F until bubbly. Baking time will depend on whether the ingredients are hot or previously refrigerated and brought to room temperature, 1 ½ to 2 hours.
  17. Remove the foil and parchment. Sprinkle the top with Parmesan cheese and nuts.
  18. Place under the broiler, or on the top rack of an oven heated to 500°F, until the top is golden brown.
  19. Allow the casserole to rest at least 15 minutes before serving.
Recipe Notes

Copyright © 2018 by VillaSentieri.com. All rights reserved.

Share this Recipe